Teikas Dad
Gold Member
When I got my rotary cutter I had several members advise me to use check chains to keep the cutter at a set height. This is due to the fact that the Kubota B3200 (and several other models) have the quarter inching valve which doesn't have a positive position control setting. The only way to keep the TPH from moving/bleeding down is to close off the valve to the TPH under the seat. That's a pain as when you need to move the TPH up or down you have to open the valve. So, check chains seem to be the answer. I searched a lot of the posts on the forum and found several different variations. One member is using Zerco check chains on his B3300 which is essentially the same tractor as the B3200. The only thing I didn't like about the Zerco chains are that the member attached them to the ROPS. I don't want any strain on the ROPS, it's sole purpose in life is to save my azz in case I do something stupid.
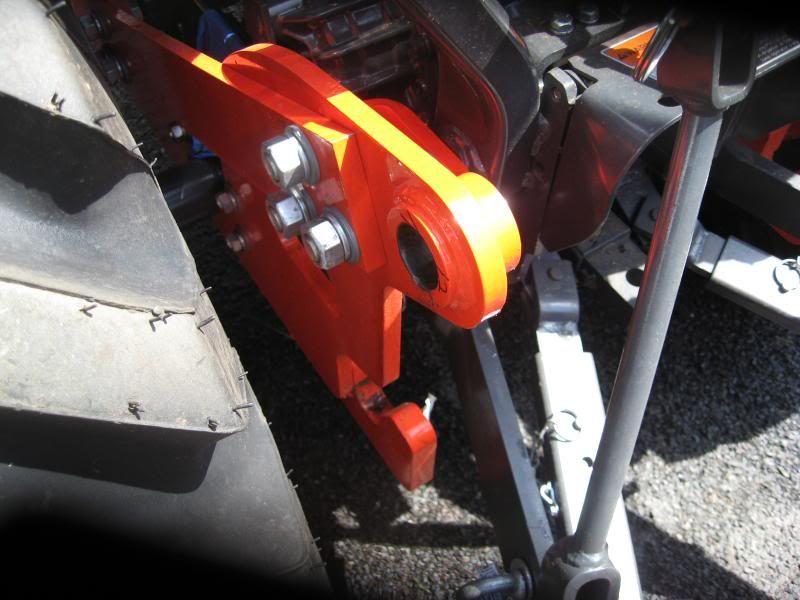
I tried to think outside the box and I came up with an alternative that works on the B3200 (and probably B3300 and 2000 series) with the frame mounted subframe for a backhoe. As others have the same or similar setups, I figured I'd share what I did. On the rear of the subframe are two knuckles (I don't know the official title of them) that mates up to the backhoe. A 1 1/4" pin goes through the two ears of the mount on the backhoe and catches the knuckle on the tractor subframe in between. That's what holds the backhoe in place. I figured if it's strong enough to hold a backhoe then check chains should be a piece of cake.
I got a set of forged eyebolts and mounted them on one of the existing holes on the lower arms of the TPH then used a length of 3/8" chain on a shackle up to and through the opening on the subframe knuckle and back to the the shackle.

It worked fine for holding the rotary mower at a lowest setting for me when I used it. The only thing I didn't like was the chain going through the 1 1/4" opening in the knuckle. I was worried that eventually the chain would beat up the mount and I'd have trouble getting the pins through to mount the backhoe.
I was going to weld up something fancy, but after thinking about it I figured I'd keep it simple. I also figured that if anyone else wants to do the same thing they don't need access to a welder. I did everything with a hacksaw and drill. As previously mentioned, the "knuckle" on the subframe has a 1 1/4" opening and is 1 9/16" wide. I am too cheap to pay what the going rate is for a 4 inch long 1 1/4" grade 8 bolt, so I came up with a different method.
I took a trip to TSC and got two 3/4" X 4 grade 8 bolts (you could probably get away with grade 5, but I tend to go the extra mile for safety) with nuts and two large washers per bolt; two 5/8" grade 8 bolts with nuts, lock washers and fender washers; a 3' piece of 1 1/2" X 1/4" flat steel that I cut four 6 inch long pieces off of. I drilled a 3/4" hole in one end of each of the pieces of flat steel and a 5/8" hole in the other end for the bolts. My plan was to put the 3/4" bolt through the frame mount and have the 5/8" bolt suspended below on the steel.
I didn't want the 3/4" bolt flopping around inside the subframe mount so after looking at the TPH parts bin I came up with a plan. I got two Cat 3 to Cat 2 top link bushings; two Cat 2 to Cat 1 top link bushings and two Cat 1 to Cat 0 top link bushings. I put the Cat 2/1 bushing inside the Cat 3/2 bushing. The 3/4" bolt then fit inside the 2/1 bushing. The outside diameter of the Cat 3/2 bushing is 1 1/4" so it fit perfect inside the subframe mount. The Cat 1/0 fit over the 5/8" bolt. I wanted the bushings on the upper part to protect the subframe mount. I used the bushing on the lower bolt as the thread were exposed and I didn't want to wear through the chain.

To get it to fit I had to cut part of the 3/4" bolt off as it was too long.

Rather than tighten it up all the way on the mount as I wanted it to swing freely, I left the nut slightly loose and drilled a 1/4" hole through the bolt and nut. When I mount it on the tractor frame I put a 3/16" hitch pin through the nut and bolt to hold it in place. I can put it on and take it off by hand with no tools that way.


The first version I made had the pieces of flat steel 6 inches long. As it turned out, they were way too long.

I cut them down to 4 inches and it made a big difference. After drilling and painting the flat steel (Kubota dark grey of course!) I mounted the 5/8" bolt through two pieces of steel with the two washers and the 1/0 bushing. I had to cut about 1/4" off the 3/2 and 2/1 bushings as they were longer than the mount was wide. I cut them all down to the same length as the 1/0 bushing. When done I ended up with something that looks like a leaf spring hanger.
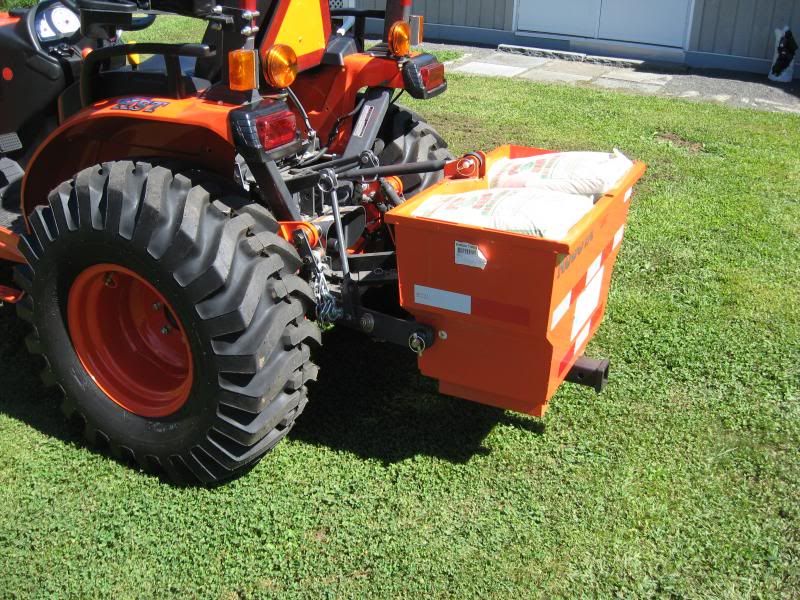
I lubed up the two bushings and the 3/4" bolt when I mounted them so that they swing freely. When the TPH comes up all the way they are not in the way and the lower arms push them back if I go too high. A D shackle attaches to the forged eye and I have another D shackle on each 5/8" bolt. The chain attaches to the D shackle on the lower arm. I set the implement height, in this case for the photos it was my weight box, then put whatever the closest chain link reaches onto the pin of the upper D shackle.
Each piece of chain is 2 feet long so I have a wide amount of adjustment depending on the implement that I have attached. For the weight box I ended up only having 3 links between the top shackle and bottom shackle so I ran the extra chain through the lower shackle and secured it to the top shackle pin. The way it's set up, even if a chain breaks it's on the outside of the lower arms and shouldn't get anywhere near a spinning PTO shaft.
After cutting them down to 4 inches this is what they look like.


All total I probably spent about $50 for all the parts. If you've got chain, steel, shackles and large bolts around your shop you can probably do it for free. I don't know what the backhoe subframes look like for JD, Kioti, Mahindra of Yanmar, but if they have the same basic design, it should work for you too.
I tried to think outside the box and I came up with an alternative that works on the B3200 (and probably B3300 and 2000 series) with the frame mounted subframe for a backhoe. As others have the same or similar setups, I figured I'd share what I did. On the rear of the subframe are two knuckles (I don't know the official title of them) that mates up to the backhoe. A 1 1/4" pin goes through the two ears of the mount on the backhoe and catches the knuckle on the tractor subframe in between. That's what holds the backhoe in place. I figured if it's strong enough to hold a backhoe then check chains should be a piece of cake.
I got a set of forged eyebolts and mounted them on one of the existing holes on the lower arms of the TPH then used a length of 3/8" chain on a shackle up to and through the opening on the subframe knuckle and back to the the shackle.
It worked fine for holding the rotary mower at a lowest setting for me when I used it. The only thing I didn't like was the chain going through the 1 1/4" opening in the knuckle. I was worried that eventually the chain would beat up the mount and I'd have trouble getting the pins through to mount the backhoe.
I was going to weld up something fancy, but after thinking about it I figured I'd keep it simple. I also figured that if anyone else wants to do the same thing they don't need access to a welder. I did everything with a hacksaw and drill. As previously mentioned, the "knuckle" on the subframe has a 1 1/4" opening and is 1 9/16" wide. I am too cheap to pay what the going rate is for a 4 inch long 1 1/4" grade 8 bolt, so I came up with a different method.
I took a trip to TSC and got two 3/4" X 4 grade 8 bolts (you could probably get away with grade 5, but I tend to go the extra mile for safety) with nuts and two large washers per bolt; two 5/8" grade 8 bolts with nuts, lock washers and fender washers; a 3' piece of 1 1/2" X 1/4" flat steel that I cut four 6 inch long pieces off of. I drilled a 3/4" hole in one end of each of the pieces of flat steel and a 5/8" hole in the other end for the bolts. My plan was to put the 3/4" bolt through the frame mount and have the 5/8" bolt suspended below on the steel.
I didn't want the 3/4" bolt flopping around inside the subframe mount so after looking at the TPH parts bin I came up with a plan. I got two Cat 3 to Cat 2 top link bushings; two Cat 2 to Cat 1 top link bushings and two Cat 1 to Cat 0 top link bushings. I put the Cat 2/1 bushing inside the Cat 3/2 bushing. The 3/4" bolt then fit inside the 2/1 bushing. The outside diameter of the Cat 3/2 bushing is 1 1/4" so it fit perfect inside the subframe mount. The Cat 1/0 fit over the 5/8" bolt. I wanted the bushings on the upper part to protect the subframe mount. I used the bushing on the lower bolt as the thread were exposed and I didn't want to wear through the chain.
To get it to fit I had to cut part of the 3/4" bolt off as it was too long.
Rather than tighten it up all the way on the mount as I wanted it to swing freely, I left the nut slightly loose and drilled a 1/4" hole through the bolt and nut. When I mount it on the tractor frame I put a 3/16" hitch pin through the nut and bolt to hold it in place. I can put it on and take it off by hand with no tools that way.
The first version I made had the pieces of flat steel 6 inches long. As it turned out, they were way too long.
I cut them down to 4 inches and it made a big difference. After drilling and painting the flat steel (Kubota dark grey of course!) I mounted the 5/8" bolt through two pieces of steel with the two washers and the 1/0 bushing. I had to cut about 1/4" off the 3/2 and 2/1 bushings as they were longer than the mount was wide. I cut them all down to the same length as the 1/0 bushing. When done I ended up with something that looks like a leaf spring hanger.
I lubed up the two bushings and the 3/4" bolt when I mounted them so that they swing freely. When the TPH comes up all the way they are not in the way and the lower arms push them back if I go too high. A D shackle attaches to the forged eye and I have another D shackle on each 5/8" bolt. The chain attaches to the D shackle on the lower arm. I set the implement height, in this case for the photos it was my weight box, then put whatever the closest chain link reaches onto the pin of the upper D shackle.
Each piece of chain is 2 feet long so I have a wide amount of adjustment depending on the implement that I have attached. For the weight box I ended up only having 3 links between the top shackle and bottom shackle so I ran the extra chain through the lower shackle and secured it to the top shackle pin. The way it's set up, even if a chain breaks it's on the outside of the lower arms and shouldn't get anywhere near a spinning PTO shaft.
After cutting them down to 4 inches this is what they look like.
All total I probably spent about $50 for all the parts. If you've got chain, steel, shackles and large bolts around your shop you can probably do it for free. I don't know what the backhoe subframes look like for JD, Kioti, Mahindra of Yanmar, but if they have the same basic design, it should work for you too.
Last edited:
