Crowning a Driveway

   / Crowning a Driveway #1  

JoshJ

Silver Member
Joined
Jun 14, 2004
Messages
167
Location
NJ
Tractor
Ford 5610
Just looking for some advice from the "been there, done that" people. Heres the story.

I have some work lined up to spread crushed shells for a driveway. I've done this with decent success just motoring along and slowing curling the bucket down to dump them, then drag out to somewhat level.

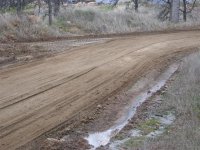
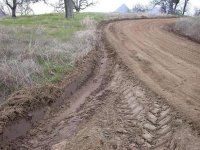
The problem is that after only a few months, ripples form across the driveway along with massive potholes. /forums/images/graemlins/frown.gif (The real problem is that the driveway is probably 1/4 mile long and they drive too fast down it /forums/images/graemlins/crazy.gif )

My thought is to try and crown it. (Second thought is drainage, but I think the crown is more of an issue).

Heres the questions:
1) Do I try to rip up the base with BB ripppers (can it, even?) and crown that before spreading the new stuff, or leave it and crown only with what is delivered? The current drive has some shells on top, with mostly gravel underneath that may have shells and some 3/4" stone mixed in.

2) Is it worth it to try and crown with a BB, or should I just look into borrowing a back blade to save myself the frustration?
3) Grass runs along the side of the driveway, and I think that it might foul up drainage. Should I just make a shallow ditch for runoff alongside?

I guess thats it. Any advice/critiques would be appreciated. I am up for "experimenting" in a few spots - it all doesnt have to be perfect on the first try.

Thanks
 
   / Crowning a Driveway #2  
If you are getting ripples and potholes then your driveway base isn't holding up. Maybe a thicker cover or something stronger underneath. Around our weekend place you get the red clay with the little pieces of iron ore (what we call it). After it gets packed down and the rocks come up it'll last a long while. The rain doesn;t get through it after it becomes packed. Hard as a rock in a rain storm.

Good Luck
 
   / Crowning a Driveway #3  
You are lucky to have ripples and pot holes that need repair. Offers more opportunity for seat time. /forums/images/graemlins/grin.gif All kidding aside, that's why I'm not going to gravel or asphalt my road. I bought the tractor instead of paying for road topping.

As far as your questions, crowning a road will help with rutting or ripples somewhat. I found it more important to do where the road rises and falls moreso than on completely flat sections of the road. The run-off has a greater chance to build up velocity on those inclined sections and do more damage.

A backblade is probably the better implement for best grading results. On the other hand, a boxblade will also do the job. Not having a backblade, I use my boxblade for all road maintenance and repairs and even to cut "gutters" along side as you were inquiring about. It has worked out well and have no need to spend money on a backblade now. In this photo you can clearly see the grading work and also the gutters.
 

Attachments

  • 882169-HOMESITE CIRCLE (Small).JPG
    882169-HOMESITE CIRCLE (Small).JPG
    75 KB · Views: 907
   / Crowning a Driveway
  • Thread Starter
#4  
RobJ- What is the best way to solve this type of problem? This is a lengthy driveway, so putting down a lot of material= $$$

3RRL- What you say makes sense. However, most of the driveway is level. I think standing water is more of an issue, though I am not really sure what happens when it rains. BTW, nice work with your BB. I am going to try and tweak mine (equipment & skill) to hopefully get some better results. I'm pretty bad at it right now, but I've got some ideas.

Thanks
 
   / Crowning a Driveway #5  
Josh,
If that's the case, standing water, I would blade the sides of your drive and cut in a gutter. With the shell and gravel there, work some of it to the center creating a slight crown. You'll most likely drive on that anyway. Try that before buying additional material. Here is anoter photo of a level part of my road after boxblading. Notice the water on the sides in the gutter area.
 

Attachments

  • 882351-NORTH ROAD ENTRANCE (Small).JPG
    882351-NORTH ROAD ENTRANCE (Small).JPG
    71.2 KB · Views: 1,105
   / Crowning a Driveway #6  
Set your boxblade like this to cut the gutters. Make several passes on each side if you need to. If using the boxblade to do this, try not to use the scarifier down on that low side. It is a real easy way to bend them because the boxblade is not square to the tractor's direction of pull now. The low end actually sits a bit farther back than the high end and the scarifier is now slightly angled. I used mine to cut the gutter first and bent the heck out of each one I put in until learning the hard way.
 

Attachments

  • 882361-TILTED BOXBLADE.JPG
    882361-TILTED BOXBLADE.JPG
    95.2 KB · Views: 883
   / Crowning a Driveway #7  
I've been working a fairly long curving hillside driveway for a while. The crushed limestone 57s that were delivered were laid in too thick. The folks living there drive F350 superduty trucks. They come up the drive in 2 wheel drive and very quickly make a bunch of small waves in each tire track.

I've moved quite a lot of the gravel further up the hill, but there are a lot of places where it's still too thick. I spend a fair amount of time with the back blade and bucket working the thing over. Even with the blade angled, tilted, and offset outside the wheel, each pass tends to move a little gravel further out, widening the driveway just a bit. It seems like a box blade would keep the stuff in the driveway better, but maybe I'm wrong on that count. I don't own one, and don't need to spend the $400 or so to get one. Any ideas??
 
   / Crowning a Driveway #8  
Rich,
</font><font color="blue" class="small">( Even with the blade angled, tilted, and offset outside the wheel, each pass tends to move a little gravel further out, widening the driveway just a bit. It seems like a box blade would keep the stuff in the driveway better, but maybe I'm wrong on that count. I don't own one, and don't need to spend the $400 or so to get one. Any ideas??)</font>

From my experience with the boxblade, that is correct. Even with the lower end slightly trailing the high end, it still grabs the material and displaces it away from the gutter (towards the center of the drive). I have no experience with the back blade so I can't say anything about that. But the boxblade has sides and keeps stuff from spilling back into the gutter, or widening the drive. Then I reset the angle ... not nearly as steep and grade the spillage and the rest of the road to put a light crown on it. Comes out looking pretty good and the gutters sure work.

Another super handy feature is the ability to back up, bulldozing the gutter into natural spillways...on the same angle as the gutter. On my property this was very important so the gutters didn't overflow before the water flow could reach the culverts. In bulldozing, you can set the back cutting blade aggressively and cut very nice escapes. It also pushes and levels the dirt so it makes a nice path for the tractor, never worrying about "going over" the edge. (Note: stop first). The Top-n-Tilt toplink has been a tremendous aid in positioning the boxblade for cutting or smoothing in forward or reverse..."on the fly".

I do this on more inclined parts of the road rather than the flatter parts. It is more important to do that where the water gains/accelerates and will rut and wash out your road. Another reason I like bulldozing backwards is that your tires end up on the area that has been bulldozed away so it will be nice and flat...not bumpy. Not like pulling the boxblade where it tends to ride up and down with the tractor if your tires are going over bumps. Bulldozing cuts those bumps out and you have immediate flat results.

I think this photo shows what I'm trying to explain about the spill-off areas. Notice how the slope follows the gutter slope, and the road is left up higher and smooth.
 

Attachments

  • 882526-HOMESITE GUTTER.JPG
    882526-HOMESITE GUTTER.JPG
    90.7 KB · Views: 680
   / Crowning a Driveway #9  
For those of you who saw my post on customizing my boxblade with added re-inforcement, weight, and hydraulic rippers, now you know why I invested so much time in it. Of the 180 or hours I have on the tractor, about 100 hrs have been working the boxblade, 50hrs with the backhoe and the rest trying to figure out how to work the tractor. /forums/images/graemlins/confused.gif
 
   / Crowning a Driveway
  • Thread Starter
#10  
</font><font color="blue" class="small">( try not to use the scarifier down on that low side. It is a real easy way to bend them because the boxblade is not square to the tractor's direction of pull now. )</font>


3RRL: (Edit: whoops, addressed wrong person before)
Do you think I could set just one or two scarifers down with the box level and bust up the soil before trying to dig a gutter?

If not then I guess I can just rip half on the drive and half on the dirt. Still not sure if I want to rip the drive up or not, but I guess that would flatten out the hardened bumps and give me a fresh start. I appreciate all your advice on this, thank again.
 
   / Crowning a Driveway #11  
</font><font color="blue" class="small">( RobJ- What is the best way to solve this type of problem? This is a lengthy driveway, so putting down a lot of material= $$$
Thanks )</font>

Well not saying it's the only way...but. You want a road material thay packs down tightly, and stays put for a long time. Persoanally I don't see a lot of fun in constantly maintaining a road. Plus when friends come to visit they pull up with whiplash from all the dips...

But if you like to maintain a sand road if can be fun. But after you spent 2 hours grooming it an 2" rain comes and ruts it up on 5 minutes. And in the process takes the soil with it.

When you live that far off a main road there are good things and not so good things. But a road is like any other tool or item, if you do it right the first time, you will usually get better results.

Good Luck!
 
   / Crowning a Driveway #12  
Josh,
</font><font color="blue" class="small">( Do you think I could set just one or two scarifers down with the box level and bust up the soil before trying to dig a gutter?)</font>

Yes, I do that all the time with no problems. It will pull easier for your tractor too. Using one or two will let it dig in pretty good. Just keep and eye on them because it will be easier for the tractor to overpower one or two instead of all of them down. You don't have to sink them in too deep either, just enough to make the sides of the drive gradable, so you move that material towards the center. It won't take as much as you think to do that. A slight crown is all you really want.
 
   / Crowning a Driveway #13  
JoshJ,

Try using "2A modified" from your local quarry. This is smaller gravel with dust in it.

Wet it down when putting it down, and run over it when leveled. It will pack eventually like concrete.

If it is washing out from water runoff, put some small stones in the "ditch" that is washing, then put the 2A modified over it.

If tearing up for new base, use fabric under the gravel if all new driveway, or I also use #3 first (about 3" round gravel) first for a base, then 2A modified, then 2B for the traditional look, if so desired.

Be prepared. Anywhere from 6 weeks to 6 months after a new gravel drive is laid, it will commonly have some dips due to uneven base. After putting a light topcoat at this later date, just an occassional refresh of gravel should be in order.

Hope this helps.

-JC
 
   / Crowning a Driveway #14  
JoshJ,

Try using "2A modified" from your local quarry. This is smaller gravel with dust in it.

Wet it down when putting it down, and run over it when leveled. It will pack eventually like concrete.

If it is washing out from water runoff, put some small stones in the "ditch" that is washing, then put the 2A modified over it.

If tearing up for new base, use fabric under the gravel if all new driveway, or I also use #3 first (about 3" round gravel) first for a base, then 2A modified, then 2B for the traditional look, if so desired.

Be prepared. Anywhere from 6 weeks to 6 months after a new gravel drive is laid, it will commonly have some dips due to uneven base. After putting a light topcoat at this later date, just an occassional refresh of gravel should be in order.

Hope this helps.

-JC
 
   / Crowning a Driveway #15  
Josh...I used to maintain, (try to anyway) a 1/4 or so gravel drive with a rear blade. It was not the best tool for the job IMO. Granted I didn't have a big blade and a heavy machine, but it was hard to get the crown right without T&T. Even with T&T the machine just didn't have the umph to move the material to create a real crown. You need the power and traction of a dozer to push and cut lots of packed road base.

The only way I'd try it again is to either rent a dozer and create the crown properly, or hire a dozer out for a half day. Hire out is probably better just because the crown should be shaped by an experienced operator so you're not wasting time and money. Then you really should put down fabric and cover it with the top material. This is costly, but it's the right way to do it. If you don't use the fabric, the top material migrates down and depresses into the softer soils below creating the washboards and the pot holes. If you don't go with the fabric, try to come up with a dozer to have the base sculpted. You can nicely maintain the surface with a CUT and a BB. A 1/4 mile drive with no fabric and no real crown is nothing short of nightmare. You'll be fighting it endlessly and it'll never last very long after you grade the surface with your machine. --Odds are high you know all this and it's nothing new, but just wanted to mention it so you don't become a slave to the road. It's nice to get it done and then maintain it once each spring.

I couldn't convince the two other neighbors that shared the road that it was the thing to do, so it never got done. We just had a rutted, washboarded and pothole filled road until I got around to scraping off the surface with my rear blade.....one week later it looked just as bad. It was endless and kind of embarassing at times when friends and family visited. I used to just leave it so the neighbors had to drive over the washboards and potholes.

I now use fabric on everything and what a difference it makes. My new road (1200') is like an interstate and will require little annual maintenance in time and additional money....but it does cost and that's where the problem lies /forums/images/graemlins/smile.gif
 
   / Crowning a Driveway #16  
Josh...I used to maintain, (try to anyway) a 1/4 or so gravel drive with a rear blade. It was not the best tool for the job IMO. Granted I didn't have a big blade and a heavy machine, but it was hard to get the crown right without T&T. Even with T&T the machine just didn't have the umph to move the material to create a real crown. You need the power and traction of a dozer to push and cut lots of packed road base.

The only way I'd try it again is to either rent a dozer and create the crown properly, or hire a dozer out for a half day. Hire out is probably better just because the crown should be shaped by an experienced operator so you're not wasting time and money. Then you really should put down fabric and cover it with the top material. This is costly, but it's the right way to do it. If you don't use the fabric, the top material migrates down and depresses into the softer soils below creating the washboards and the pot holes. If you don't go with the fabric, try to come up with a dozer to have the base sculpted. You can nicely maintain the surface with a CUT and a BB. A 1/4 mile drive with no fabric and no real crown is nothing short of nightmare. You'll be fighting it endlessly and it'll never last very long after you grade the surface with your machine. --Odds are high you know all this and it's nothing new, but just wanted to mention it so you don't become a slave to the road. It's nice to get it done and then maintain it once each spring.

I couldn't convince the two other neighbors that shared the road that it was the thing to do, so it never got done. We just had a rutted, washboarded and pothole filled road until I got around to scraping off the surface with my rear blade.....one week later it looked just as bad. It was endless and kind of embarassing at times when friends and family visited. I used to just leave it so the neighbors had to drive over the washboards and potholes.

I now use fabric on everything and what a difference it makes. My new road (1200') is like an interstate and will require little annual maintenance in time and additional money....but it does cost and that's where the problem lies /forums/images/graemlins/smile.gif
 
   / Crowning a Driveway #17  
The nice thing about a back blade is that you can lower one side like the photo of the box blade, AND angle the low end forward. This moves material from the gutter you are creating to the center of the road, thus creating a crown.
My drive isn't level so I have several places where one side of the road is higher than the other, allowing the water to drain. If I left a crown in the middle I'd have standing water on the high side since it couldn't drain anywhere but onto the road.
The land is steep enough that trhe runoff can build up velocity and cut a wild ditch on the low side, and some places where the surface is displaced as the water flows across. I have made run outs, and when they get full, pond scoop the material back into the ditch on the side of the drive. I have a landscape rake so after the spring rainy season I can rake the rock to the top of the surface. Clearly the underlayment would have helped prevent the latter but it is Forest Service right of way. They don't mind me grading or even adding material but won't allow me to dig down deep enough to use the fabric. Plowing snow moves gravel to the ditch since that is where I'm trying to put the snow. I need gauge wheels on the blade. /forums/images/graemlins/tongue.gif
 
   / Crowning a Driveway #18  
The nice thing about a back blade is that you can lower one side like the photo of the box blade, AND angle the low end forward. This moves material from the gutter you are creating to the center of the road, thus creating a crown.
My drive isn't level so I have several places where one side of the road is higher than the other, allowing the water to drain. If I left a crown in the middle I'd have standing water on the high side since it couldn't drain anywhere but onto the road.
The land is steep enough that trhe runoff can build up velocity and cut a wild ditch on the low side, and some places where the surface is displaced as the water flows across. I have made run outs, and when they get full, pond scoop the material back into the ditch on the side of the drive. I have a landscape rake so after the spring rainy season I can rake the rock to the top of the surface. Clearly the underlayment would have helped prevent the latter but it is Forest Service right of way. They don't mind me grading or even adding material but won't allow me to dig down deep enough to use the fabric. Plowing snow moves gravel to the ditch since that is where I'm trying to put the snow. I need gauge wheels on the blade. /forums/images/graemlins/tongue.gif
 
   / Crowning a Driveway #19  
I agree blades are nice if one has a heavy machine that won't get pulled off line while you're trying to shape the base. T&T would be perfect here with a HD blade and some HP.
 
   / Crowning a Driveway #20  
I agree blades are nice if one has a heavy machine that won't get pulled off line while you're trying to shape the base. T&T would be perfect here with a HD blade and some HP.
 

Tractor & Equipment Auctions

2019 Dodge Grand Caravan Van (A59231)
2019 Dodge Grand...
TANK MANIFOLD (A55745)
2016 Chevrolet Sonic LS Hatchback (A56859)
2016 Chevrolet...
2016 Caterpillar 349FL Hydraulic Excavator (A56857)
2016 Caterpillar...
500 BBL FRAC TANK (A58214)
500 BBL FRAC TANK...
Toro MBTX-2500 Concrete Buggy (A54865)
Toro MBTX-2500...
 
Top