Culvert Updates

   / Culvert Updates #1  

Harv

Elite Member
Joined
Aug 22, 2000
Messages
3,346
Location
California - S.F. East Bay & Sierra foothills
Tractor
Kubota L2500DT Standard Transmission
Some of you may recall my very first tractor project last October was to build 3 separate culverts which were designed to give me tractor access to the "back forty" of my property. (For those of you who missed this exciting saga, you can find the thread or check out the Cliff's Notes version on my website.)

At that time I promised to let y'all know how they held up once the rainy season hit. Well, we just had our rainy season and the results are in. Now, I said I would share the successes and the failures alike, so all I have to say is, two out of three ain't bad! /w3tcompact/icons/crazy.gif

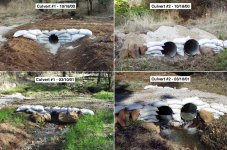
The rain itself kept me away from the property for five weeks in a row, but apparently there were some dandy storms up there, and the culverts were indeed tested. The first culvert was a single 12-inch pipe, and it held up just fine, as did culvert #2 (the "big" one), with it's dual 18-inchers. The rains have stopped for the time being, so the flow is down to a trickle -- a trickle which will last probably through mid-summer due to mountain snowmelt.

The attached photo shows these two culverts as they were on or near completion, and how they look today. Not the most exciting pictures -- unless you're planning on building a culvert soon yourself. /w3tcompact/icons/wink.gif

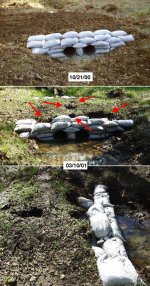
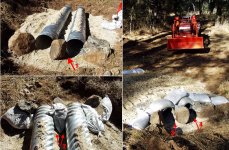
Culvert #3? Well ... that's the next message or two.

HarvSig.gif
 

Attachments

  • 33-37222-GoodCulverts.jpg
    33-37222-GoodCulverts.jpg
    141.2 KB · Views: 1,544
   / Culvert Updates
  • Thread Starter
#2  
Okay, so now we come to culvert #3 --

At the time of the project, some of youse (maybe Gordon?) warned about the dreaded "blow-hole" phenomenon. I took the warning seriously and made sure that I faced off each culvert in such a way that it wouldn't happen to me. At least I thought I did. /w3tcompact/icons/crazy.gif

This last culvert was just a simple pair of 12-inch pipes that would only catch the overflow from our neighbor's pond. Well, apparently that overflow can be substantial during a storm, 'cuz the water found a way around my rock face, created a blow hole and proceeded to blow out nearly all of my limestone crush that I had so carefully compacted in by hand.

Kind of hard to photograph, it turns out, but in the attachment I added red arrows to show where the topsoil either blew out or caved in. The bottom picture is merely another angle attempting to show how the downstream end just caved in after the backfill was gone. /w3tcompact/icons/frown.gif

Why did it happen? Probably not too hard to figure -- we'll take a look in the next message.

HarvSig.gif
 

Attachments

  • 33-37223-CulvertBlowout.jpg
    33-37223-CulvertBlowout.jpg
    176.9 KB · Views: 478
   / Culvert Updates
  • Thread Starter
#3  
So now I would like to pin down exactly what happened, naturally, so I don't make the same mistake again. To that end I've attached some pictures taken during the construction phase that I think show where the trouble probably began. I tossed in a few numbered arrows this time, so's I can invite some discussion from you experienced folk out there.

It looks like I was a mite too casual with the rock face on this one. My money is on the area indicated by arrow #1, but there may have been more than one vulnerable spot.

The bottom-left picture shows how I crammed sandbags full of ready-mix in behind the face stones. I still think this was a good idea, but I just didn't pay enough attention to how poorly they fit the gap in places.

The attached file is kinda big, so if you're not really fascinated by dirt and rocks and pipe 'n' stuff, you could easily skip this one. /w3tcompact/icons/wink.gif

Constructive comments are most welcome. Okay, GlueGuy, I'll take your comments, too. /w3tcompact/icons/smile.gif

HarvSig.gif
 

Attachments

  • 33-37224-CulvertAnalysis.jpg
    33-37224-CulvertAnalysis.jpg
    192.6 KB · Views: 374
   / Culvert Updates #4  
Harv,
Maybe some good coarse rocks pack between the two culverts would help.

Maybe a header funnel attach to your culvert than hard soil on top pack might do the trick.

When the dirt around culverts start to wash out it can be a long nightmare to keep repairing,and the best way I found out is to dig them open and refill w/stones.

How did it feel to spend some time on your Kubota finally. /w3tcompact/icons/wink.gif

Thomas..NH /w3tcompact/icons/wink.gif
 
   / Culvert Updates #5  
Neat photos Harv! Yeah, I'd agree with you that two out of three ain't bad. Any indication how high the water level got behind the culvert? Basically, your "road" acts as a dam with a couple of pipes in it. Water will seek the path of least resistance, which as you found out may be between the pipes and the earth. The place where I grew up had a 36 inch culvert for a small creek under the drive. It blew out one year and the solution was to put one of those funnel like things at the entrance. Apparently, over many years the water had been eroding under the culvert and one spring it just caved in. They can also erode from the downstream side if the water pools and circulates beneath the pipe.

Thanks again for the update, good luck with your repairs /w3tcompact/icons/smile.gif

18-32437-790signaturegif.gif
 
   / Culvert Updates #7  
Harv,
I feel for you bro. We built a 3/4ac pond a few years ago and we put 3 , 12" poly pipe under our driveway to take the overflow. We had just gotten the pipe in the ground and within 24 hours we got 8" of rain and 36 hours 13". So, it got the test of a lifetime right away.
Well, the builder had made the mistake of sitting the pipes touching each other and had not taken caution to "seal" the gaps between the pipes. The water found it's way between the pipes right away and washed the dirt around the pipes first thing. I'll post a few pics here later. But it was bad.

The builder came back after it dried-up a week later and we re-set the pipes, this time we spread them 10" apart and poured 5yrds of concrete from the lip of the pipes back about 10', making sure the concrete got packed under, around, between, and over and all the air was vibrated out.

In other words, this wasn't going to happen again. After the concrete set up, I packed clay, with a sledge hammer, around the concrete and made sure it was as solid as could be.

I later got some info on the specs that the DOT people have to use to put in culvert pipes, and it talks about the type and compaction of the soil around pipes laid in the ground.

Basically, you can't just lay pipe in a ditch and backfill it without packing it every 2-3".
The sandbags that I see in your pics, are they filled with sand and brick mortor?

At the very least, I'd pour several yards of concrete around/between your pipes at the top and around the lips insure the water can't get under the pipes EVER.

Don't use any loose rock, since water loves to get though rock to whatever is behind it. Pack dense clay if you can get it or dump concrete that will seal up the pipe lips.

gary
 
   / Culvert Updates #8  
Oh to see green again - we still have 2-4' of snow on the ground.

Nice job with the culverts but headwalls and entrance/exit areas are indeed critical (as you have learned). FWIW, I have been told that building a stone headwall at least the culvert thickness above the culvert (for 18" and under) and 2-3 times it's width is a good general practice. as well, making sure you have erosion stone or similar entrance and exit ramps or skirts will prevent undercutting.

Nice pictures! keep 'em coming.

"Beer is proof that God loves us and wants us to be happy." - Ben Franklin
 
   / Culvert Updates
  • Thread Starter
#9  
Thomas, Rob, Gary, Andy -

Just to clarify a few things --

WIthout re-creating the entire "Culvert Project" thread, it was the well-documented consensus of experts that proper backfill is a key element for a successful culvert. The limestone crush I used is a highly preferred material which, when properly compacted (in thin layers, as Gary points out), offers perfect support for the pipes themselves, and makes a good base for the road across them.

Based on the performance of culverts #1 and #2, I'd have to say that the backfill seems more than adequate, but you're all correct in saying the headwall is the real challenge. I considered using the metal funnel thingies, but wanted to use as much of my natural resources (rock) as I could. Call me cheap -- that would please my wife. /w3tcompact/icons/wink.gif

I agree that massive amounts of concrete would do the job, but I'm still under the impression that that would be over-kill, not to mention the difficulty in hauling and mixing the stuff in such a remote part of the property. Most of the bags you see in the pictures were filled with "QUICKRETE" general purpose concrete mix. They were staked together with rebar and turned solid during the first rains of the season.

I'm gonna listen to more feedback before I firm up my plans. Thanks to all for your comments so far.

BTW - yeah, that formula really cleared things up, John. /w3tcompact/icons/frown.gif

HarvSig.gif
 
   / Culvert Updates #10  
Harv,

I also use/built a stone & concrete "headwall" at the entrance of the culvert where my driveway crosses the drainage ditch along the town road. All it really consisted of was facing off the culvert with a braced wood form with the ends returned back into the bank and then backfilling about a foot thick with premix and large stones. It was about 3' wide and about 1' over the top of the pipe. Been there for more than 10 yrs now.

It would look alot like what you have created with the sandbags except solid. Maybe you can go right over the bags with some concrete premix.

I would suggest some concrete or mortar between between the pipes for sure. Other than that maybe a lot of stone rip rap so the sod won't wash away. Just my .02.

Does seem like alot of water. Do you think you might need larger pipe?

DFB

18-30366-dfbsig.gif
 

Tractor & Equipment Auctions

4yd Dumpster (A44571)
2025 Dig Master DM100 UNUSED Mini Excavator (A47484)
2025 Dig Master...
1997 Ford LT9000 T/A Day Cab Truck Tractor (A44571)
1997 Ford LT9000...
2022 Ford F-150 4x4 Crew Cab Pickup Truck (A44572)
2022 Ford F-150...
2025 Wolverine TF1-66-4000G Adjustable Pallet Fork (A47484)
2025 Wolverine...
2015 Ford F-150 Pickup Truck (A44572)
2015 Ford F-150...
 
Top