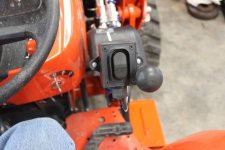
Michael In Tennessee
Gold Member
DIY Third function for Kubota MX4800.
Firstly, a couple of acknowledgements. Brian (MountViewRanch) @ Fit Rite Hydraulics for comments regarding flow rate of fittings I intended to use. LD1 for general knowledge and MX knowledge in particular. "Dave Knows How" on youtube who has an excellent series on putting a 3rd function valve on an L series as well as other Kubota based videos.
This is specific to my MX4800 tractor but is very similar to L series tractors and maybe others.
Parts list: I'll update over over time as I collect my receipts. The bulk of everything came from surplus center. The Northman SWH-G02-C6-D12-10 valve that everyone seems to like to use wasn't available, so I had to go with a slightly more expensive valve from Surplus center. I spurces a rear port D03 valve from ebay, but I probably wouldn't recommend doing this. It did provide areal clean installation, but you will see it was a slight challenge as we go through the build.
Surplus Center:
QTY 1 1/2" x 24" JIC 8F Swivel x JIC 8F Swivel SAE 100R16 Hydraulic Hose Assembly 4000 PSI Item Number: 940-2224 $13.95
QTY 2 3/8" x 96" JIC 6F Swivel x JIC 6F Swivel SAE 100R16 Hydraulic Hose Assembly 5000 PSI Item Number: 930-2296 $45.90
QTY 2 JIC 6M x 3/8 NPTF Bulkhead Connector Item Number: 9-2705-6-6 $5.20
QTY 2 JIC 6 Bulkhead Lock Nut Item Number: 9-306-N-6 $0.90
QTY 2 3/8 NPT Hex Nipple Item Number: 9-5404-6-6 $2.70
QTY 2 JIC 6M x 3/8 NPTM Connector Item Number: 9-2404-6-6 $2.40
QTY 2 JIC 8M x 3/8 NPTM Connector Item Number: 9-2404-8-6 $3.20
QTY 2 3/8 in Two Wire Dual Hydraulic Hose Clamp Item Number: 9-A2-18-D $6.90
QTY 2 3/8" NPT Hollow Head Plug Item Number: 9-5406-HP-6 $1.10
QTY 2 JIC 6 Cap Item Number: 9-304-C-6 $1.40
QTY 2 JIC 8 Cap Item Number: 9-304-C-8 $1.80
QTY 2 JIC 6 Plug Item Number: 9-2408-6 $1.50
QTY 2 JIC 8 Plug Item Number: 9-2408-8 $2.10
QTY 1 12 Volt DC 10 GPM OC DA Solenoid Valve Item Number: 9-6136 $147.10
QTY 2 Hirschmann Connector Item Number: 11-2457 $9.60
Subtotal: $245.75
Shipping: $21.15
Total: $266.90
Ebay:
DAMAN AD03SPB6P 1093 SUBPLATE VALVE $23.50 shipped.
Amazon:
Southwire 14 auge primary wire, 100% copper. Blue, Red, Black, 100 ft. each $58.28 shipped.
1/2" double split shaft collars (4) $10.00
Weatherpack connectors $17.00 Shipped.
Operators switch:
GAMA electronics P12001-3-MOM $34.95 shipped.
Steel:
$6 from local steel dealer.
Relays, fasteners, butt splices, etc were from my own stock, but were not expensive.
Lets start the build:
Hydraulics first:
I have a backhoe, so my power beyond on the FEL valve goes to my backhoe instead of the manifold under the right floorboard. It also has enough length and flex to be useful as the output of the 3rd function, so it was reused. Oddly enough, the input to the FEL valve is 3/8" JIC, but the output is 1/2". So, I used a 24" 1/2" hose with JIC fittings between the FEL power Beyond port and the P port on the D03 plate. The backhoe hose was used on the T port. 8 ft 3/8" JIC hoses were used to go up the FEL booms to the front of the loader.
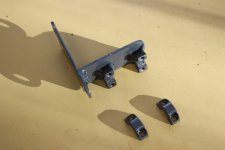
The 3rd function valve was located below the loader valve. I used 3" wide 1/4" plate and made a tee that fit the spread of the loader valve attachment bolts and mounted the 3rd function valve as high as I could under the loader valve.

The cloverleaf holes are made with a 1" hole saw, just overlapped. The two small mounting holes were tapped 1/4-20 once I had the valve in hand.
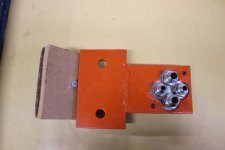
The D03 subplate is installed. You can see the NPT to JIC adapters. It is a very tight fit. Here we also find mistake #1. I was too clever. There is no room to get a wrench around the flats of the hose nuts. well, almost no room. In fact, my OEM backhoe hose had wrench flats wider than the #8 JIC hose I got from Surplus Center. I had to go down to my local hydraulic hose maker and see if his fittings were a tab smaller. They were, so I had the OEM hose end cut off and replaced. That nut was between the sise of the 24" surplus center hose and the OEM fitting, but worked out. Barely. As I was wrenching that connection on, the corners of the nut would just tic by the other fitting nuts. Not a recommended practice. I suggest one source a more common side ported D03 plate and use 90 degree fittings.
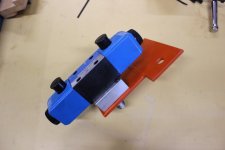
Here we have the assembled valve and bracket.
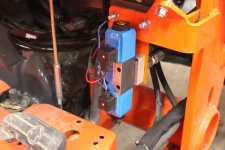
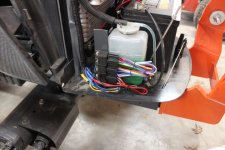
And installed. You can see the wiring to the two Hirshman connectors you need for this valve. I've never used them before, but they actually make wiring easy. Also, if I wish to reverse the function of the thumb switch, I can just swap those two connectors.
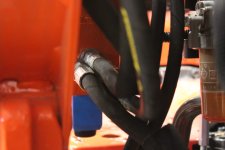
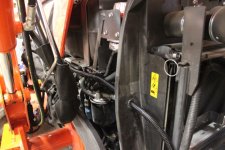
Here you can barely see how tight those hoses are. I hope I have no future issues with this.
Hose routing:
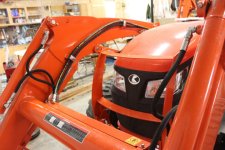
Mistake #2: Take time to layout your hose routing and determining how long your hoses need to be. I did my measuring with the FEL on the ground not taking into account the service loop needed to raise the bucket. Thus, in the end, my hoses area tad too short and I might have to get longer hoses. Since I don't have an attachment to use yet, I'll wait to figure out that. Also, in your hose routing, make your hoses route near your boom pivot joint. Thay makes for the least movement in the hoses and ensures you don't have to manage much hose movement.
Hose routing was simple. Out the back of the 3rd function as shown above. Then up the FEL mounting bracket to the upper pivot and out the boom to the bucket. On the LA1065 FEL, you have two welded tabs for the OEM 3rd function installation. The Hose brackets I bought from Surplus center fit with a little modification. Discard the existing bolt and the metal bottom plate. Keep the top metal plate and replace the bolt with a 8mm x 1.25 mm x 50 mm bolt. Works beautiful. (obviously, double check bolt size if you have a different tractor.)
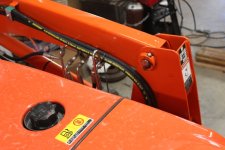
You can also see my hoses are a bit too short. The next length up would have been 2 feet longer, so I'll just wait and see what I need later. Also note I have not attached my bulkhead fittings and made a bracket for them yet for the same reason.
Firstly, a couple of acknowledgements. Brian (MountViewRanch) @ Fit Rite Hydraulics for comments regarding flow rate of fittings I intended to use. LD1 for general knowledge and MX knowledge in particular. "Dave Knows How" on youtube who has an excellent series on putting a 3rd function valve on an L series as well as other Kubota based videos.
This is specific to my MX4800 tractor but is very similar to L series tractors and maybe others.
Parts list: I'll update over over time as I collect my receipts. The bulk of everything came from surplus center. The Northman SWH-G02-C6-D12-10 valve that everyone seems to like to use wasn't available, so I had to go with a slightly more expensive valve from Surplus center. I spurces a rear port D03 valve from ebay, but I probably wouldn't recommend doing this. It did provide areal clean installation, but you will see it was a slight challenge as we go through the build.
Surplus Center:
QTY 1 1/2" x 24" JIC 8F Swivel x JIC 8F Swivel SAE 100R16 Hydraulic Hose Assembly 4000 PSI Item Number: 940-2224 $13.95
QTY 2 3/8" x 96" JIC 6F Swivel x JIC 6F Swivel SAE 100R16 Hydraulic Hose Assembly 5000 PSI Item Number: 930-2296 $45.90
QTY 2 JIC 6M x 3/8 NPTF Bulkhead Connector Item Number: 9-2705-6-6 $5.20
QTY 2 JIC 6 Bulkhead Lock Nut Item Number: 9-306-N-6 $0.90
QTY 2 3/8 NPT Hex Nipple Item Number: 9-5404-6-6 $2.70
QTY 2 JIC 6M x 3/8 NPTM Connector Item Number: 9-2404-6-6 $2.40
QTY 2 JIC 8M x 3/8 NPTM Connector Item Number: 9-2404-8-6 $3.20
QTY 2 3/8 in Two Wire Dual Hydraulic Hose Clamp Item Number: 9-A2-18-D $6.90
QTY 2 3/8" NPT Hollow Head Plug Item Number: 9-5406-HP-6 $1.10
QTY 2 JIC 6 Cap Item Number: 9-304-C-6 $1.40
QTY 2 JIC 8 Cap Item Number: 9-304-C-8 $1.80
QTY 2 JIC 6 Plug Item Number: 9-2408-6 $1.50
QTY 2 JIC 8 Plug Item Number: 9-2408-8 $2.10
QTY 1 12 Volt DC 10 GPM OC DA Solenoid Valve Item Number: 9-6136 $147.10
QTY 2 Hirschmann Connector Item Number: 11-2457 $9.60
Subtotal: $245.75
Shipping: $21.15
Total: $266.90
Ebay:
DAMAN AD03SPB6P 1093 SUBPLATE VALVE $23.50 shipped.
Amazon:
Southwire 14 auge primary wire, 100% copper. Blue, Red, Black, 100 ft. each $58.28 shipped.
1/2" double split shaft collars (4) $10.00
Weatherpack connectors $17.00 Shipped.
Operators switch:
GAMA electronics P12001-3-MOM $34.95 shipped.
Steel:
$6 from local steel dealer.
Relays, fasteners, butt splices, etc were from my own stock, but were not expensive.
Lets start the build:
Hydraulics first:
I have a backhoe, so my power beyond on the FEL valve goes to my backhoe instead of the manifold under the right floorboard. It also has enough length and flex to be useful as the output of the 3rd function, so it was reused. Oddly enough, the input to the FEL valve is 3/8" JIC, but the output is 1/2". So, I used a 24" 1/2" hose with JIC fittings between the FEL power Beyond port and the P port on the D03 plate. The backhoe hose was used on the T port. 8 ft 3/8" JIC hoses were used to go up the FEL booms to the front of the loader.
The 3rd function valve was located below the loader valve. I used 3" wide 1/4" plate and made a tee that fit the spread of the loader valve attachment bolts and mounted the 3rd function valve as high as I could under the loader valve.

The cloverleaf holes are made with a 1" hole saw, just overlapped. The two small mounting holes were tapped 1/4-20 once I had the valve in hand.

The D03 subplate is installed. You can see the NPT to JIC adapters. It is a very tight fit. Here we also find mistake #1. I was too clever. There is no room to get a wrench around the flats of the hose nuts. well, almost no room. In fact, my OEM backhoe hose had wrench flats wider than the #8 JIC hose I got from Surplus Center. I had to go down to my local hydraulic hose maker and see if his fittings were a tab smaller. They were, so I had the OEM hose end cut off and replaced. That nut was between the sise of the 24" surplus center hose and the OEM fitting, but worked out. Barely. As I was wrenching that connection on, the corners of the nut would just tic by the other fitting nuts. Not a recommended practice. I suggest one source a more common side ported D03 plate and use 90 degree fittings.

Here we have the assembled valve and bracket.

And installed. You can see the wiring to the two Hirshman connectors you need for this valve. I've never used them before, but they actually make wiring easy. Also, if I wish to reverse the function of the thumb switch, I can just swap those two connectors.

Here you can barely see how tight those hoses are. I hope I have no future issues with this.
Hose routing:
Mistake #2: Take time to layout your hose routing and determining how long your hoses need to be. I did my measuring with the FEL on the ground not taking into account the service loop needed to raise the bucket. Thus, in the end, my hoses area tad too short and I might have to get longer hoses. Since I don't have an attachment to use yet, I'll wait to figure out that. Also, in your hose routing, make your hoses route near your boom pivot joint. Thay makes for the least movement in the hoses and ensures you don't have to manage much hose movement.
Hose routing was simple. Out the back of the 3rd function as shown above. Then up the FEL mounting bracket to the upper pivot and out the boom to the bucket. On the LA1065 FEL, you have two welded tabs for the OEM 3rd function installation. The Hose brackets I bought from Surplus center fit with a little modification. Discard the existing bolt and the metal bottom plate. Keep the top metal plate and replace the bolt with a 8mm x 1.25 mm x 50 mm bolt. Works beautiful. (obviously, double check bolt size if you have a different tractor.)

You can also see my hoses are a bit too short. The next length up would have been 2 feet longer, so I'll just wait and see what I need later. Also note I have not attached my bulkhead fittings and made a bracket for them yet for the same reason.


