HOW to replace the &*^%$# thermister??? on my 4400HST -- HELP!!!

   / HOW to replace the &*^%$# thermister??? on my 4400HST -- HELP!!! #1  

Mike_S

Silver Member
Joined
Feb 8, 2001
Messages
155
Location
South of Kansas City
Tractor
JD4400HST
Thanks to numerous postings here on TractorByNet, I found the little bugger that was likely causing my tractor to fail to start, and once I clipped the zip tie that was holding it and the wire bundle around it, was able to pull it out since it had 5 inch pigtails attached to it by insulated wires, a factory crimp and heatshink tubing.

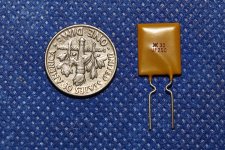
I bought a new thermistor, decided to add my own pigtails to it, used a heat sink, used a gold crimp connector, then carefully crimped and soldered the pigtail to the first electrode. While carefully working to do the second electrode sticking out of this fragile little "thing," the first electrode fell off.

I have worked with electronics off and on during my 69 years but this thermistor is so *&%^#@% fragile that I am humbled and desperate -- asking for suggestions on HOW to get some 5 inch pigtails attached in my shop where I have total control, and then they can be soldered with heatshrink placed on top of those two joints to the existing two wires behind the fuse panel, and the new thermistor, with extended wires can be looped over the top of the fuse panel so when the thermistor goes out again, I can "easily" replace it without taking off the frame and releasing the fuse panel and trying to work behind it.

What a royal PITA on something that obviously has caused MANY owners, starting problems -- thank you JD!!! (At least it was not as bad as JD leaving the millings from the transmission housing inside to be transported everywhere that the hydraulic fluid went, destroying the brakes, hydrostatic pump, hydraulic pump, etc. by the time it had 50 hours on the former previous 4400HST that I owned)

HELP -- any suggestions on how to wire the thermistor without breaking its leads? Suggestions greatly appreciated... THANKS
 
   / HOW to replace the &*^%$# thermister??? on my 4400HST -- HELP!!! #2  
Don't know for sure... But can't you jumper it with some alligator clips to get it in the shop? Bit of electrical tape and a prayer...

AKfish
 
   / HOW to replace the &*^%$# thermister??? on my 4400HST -- HELP!!!
  • Thread Starter
#3  
This simple thermistor is NOT rocket science but rather JD being cheap and as many of these as have gone out on owners preventing the fuel solenoid from properly functioning and the tractor starting, there should have been designed a more solid (read "indestructible") replacement. I see NO reason to take it in for them to charge a few hundred dollars to fix when, once the cursed little thing is found, it should be easy to replace it, but the leads on the thermistor are so tiny and they break off at the body of the thermistor so easily, that it is really a challenge to repair.
 

Attachments

  • _MG_6154.jpg
    _MG_6154.jpg
    818.3 KB · Views: 321
   / HOW to replace the &*^%$# thermister??? on my 4400HST -- HELP!!! #4  
Whoa... Looks like a part for my wife's sewing machine! Had no idea that it was something so small! Might be from the same design team that spec'd out the fuel lift pump for the 4000x20 series tractors.

AKfish
 
   / HOW to replace the &*^%$# thermister??? on my 4400HST -- HELP!!! #5  
I'm assuming that Deere has not/did not devise a suitable replacement or a work-around? Service manager review the past repair bulletins for you?

AKfish
 
   / HOW to replace the &*^%$# thermister??? on my 4400HST -- HELP!!! #6  
Mike,

Use hemostats, or if you don't have those, a pair of long needle nose pliers with a rubber band around the handle to keep them closed, as a heat sink - clip them to the lead as close to where it enters the body of the thermister as possible. Then solder outboard of the heat sink.

bumper
 
   / HOW to replace the &*^%$# thermister??? on my 4400HST -- HELP!!!
  • Thread Starter
#7  
Thanks for the idea of using Kelly hemostats as a heat sink in order to solder each electrode to the new pigtail - have several pairs and it has been decades since I used them as heatsinks. I still plan to add my own 6 inch pigtails and then more easily connect them to the original pigtails and loop the thermistor over the top of the fuse panel for easy future replacement should it be required.

Am thinking of embedding the heat shrink tubing over the electrodes (after heating and cooling it) in a blob of silicon caulk to add support to the rather delicate electrodes where they exit the thermistor. There is a TSB regarding the thermistor causing starting problems due to it failing the fuel solenoid, but I didn't see any special resolution other than replacement with the OEM part.
--------------
The service manager did not offer any suggestion other than the thermistor was a nasty job that would be very expensive if they had to do it.

Thanks to each of you that made suggestions!
 
   / HOW to replace the &*^%$# thermister??? on my 4400HST -- HELP!!! #8  
What if you get a small piece of perf board, silicone the body to the perf board with the leads sticking thru then get two pieces of 20-22ga wire and put it thru the board from the same side as the component and solder them to the thrmisistor. That way the wire will be the parts flexing when you attach it to the tractor and you'll be soldering lighter gauge wires to the thermisistor....Mike
 
   / HOW to replace the &*^%$# thermister??? on my 4400HST -- HELP!!! #9  
Mike_S;

Have you thought of using a small IC or DIP socket? You could solder the pigtails to the socket and then insert the thermistor into the socket. I would think that would allow you the ability to plug and play with the thermistor or disconnect the pigtails for servicing/replacing. Sort of like a traditional bladed fuse, etc. This idea kind of goes along with mrmikey's idea of a perf board solution. Good luck.

SimS
 
   / HOW to replace the &*^%$# thermister??? on my 4400HST -- HELP!!! #10  
SimS
Had a similar thought, to just wire in a socket that would take the thermister leads. Plug in and play.
Wrap with some black electrical tape and be done with any future failure. Make it handy to get to, as well.
 

Tractor & Equipment Auctions

LOT LOCATIONS (A51219)
2019 CATERPILLAR 440 BACKHOE (A51242)
2019 CATERPILLAR...
2015 BOBCAT E35 EXCAVATOR (A51242)
2015 BOBCAT E35...
1240 (A50490)
1240 (A50490)
2018 John Deere R4038 Self Propelled Sprayer, (A50657)
2018 John Deere...
John Deere 946 Center Pivot Rotary Mower-Conditioner (A52128)
John Deere 946...
 
Top