In need of welding tips (and thoughts on Forney rods)

   / In need of welding tips (and thoughts on Forney rods) #1  

nsmithnd

Silver Member
Joined
Feb 27, 2011
Messages
103
Location
Bismarck, ND
Tractor
Ford 1700
Have been attempting to "blob" metal together occasionally for a few years. Pretty much suck at it but LOVE it. :laughing: Just tried out my new auto-darkening helmet and FINALLY got a good view of the infamous "puddle" that has been all but eluding me these past few years. I even struggled with #10 shade in the old helmet (too old to be trying to have fun maybe?).

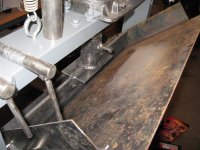
Now that I can actually kinda see what I'm doing, I thought I'd reach out for some pointers. Attached are some ugly welds from a little experiment this a.m. with Forney rod that I picked up at MACs Hardware (6011, 6013, and 7018 - just to try it once). DON'T LAUGH TOO HARD !! :laughing:

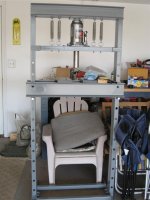
The wire-feed flux sample is from a Tractor Supply Farmhand 85 (flux core only), 1st pass didn't bite too well so tried to lay another pass next to it. Have NEVER had any luck with it until today when I could actually see the puddle. Was about to give up on it and try to get $75 or so for it, now maybe I'll hang onto it until I can get myself a MIG setup.

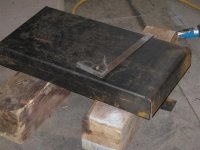
Ran the 6011, 6013, and 7018 on the old Forney AC welder that I paid $50 for. Just plugged into the 120 amp socket for consistency to see what they'd do (1/8" rod - 3/8" steel). Is 120 too hot for the 6011? And is 120 too cold for 6013 and 7018? The 7018 was a little hard for me to strike (no oven) but I eventually got it going. And the 6013 felt the easiest too me.

Is there any hope for me? I know everyone says practice-practice-practice. Or should I just move in next door to Shield Arc so I have a neighbor that can do my welding for me?? :)

So... Thoughts on the Forney rods? Are they good, bad, or just ok? The only other rod I've tried is the stuff Menards sells (US Forge I think). Any other brand I should give a try?

Thanks
-Neil
 

Attachments

  • welding 017 (Large).jpg
    welding 017 (Large).jpg
    74.5 KB · Views: 2,236
  • welding 014 (Large).jpg
    welding 014 (Large).jpg
    105.2 KB · Views: 1,096
   / In need of welding tips (and thoughts on Forney rods) #2  
Now the next task is to learn to read the puddle, then make it do what you want it to.:laughing:


They're all too cold, turn that machine up, way up!
 
   / In need of welding tips (and thoughts on Forney rods) #3  
Also the 7018 is really a DC rod, you might try some 7018AC which is designed to run on AC machines or maybe some 7014. Although I saw some of shield arc's 7018 beads on AC and it looked pretty good. Yes I agree an auto-darkening helmet did more for my welding than all other things combined.

James K0UA
 
   / In need of welding tips (and thoughts on Forney rods) #4  
Nothing wrong with an old AC welder like that. Forney and similarly Marquette introduced affordable welders to the small househould/farm back in the late 1940's and 1950's. Most households that had electricity back then only had 60 amps total service. Those Forney's and Marquettes usually drew less that 40 amps at WOT leaving 20 amps or so to run the refrigerator and a few lights in the house.

Forney still exists today as a marketing company. In other words they make very little of their own stuff anymore - they simply buy other peoples stuff and slap their sticker on it. While the used to make their own welding rods too - I believe they closed their last welding rod factory 2-3 years ago. Some new old stock true Forney rods are still out on the shelves, but Hobart seems to be who Forney buys their rods from now instead of making their own like they used too. Sort of a shame as I did like the true Forney made rods.

For an AC buzzbox like that
6011 (3/32 and 1/8) for deep root penetration and rusty metal
7014 (3/32 and 1/8) idiot rod that almost welds itself and burns really nice on AC for cap passes or medium penetration
6013 (1/16, 5/64, 3/2) thin sheet metal when a wire feeder is not available.
will all be your friends.
(note: 7018AC is useful too and better suited than plain old 7018 for an AC buzzbox but technically requires rod oven storage so I only use it very rarely).

As for preferred brand of rod, every brand of welding will burn slightly different on different welding machines. Since you have tapped settings on your welder, then once you find a brand and type rod that burns well on a setting that you actually have on the welder then that one is a keeper. Buy the small packs until you figure it out what you like.
 
Last edited:
   / In need of welding tips (and thoughts on Forney rods) #5  
I suggest learning first with 6011. Don't confuse "smooth" with "strong".

Run one rod for at least ten hours until you can turn out decent beads, then move to another.
Practice in welding terms means "burnandburnandburnandburn".

Once you master stick you have the foundation for "everything else". :thumbsup:

You'll figure it out, and it will be worth it!
 
   / In need of welding tips (and thoughts on Forney rods)
  • Thread Starter
#6  
Forgot to mention... It was 7018 AC rod...

6011 is all I had ever used up to this point (everything I've ever found on the subject has said 6011 is the "general purpose" rod).

I do like building things (a few projects attached). Goal is to one day learn to weld good enough to not have to worry about my projects falling apart. Needless to say, nothing I weld leaves the property. :laughing:

Independent 3-pt on the Bolens garden tractor has been the most fun to fabricate (so far). Would like to build a Cat 1 rear blade to put on the Ford 1700 diesel, strength of the welds will be important on that project.

-Neil
 

Attachments

  • cultivator 002 (Large).jpg
    cultivator 002 (Large).jpg
    144.3 KB · Views: 357
  • 3-pt-hitch 013 (Large).jpg
    3-pt-hitch 013 (Large).jpg
    109.8 KB · Views: 432
  • 3-pt-hitch 022 (Medium).jpg
    3-pt-hitch 022 (Medium).jpg
    93.3 KB · Views: 476
  • 3-pt-hitch 032 (Large).jpg
    3-pt-hitch 032 (Large).jpg
    79.3 KB · Views: 354
  • rear-blade-project 011 (Large).jpg
    rear-blade-project 011 (Large).jpg
    179.4 KB · Views: 433
   / In need of welding tips (and thoughts on Forney rods)
  • Thread Starter
#7  
Now the next task is to learn to read the puddle, then make it do what you want it to.:laughing:


They're all too cold, turn that machine up, way up!


One question regarding the puddle... How does one overcome the laws of gravity? For example, a "T" joint (assume the pieces have to remain horizontal and vertical). How do keep the puddle from drooping? Is it just a matter of laying the rod a little more horizontal rather than dividing the 90 degrees evenly? Or worse, OVERHEAD... how do you keep the puddle UP there (have never dared to try it)?? :laughing:

-Neil
 
   / In need of welding tips (and thoughts on Forney rods) #8  
Proper rod angle is your best weapon against gravity. Then arc length, to a point the longer the arc length the hotter the puddle. A hot puddle is a wet puddle, a wet puddle will droop or fall on the ground.

When doing vertical up hill welding I think most people make the mistake of using to much rod angle, trying to force the puddle up hill. What I do is build a shelf, and let the puddle ride on that shelf I'm continually building. I work the rod / wire at the back of the puddle.

When doing over head, I run just about the same heat as when welding flat. Proper rod angle, arc length, and travel speed are the keys to over head welding.

It's really quite simple when you think about it! You just have to combine these 4 things together. Proper heat, proper travel speed, proper rod / gun angle, proper arc length.
 
   / In need of welding tips (and thoughts on Forney rods)
  • Thread Starter
#9  
Thanks Shield Arc... I'll keep your comments in mind next time I get to play with the welder...
 
   / In need of welding tips (and thoughts on Forney rods)
  • Thread Starter
#10  
Well... Jumped in head-first...

Needed some fenders for a trailer project (old pop-up camper to utility trailer conversion). So decided to build a shop press and a couple attachments to make some bends (looked at Harbor Freight units and thought building one would be more fun). I wanted a little radius on the fender front and back so used some pipe I had laying around for one of the attachments. The lower half of the angle iron attachment drops into the radius attachment for a little extra support.

A little touch-up with the cut-off wheel and the fenders will be ready to weld. Hopefully I can control the heat on the thin stuff. Maybe I better practice on some scrap first. :laughing:

-Neil
 

Attachments

  • hydraulic-press 006 (Large).jpg
    hydraulic-press 006 (Large).jpg
    60.8 KB · Views: 370
  • hydraulic-press 012 (Large).jpg
    hydraulic-press 012 (Large).jpg
    82.9 KB · Views: 404
  • hydraulic-press 007 (Large).jpg
    hydraulic-press 007 (Large).jpg
    82.8 KB · Views: 406
  • hydraulic-press 011 (Large).jpg
    hydraulic-press 011 (Large).jpg
    114.9 KB · Views: 365
  • hydraulic-press 014 (Large).jpg
    hydraulic-press 014 (Large).jpg
    102.7 KB · Views: 364

Tractor & Equipment Auctions

2004 HYUNDAI 53FT CHASSIS (A45677)
2004 HYUNDAI 53FT...
2007 KENWORTH T8 SERIES DUMP TRUCK (A47001)
2007 KENWORTH T8...
2008 BELSHE INDUSTRIES 25 GOOSENECK (A47001)
2008 BELSHE...
AerWay AWGHP-90-1C6-DB Pull-Behind Aerator (A45336)
AerWay...
2013 ARISING INDUSTRIES, INC COMMAND CENTER (A47001)
2013 ARISING...
ALLISON TRANSMISSION (A47001)
ALLISON...
 
Top