California
Super Star Member
- Joined
- Jan 22, 2004
- Messages
- 14,759
- Location
- An hour north of San Francisco
- Tractor
- Yanmar YM240 Yanmar YM186D
First, I don't recommend this if you intend to re-use the injectors. I had new replacements on hand so botching the old ones wasn't a concern.
This tractor is a YM240, same as a YM2000, two cylinders. I paid $107 each for new Yanmar injectors from a local truck/farm injector house.
I thought I could put a little tension on the old injectors and pop them out. I cleaned a bolt that matched the fuel-return threads and threaded it in by hand to learn how deep it would go (8 1/4 turns). I think at this point the injector is contaminated and shouldn't be returned to service without professional overhaul, in case metal fragments got into it.
Then I threaded the holddown nuts flush to the top of the studs, put on a plate I had with a 1/4" hole, found a spacer (socket) that let the top bolt go in 6 turns, and pulled some tension on the center bolt. Hah. All I accomplished was to bend the plate.

Plan B. I used the tractor's holddown bracket to better support my top plate, and started from the bottom of the threads on the holddown studs. This still didn't apply enough force before I reached the point where I expected I might strip threads. I gave up and went to the front (#2) cylinder.
The front cylinder was easier. Threading the nuts upward to make tension then rapping on the injector with a brass drift while prying upward with a heel bar was enough to make it start moving. But even after it lifted a quarter inch as shown in the picture, it was still a heavy press fit clear up to the top of 1.5 inch lift I needed to get it out of its bore. I didn't dare damage the middle and upper part of the holddown stud threads (needed for reassembly) so I kept swapping spacers above the center bolt and moving the holddown nuts down before making each quarter inch lift.

Finally I applied the same technique on the more difficult rear injector. I used different nuts because I feared stripping threads and didn't want to botch the original holddown nuts. Also because of no clearance to swing the rear wrench when using its open end, I put a 12-point box end on each nut before installing my 'injector puller'.

Pulling all the tension I could get on both wrenches I finally heard it pop loose. The snap was so severe I thought I had snapped a holddown stud, but of course they are in compression, not tension.
This injector was so stiff all the way out that rocking the injector by alternately turning the front and back nut was the only way I could make it move.
When I got it out I saw I had sucked the threads most of the way out of one of the temporary nuts I had used. I'm glad I didn't use the tractors original holddown nuts for this. The studs must be better steel; their threads were unhurt.
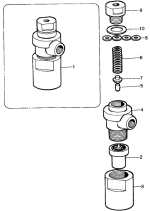
The bores in the head were jammed with burned carbon so the new injectors wouldn't go in. This took a long time to chip out. I dropped a big washer down the bore to protect the recess down there where the 'insulator' (gasket) fits. After cleaning the bores, the injectors are only about .010" smaller than their bores that they slide into.
The grooves for the 'insulators' (teflon sealing gaskets at the bottom of the injectors) were clean. The insulators had lifted out intact with the injectors. I can see where cleaning the groove down there in the head that centers them would be difficult if they had disintegrated.
The manual emphasizes fit the fuel lines to the new injectors before tightening the holddowns so the fuel fittings align properly. 14 ft lbs torque on the holddown nuts.
The results were as hoped, the tractor starts easily again. As I described in another thread, I think I carboned up the original injectors running 90% biodiesel (B-90) for a year and the spray pattern had become a squirt.
The manual says to test injectors by viewing the spray pattern, spraying against a sheet of cardboard and with adequate protection to avoid getting diesel injected into your skin. (I used a heavy welding glove and a big piece of cardboard to get my hand far from the spray). So far as I could see all four injectors, two old and two new, all sprayed the same pattern - vapor with a center spurt. It seems that professional testing would be needed to distinguish a bad spray pattern.
Ok, now it's good for another 30 years.
This tractor is a YM240, same as a YM2000, two cylinders. I paid $107 each for new Yanmar injectors from a local truck/farm injector house.
I thought I could put a little tension on the old injectors and pop them out. I cleaned a bolt that matched the fuel-return threads and threaded it in by hand to learn how deep it would go (8 1/4 turns). I think at this point the injector is contaminated and shouldn't be returned to service without professional overhaul, in case metal fragments got into it.
Then I threaded the holddown nuts flush to the top of the studs, put on a plate I had with a 1/4" hole, found a spacer (socket) that let the top bolt go in 6 turns, and pulled some tension on the center bolt. Hah. All I accomplished was to bend the plate.
Plan B. I used the tractor's holddown bracket to better support my top plate, and started from the bottom of the threads on the holddown studs. This still didn't apply enough force before I reached the point where I expected I might strip threads. I gave up and went to the front (#2) cylinder.
The front cylinder was easier. Threading the nuts upward to make tension then rapping on the injector with a brass drift while prying upward with a heel bar was enough to make it start moving. But even after it lifted a quarter inch as shown in the picture, it was still a heavy press fit clear up to the top of 1.5 inch lift I needed to get it out of its bore. I didn't dare damage the middle and upper part of the holddown stud threads (needed for reassembly) so I kept swapping spacers above the center bolt and moving the holddown nuts down before making each quarter inch lift.
Finally I applied the same technique on the more difficult rear injector. I used different nuts because I feared stripping threads and didn't want to botch the original holddown nuts. Also because of no clearance to swing the rear wrench when using its open end, I put a 12-point box end on each nut before installing my 'injector puller'.
Pulling all the tension I could get on both wrenches I finally heard it pop loose. The snap was so severe I thought I had snapped a holddown stud, but of course they are in compression, not tension.
This injector was so stiff all the way out that rocking the injector by alternately turning the front and back nut was the only way I could make it move.
When I got it out I saw I had sucked the threads most of the way out of one of the temporary nuts I had used. I'm glad I didn't use the tractors original holddown nuts for this. The studs must be better steel; their threads were unhurt.
The bores in the head were jammed with burned carbon so the new injectors wouldn't go in. This took a long time to chip out. I dropped a big washer down the bore to protect the recess down there where the 'insulator' (gasket) fits. After cleaning the bores, the injectors are only about .010" smaller than their bores that they slide into.
The grooves for the 'insulators' (teflon sealing gaskets at the bottom of the injectors) were clean. The insulators had lifted out intact with the injectors. I can see where cleaning the groove down there in the head that centers them would be difficult if they had disintegrated.
The manual emphasizes fit the fuel lines to the new injectors before tightening the holddowns so the fuel fittings align properly. 14 ft lbs torque on the holddown nuts.
The results were as hoped, the tractor starts easily again. As I described in another thread, I think I carboned up the original injectors running 90% biodiesel (B-90) for a year and the spray pattern had become a squirt.
The manual says to test injectors by viewing the spray pattern, spraying against a sheet of cardboard and with adequate protection to avoid getting diesel injected into your skin. (I used a heavy welding glove and a big piece of cardboard to get my hand far from the spray). So far as I could see all four injectors, two old and two new, all sprayed the same pattern - vapor with a center spurt. It seems that professional testing would be needed to distinguish a bad spray pattern.
Ok, now it's good for another 30 years.