Installing a 3rd SCV on a 4310

   / Installing a 3rd SCV on a 4310 #1  

Tractors4u

Elite Member
Joined
Mar 10, 2002
Messages
2,540
Location
Athens Alabama
Tractor
Deere 4310, Kubota L355, John Deere SST18 Spin Steer, 2006 Polaris Ranger
OK you may have read where I asked for help with the 3 pt lever handle. We will get to that a little later. I thought I would pass own the knowledge I gain from this little endeavor.

Every part you need to do the install is in box.

You will need allen wrenches, patience, metric sockets, floor jack, PhD in mechanical engineering, hammer, snap ring pliers, patience, Dremel tool or equivalent, and patience.

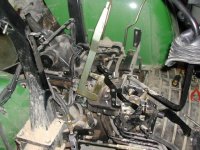
I started by pulling the right rear wheel and fender off as directed by the instructions. It also said to remove the seat assembly and seat panel. I figured I could get it in with out doing that and I was WRONG. I ended up removing a couple of things that weren't in the instructions.

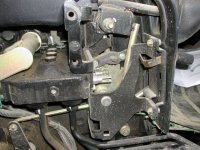
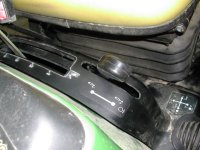
As for the black grip on the 3 pt lever, I bought a new one at the dealer today and cut the old one off. After re-reading the instructions I saw that it said "remove rockshaft control lever" instead of the handle. They were referring to the other handle for the range shifter. However I did try to remove the entire lever last night but I rounded the bolt head because I could get the socket to seat right in those cramped quarters.

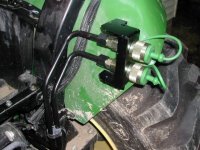
Attached is a picture of everything removed.
 

Attachments

  • 473826-Taking apart.jpg
    473826-Taking apart.jpg
    81.2 KB · Views: 413
   / Installing a 3rd SCV on a 4310
  • Thread Starter
#2  
As someone has mentioned before, the 4310 already has the SCV, you are simply installing the lines, lever, and quick disconnects to it. Here is the close up of it.
 

Attachments

  • 473833-Close up of diverter.jpg
    473833-Close up of diverter.jpg
    78.8 KB · Views: 410
   / Installing a 3rd SCV on a 4310
  • Thread Starter
#3  
In my list of tools for the job I called out a Dremel. Here is why. A slot has to be cut in the seat panel to accomodate the control lever for the SCV. There is an outline of where you should cut impressed on the bottom of the panel. I used a Dremel with a cut off wheel to make the slot and then changed bits to make the round ends and finished up the sides with a file. Here is a picture from the bottom.
 

Attachments

  • 473839-Slot from bottom.jpg
    473839-Slot from bottom.jpg
    65.5 KB · Views: 338
   / Installing a 3rd SCV on a 4310
  • Thread Starter
#4  
At this point I have taken everything off that the instructions told me to take off. The first thing you do is install the adaptors to connect you hydraulic lines to the Dual SCV valve. Simple and straight forward. Now it is time to install the lever. It doesn't just slide in! I had to push, pull, hammer, and tug to get it in.

Next is where the yahoo that wrote the instruction manual goofed and no doubt has caused a lot of swearing across America. It says to re-install the fender that was removed earlier. If you can but the fender back and then install the hydraulic lines, then you my friend will be the envy of David Copperfield. The magician, not the guy Dickens wrote about. There is absolutely no way to get those lines in with the fender in place. And no I didn't find out the hard way. In fact the book states: "Picture Note: Parts removed for unobstructed view of hydraulic line routing."

I discovered something else that needs to be removed. Take a look at the attached picture.

The two new lines are placed on the outside of the two existing hydraulic lines that come out out of Dual SCV. The line to the rear of the tractor has to be disconnected because the first line you install has to go behind it.
 

Attachments

  • 473855-Close up of diverter.jpg
    473855-Close up of diverter.jpg
    78.8 KB · Views: 371
   / Installing a 3rd SCV on a 4310
  • Thread Starter
#5  
The lines will go in, but there are times that you will think that the guy who came up with those two bent torture tools was a sick sadistic John Deere employee. You have to really wiggle and push them and try different approaches to get them around the ROPS, existing lines, and wiring harnesses. But in the end it works.
 

Attachments

  • 473857-Finished.jpg
    473857-Finished.jpg
    73.3 KB · Views: 353
   / Installing a 3rd SCV on a 4310
  • Thread Starter
#6  
Last pic, the control lever.
 

Attachments

  • 473859-Control lever.jpg
    473859-Control lever.jpg
    58.7 KB · Views: 349
   / Installing a 3rd SCV on a 4310 #7  
Thanks for the info and pics. How much was the kit? Now that you have done this would you have let the dealer do the work? Did you get a quote on having the dealer do the work? I ask because I should have let the dealer install the 3rd scv prior to delivery but it was an after thought.
 
   / Installing a 3rd SCV on a 4310
  • Thread Starter
#8  
A few months ago I asked the dealer how much it would cost for a 3rd SCV and he told me $500. I thought that was sky high and decided to wait. Last week I came into some money and decided to put it in to my tractor and I looked up the price for the kit on Johndeere.com and it was listed at $204. Now looking back I think the dealer quoted me the installed price. I would do it again to save $300. It isn't technically challenging, it is just time consuming and doesn't just "bolt on", you have to work at it.
 
   / Installing a 3rd SCV on a 4310 #9  
Brent,
Thanks for the photo essay. Very interesting.
Cliff
 

Tractor & Equipment Auctions

2021 John Deere 622F Flex Header  22 Ft  Trailer Included  Excellent Condition (A46878)
2021 John Deere...
2014 UTILITY 53X102 DRY VAN TRAILER (A43005)
2014 UTILITY...
We do NOT accept credit cards as payment. (A46443)
We do NOT accept...
2014 Peterbilt 384 T/A Wet Kit Day Cab Truck Tractor (A44571)
2014 Peterbilt 384...
2025 Wolverine TCR-12-48H Trencher Attachment (A47484)
2025 Wolverine...
Kivel Mini Pallet Fork Attachment (A47809)
Kivel Mini Pallet...
 
Top