jaredyates
Member
I thought I'd post some pictures of how I installed the third function hydraulics on the 1526. I'm not making any promises that this is the best way to do it, just one way that seems to work.
The easiest part was bolting on the valve assembly. Nothing much to that.
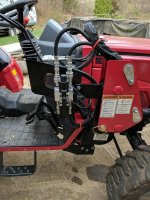

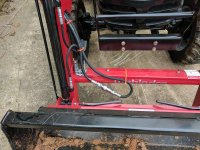
I found about the only way to get the hydraulic lines down the loader arm was to remove the quick disconnect fittings, especially the female. With those off, fishing the lines was pretty easy. One detail worth noting is that the quick disconnects are different sizes on different ends of the hoses. Someone with a sharp eye would probably spot this right away, but I ended up having to do the fishing twice, not realizing it at first.
Making the other hydraulic hookups was really easy thanks to the information about the valves in the loader manual. There is as much detail in the loader manual as there is in the tractor manual, maybe more. If only Mitsubishi put as much into manual development as the company that made the loader, that would be nice. The tractor manual would be as thick as a big city phone book instead of a rural phone book.
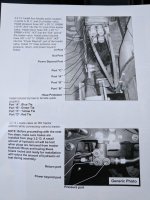
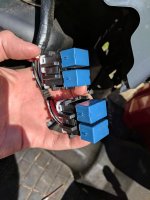
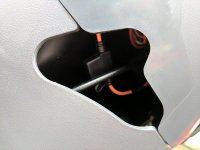
The electrical connections were a little more involved, in part because I had to do a little detective work. The folks at WR Long provide all of their directions on a single piece of paper printed on both sides, and not much detail at all about the electrics. The included fuse holder takes the same size fuse as the rest of the tractor, which is nice. I wanted to keep the fuse accessible without needing tools, but if I were to try and put the fuse up by the main block, there would be a lot of extra wiring. I found that there was a little rubber hatch just on the left side of the plastic parts under the steering wheel. I'm not sure what that is for, but it seemed like a nice fuse hatch, so I targeted that area for the fuse holder. I removed the red metal strip that goes between the hood and the gray plastic dash pieces, and that allowed me to remove the fasteners that hold on the gray pieces. The bottom one comes off easy, so I got it out of the way entirely. The top panel doesn't need to come off completely to get access to the block of relays. I'm not positive about the function of each relay, but I have some guesses. I ruled out the flashing of the blinkers, since that comes from another unit further down the steering column. One of the blue relays is for connecting the battery wires (generally red) to the wires that are only hot when the key is in the run position (generally white with a blue stripe). This one is easy to find because the wires are nice and fat, with a red one coming in and a white/blue one coming out. I didn't see any point in keeping the valve energized when the key is out of the tractor, so rather than tap the red wire, I tapped the white and blue one. One end of the fuse wire goes there, and the other end goes to the switch control. There are many ways to make the connections, but I chose to solder the wires and cover the joints with a double-wall heat shrink, making a waterproof joint. Another good choice would be heat-shrink crimp-on connectors, which are available at the auto parts stores where I live. The main priority was making a good solid connection that would not give any trouble for years to come.

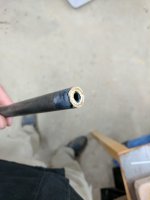
As it is shipped, I didn't care for the loader valve handle with the switch in it. The whole thing seems a little cheap, but the mounting is especially troubling. The loader lever is just a bent piece of steel with threads on the end, and the rod is covered with something that looks like a fuel hose. The new plastic handle is supposed to clamp down on that hose with little set screws, and the whole thing seemed rickety. There is a steel sleeve that the set screws are threaded into, which has a 3/4" ID. I grabbed a piece of scrap 3/4" tubing and brazed on a nut with the same thread as the old knob. I cut off the last 2" or so of that tubing and threaded it onto the bent rod, and that gave me something much more substantial to match up with the plastic WR Long handle. The little stub of tubing is secured with a jam nut tightened against the brazed nut. I predict that this whole plastic assembly is unlikely to last as long as my first set of tires, though I'd love to be proven wrong.
There isn't mention in the instructions of how to configure the direction of the switch for the function of the hydraulics. For example, what if you want the front of the switch to close a grapple, and the back of the switch to open it? It looks like you could take apart the plastic control and swap the two black wires on the switch pretty easily. On mine the switch uses 1/4" spade terminals.
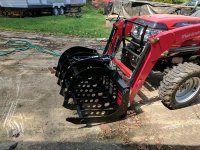
So far the Grapple has been useful for taking out small trees. I can drive up to a tree with the grapple rolled fully forward and fully open, then steer hard to one side to bend the trunk over, keeping the lowest part of the trunk in the middle of the grapple. I close the thumb and lift, and often the whole thing comes right up out of the ground.
The easiest part was bolting on the valve assembly. Nothing much to that.


I found about the only way to get the hydraulic lines down the loader arm was to remove the quick disconnect fittings, especially the female. With those off, fishing the lines was pretty easy. One detail worth noting is that the quick disconnects are different sizes on different ends of the hoses. Someone with a sharp eye would probably spot this right away, but I ended up having to do the fishing twice, not realizing it at first.
Making the other hydraulic hookups was really easy thanks to the information about the valves in the loader manual. There is as much detail in the loader manual as there is in the tractor manual, maybe more. If only Mitsubishi put as much into manual development as the company that made the loader, that would be nice. The tractor manual would be as thick as a big city phone book instead of a rural phone book.

The electrical connections were a little more involved, in part because I had to do a little detective work. The folks at WR Long provide all of their directions on a single piece of paper printed on both sides, and not much detail at all about the electrics. The included fuse holder takes the same size fuse as the rest of the tractor, which is nice. I wanted to keep the fuse accessible without needing tools, but if I were to try and put the fuse up by the main block, there would be a lot of extra wiring. I found that there was a little rubber hatch just on the left side of the plastic parts under the steering wheel. I'm not sure what that is for, but it seemed like a nice fuse hatch, so I targeted that area for the fuse holder. I removed the red metal strip that goes between the hood and the gray plastic dash pieces, and that allowed me to remove the fasteners that hold on the gray pieces. The bottom one comes off easy, so I got it out of the way entirely. The top panel doesn't need to come off completely to get access to the block of relays. I'm not positive about the function of each relay, but I have some guesses. I ruled out the flashing of the blinkers, since that comes from another unit further down the steering column. One of the blue relays is for connecting the battery wires (generally red) to the wires that are only hot when the key is in the run position (generally white with a blue stripe). This one is easy to find because the wires are nice and fat, with a red one coming in and a white/blue one coming out. I didn't see any point in keeping the valve energized when the key is out of the tractor, so rather than tap the red wire, I tapped the white and blue one. One end of the fuse wire goes there, and the other end goes to the switch control. There are many ways to make the connections, but I chose to solder the wires and cover the joints with a double-wall heat shrink, making a waterproof joint. Another good choice would be heat-shrink crimp-on connectors, which are available at the auto parts stores where I live. The main priority was making a good solid connection that would not give any trouble for years to come.


As it is shipped, I didn't care for the loader valve handle with the switch in it. The whole thing seems a little cheap, but the mounting is especially troubling. The loader lever is just a bent piece of steel with threads on the end, and the rod is covered with something that looks like a fuel hose. The new plastic handle is supposed to clamp down on that hose with little set screws, and the whole thing seemed rickety. There is a steel sleeve that the set screws are threaded into, which has a 3/4" ID. I grabbed a piece of scrap 3/4" tubing and brazed on a nut with the same thread as the old knob. I cut off the last 2" or so of that tubing and threaded it onto the bent rod, and that gave me something much more substantial to match up with the plastic WR Long handle. The little stub of tubing is secured with a jam nut tightened against the brazed nut. I predict that this whole plastic assembly is unlikely to last as long as my first set of tires, though I'd love to be proven wrong.

There isn't mention in the instructions of how to configure the direction of the switch for the function of the hydraulics. For example, what if you want the front of the switch to close a grapple, and the back of the switch to open it? It looks like you could take apart the plastic control and swap the two black wires on the switch pretty easily. On mine the switch uses 1/4" spade terminals.
So far the Grapple has been useful for taking out small trees. I can drive up to a tree with the grapple rolled fully forward and fully open, then steer hard to one side to bend the trunk over, keeping the lowest part of the trunk in the middle of the grapple. I close the thumb and lift, and often the whole thing comes right up out of the ground.

