Making Gravel Driveways Last

   / Making Gravel Driveways Last #1  

JCS_in_KY

Silver Member
Joined
Nov 30, 2005
Messages
170
Location
Kentucky
Tractor
Massey Ferguson 1533
In this area when people do a gravel drive all they do is call up the local quarry and they send out tri-axle loads of rock and do a pretty good job of spreading it for you. The driveways look great when they are done but they don't last. Most people don't do any preparing of the soil before putting the gravel down or build up any kind of base of different types of gravel. I'd like to make my driveways last as long as possible, right now they are all in bad shape and in need of repair. What can I do to build up a good base to get the drives to last for a while? Most of the drives run at a slight angle so I don't think I need to crown them.
John
 
   / Making Gravel Driveways Last #2  
For driveway preparation:

Establish good drainage
removal of organic top soil
Placement and compaction of inorganic type soil to above the surrounding ground level.
Placement and compaction of crushed well graded gravel
Frequent maintenance to ensure no washboard or holes develop.

Egon /forums/images/graemlins/grin.gif
 
   / Making Gravel Driveways Last #3  
Crowning your gravel driveway will cause the water to run off the drive to the side rather than causing wash outs due to the water running the length of the drive. Crowning stops the water from gaining momentum and volume. My drive is not crowned and I have to re-work the gravel every year to fill in the valleys caused by running water from rain and snow melt. I am not sure on what prep work was done prior to adding the gravel but there is a standard mix that is used in Michigan that is made from sand, gravel and clay but I do not know the ratios.
Good luck.
Farwell
 
   / Making Gravel Driveways Last #4  
What egon said.

Besides that, larger crushed stone used as a base should prevent sinking a while longer.

Pack the larger stone in real good. A tractor with filled R4 tires and a heavy implement does this surprisingly well and quickly. Top the larger stone with the finish gravel size of your choice, or even 2 grades if money is no object.

When removing top soil, replace it with clay. Otherwise your roadbed will hold water. But I'm sure you knew that!
 
   / Making Gravel Driveways Last #5  
I agree with the other comments that a good driveway starts with a good base. After that, the best thing you can do is put a geotextile fabric prior to laying any rock. It costs a little initially but will pay for itself very quickly.

Steve
 
   / Making Gravel Driveways Last #6  
What Egon said.

And the fist thing he said is the most important. Drainage. Get the water off the rock and away from it as fast and as far as you can.

Water is your enemy. It causes all your damage and wear.

Too many roadways don't have enough height to them to get really move the water away from the rock. I like a really big crown and wide, deep channals along the sides of my roads.

Before the rock goes down, I like to build it up with lots and lots of dirt first. The dirt is cheaper than the rock, and it builds the foundation for a long lasting road.

If you already have a low drive, cut down the drainage channels to get the water away from the rock.

Eddie
 
   / Making Gravel Driveways Last #7  
Before I decided on a spec. for the new road I've installed on my property, I did two things. The first was get in touch with a couple of local contractors and ask them to recommend a spec.for my area. The second was to review the benefits of using a geotextile separating membrane.

Soil conditions here are clay and each of the contractors came up with a similar spec. I generally followed their advice but added the geotextile membrane after talking to a couple of the manufacturers of these products. I used two of the local contractors to run in the material I needed but did my own excavation, spreading and consolidation. Here's the final road build up.

1 Excavate and remove all organic matter and topsoil (in my case 12 - 16");
2 Lay geotextile separating membrane;
3 Spread and consolidate approx 8" of overs (rocks from 3 - 6" in size);
4 Spread and consolidate approx 3" of pit run ( mainly gravel fines);
5 Top with 2" of crushed rock.

The separating membrane prevents the clay from pumping up into the overs, which it would over time, causing ruts and depressions. Depending on your soil, the separating membrane might not be necessary.

Each of the contractors recommended I start with the overs to provide a good, free draining base. The pit run topping binds the overs and prevents any movement in the base. I might have been able to use smaller rocks for the base than the overs but the cost of smaller material would have been much the same and I decided to opt for material that would be as free draining as possible. Maybe with overs the size I used I could have got away without the geotextile membrane but I figured it wasn't worth the risk. The nuisance and cost of continually trying to fix a badly spec'd road would cost a lot more than the geotextile fabric did.

I've only laid one load of the crushed rock topping so far - I wanted to try a sample before I decided if this is what I wanted to use as the wearing coat. It's worked well and I'll top the rest of the road once I finish the construction works for the house and barn.

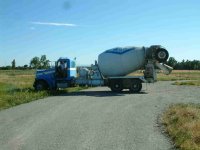
We're already run 40 ton, ten wheelers up and down the road and so far we've suffered no ruts or depressions despite wet weather so I'm pretty confident the road will perform well long term.

Maybe what I have is overdesigned but the material costs haven't been that much. Excluding diesel and tractor time, I've spent around $3,000 CAN so far for a 12 feet wide road 220 feet long. With any construction in the ground, it's necessary to get it right first time because if you don't, fixes tend to be disruptive and expensive. I've another 150 feet or so to construct but already have the geotextile fabric for it so reckon I have to spend about another $1k CAN on materials before we're through. This excludes the crushed rock topping.
 
   / Making Gravel Driveways Last #8  
I had my gravel driveway installed late last May when the temp was in the 90s here in the North Valley. It's 20'W x 240'L and 6" thick.

The contractor excavated about 3-4 inches with a box blade on a big JD tractor. The gravel is standard road base that the county uses. Has rocks up to about 1/2-3/4 inches and a lot of fines. It hardens with rain and sun exposure.

The roadbed was built up in 2" layers. A water truck was on hand to wet the layer and then a vibrating "steam roller" was used to compact. To satisfy the county road dept, I had to asphalt pave the last 30 ft where the driveway meets the road.

I've had a dozen or more readi-mix trucks and lots of smaller vehicles run over the driveway in the last 5 months and it looks fine. No major rutting.
 

Attachments

  • 792042-DSCF0034-cement truck on driveway.JPG
    792042-DSCF0034-cement truck on driveway.JPG
    73.4 KB · Views: 1,225
   / Making Gravel Driveways Last #9  
I think I agree with Eddie to build a crowned road with good roadside drainage out of the material on site (Or even imported granular material) and then build the road on top of that. I see a potential problem with digging out a foot of material and then filling with a foot of good crushed rock to only have a road section that has already sunken. Sounds a lot like a bath tub. Unless you have free draining ditches that are really deep. Your goal must be to drain the subgrade and the surface.

Water is the enemy of roads. By the timing of this thread I would imagine that the poster's road is a mud hole. At that point it is tough but not impossible to make adequate to get you through the winter. Lots of clean rock.

I am at a similar point of road building. My pioneer road is clay with a good crown. The loggers made a mess of it after the fall rains but I smeared the frosting into a crowned road and it healed enough to spread a few inches of 1.5" clean crushed rock on top last weekend. Once that rock compacts, drys, and sinks in a bit it should firm up nicely and then the typical top course in these parts is 1-1/4" minus crushed rock. It smooths out and compacts real well.

You must be rid of water. From the top and from the bottom.
 
   / Making Gravel Driveways Last
  • Thread Starter
#10  
My driveways are pretty dry now, and the area where I'm putting a new drive in is starting to dry up. I've got a bad cold now but hopefully will be better in a day or two and then I can get started. I think I'll start on my new drive first as it seems like it will be easier to do it right the first time. After I get some experience I'll go back and repair the existing driveways. The rock they use for driveways here is a mix of 3/8 - 3/4 size and like I said all they do is just drop the load on whatever surface you happen to have, usually only 2 - 3 inches thick. It looks good but doesn't last long. What size would you recommend for the larger rock to build up my base?
John
 

Tractor & Equipment Auctions

Swict 66" Bucket (A44502)
Swict 66" Bucket...
2013 KENWORTH T800 MID-ROOF SLEEPER (A45333)
2013 KENWORTH T800...
Case IH 180 Magnum (A44501)
Case IH 180 Magnum...
Club Car Electric Golf Cart (A44502)
Club Car Electric...
KOMATSU PC360LC-11 (A45046)
KOMATSU PC360LC-11...
2013 KENWORTH T800 MID-ROOF SLEEPER (A45333)
2013 KENWORTH T800...
 
Top