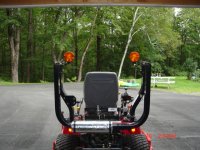
Mickey Mouse ROPs lights-- finally moved!

   / Mickey Mouse ROPs lights-- finally moved! #1  

irvingj

Elite Member
Joined
Feb 3, 2008
Messages
3,483
Location
Etna, NH
Tractor
2007 MF GC2310 TLB
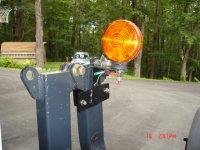
A common problem, I suspect, and I've been dealing with it for several years. I banged those ROPS lights on trees, eaves, rain gutters, you name it. Finally replaced the original M-F lights with Kubota lights, as they were a bit smaller and less $$.

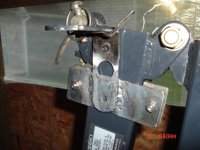
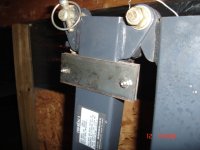
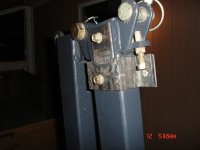
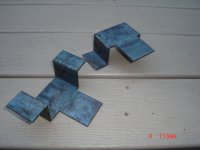
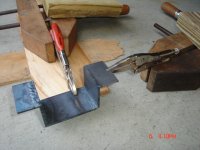
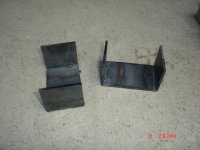
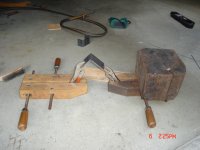
At any rate, I finally got them moved to the INSIDE of the ROPS this summer, getting in some needed practice in welding (oxy-acetylene). I made brackets out of 2" wide by 1/8" mild steel, cutting the pieces separately and them butt-welding them together (no filler!) to make a bracket to use the existing holes. I did drill one new hole in the ROPS to carry the wires out to the inside of the ROPS frame.

Throw on a little black paint, and stand back and smile.....

Works like a champ, and I haven't nailed them once since the mod!:cool2:

DSC04294.JPGDSC04319.JPGDSC04321.JPGDSC04304.JPGDSC04302.JPGDSC04300.JPGDSC04298.JPGDSC04297.JPGDSC04295.JPGDSC04330.JPG
 
   / Mickey Mouse ROPs lights-- finally moved! #2  
Good job, looks good.
But I'm curious. When the rops are in the 'up' position, won't the lights be upside down, potentially allowing water to enter the light?
 
   / Mickey Mouse ROPs lights-- finally moved! #3  
My first experience welding was a oxy course at the local college. Those look like a lot nicer welds than I was ever able to get using oxy. I keep thinking about getting set up with an oxy kit, but mostly for cutting and heating, welding is a lot easier with the mig welder I bought and a lot less forgiving for a weekend hack like me!
 
   / Mickey Mouse ROPs lights-- finally moved!
  • Thread Starter
#4  
I know it doesn't look like it, Don, but the lights are actually mounted to the stationary (lower) section, which has the weird curve in it. Lights are just mounted to the inside of where they used to be, just below the "joint" in the ROPS. Perhaps the pic below will show that more clearly....

Thanks for the compliment on the welding, kiotiken; I thought they came out pretty good, too, for a rank amateur like myself. :laughing:

I have a flux-core wire feed welder, but I'm just not as comfortable with that, so it was oxy-acetylene with a fairly small tip. I did, however, use filler when I mounted the original right-angle mounting piece to the exterior of my new clamp; the original piece was quite a bit thicker than my clamp pieces, and I couldn't seem to get the heat right on both pieces at once.

Just wish I did this years ago!

DSC04328.JPG
 
   / Mickey Mouse ROPs lights-- finally moved! #5  
I know it doesn't look like it, Don, but the lights are actually mounted to the stationary (lower) section, which has the weird curve in it. Lights are just mounted to the inside of where they used to be, just below the "joint" in the ROPS. Perhaps the pic below will show that more clearly....

Thanks for the compliment on the welding, kiotiken; I thought they came out pretty good, too, for a rank amateur like myself. :laughing:

I have a flux-core wire feed welder, but I'm just not as comfortable with that, so it was oxy-acetylene with a fairly small tip. I did, however, use filler when I mounted the original right-angle mounting piece to the exterior of my new clamp; the original piece was quite a bit thicker than my clamp pieces, and I couldn't seem to get the heat right on both pieces at once.

Just wish I did this years ago!

View attachment 278950
Wow...............I hesitated for over 30 minutes before posting, because I wasn't really sure on the mounting. But your newest pics clearly show the difference.

They say pictures are worth a thousand words(and imply that they show it all)................But this thread proves that .............pictures really don't show everything.
 
   / Mickey Mouse ROPs lights-- finally moved! #6  
It personally makes me nervous to do any changes to a ROPS. I am NOT being safety police because in the end I don't think drilling some holes will make a huge difference... anyway, with that clarification I wanted to tell you how i secured my electric wires on my rops which was that I used black calk and tied the wires down with it. So far i have about 5 years on the wires and the caulk is now showing its wear, which maybe in another 5 years i will need to replace. I run in heavy trees.. lots of branches rubbing the ROPS...

Anyway, just an alternate to drilling.
 
   / Mickey Mouse ROPs lights-- finally moved!
  • Thread Starter
#7  
woodlandfarms, I really hated to drill into the steel there, but the whole project was beginning to take some time and I just wanted to be done with it.... and I was afraid if I left the wires coming out the original (out) side, I'd probably just clean 'em off at some point! Still don't feel great about it, though.
 

Tractor & Equipment Auctions

TEST YOUR BID BUTTON! (A51244)
TEST YOUR BID...
2013 Dodge Journey SXT SUV (A50324)
2013 Dodge Journey...
2023 CATERPILLAR 307.5 EXCAVATOR (A51242)
2023 CATERPILLAR...
Unverferth Model 1225 Double Rolling basket (A52349)
Unverferth Model...
UNUSED AGT MX12RX EXCAVATOR (A51243)
UNUSED AGT MX12RX...
2021 CATERPILLAR 279D3 SKID STEER (A51242)
2021 CATERPILLAR...
 
Top