kavisiegel
New member
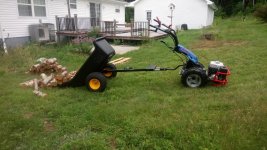
Only took a year to get it finished but I'm pretty happy with what I ended up with.
I started by trying to figure out what trailer I should buy. I wanted a dumping trailer that had its axle offset towards the back to put more weight on the BCS. Most of the trailers I saw were centered, which is terrible for traction on the BCS - especially for pulling firewood uphill. I also could not allow myself to buy a junky product from the local Home Depot's garden tractor section. The plastic on those things were thinner than the plastic my blocks of cheese come wrapped in.
The trailer I settled on is the Polar HD 1500. 22 cubic feet, 1500lb capacity. Bought it on eBay from Northern Tool and had it delivered by freight in a few days. Total cost $380. Another benefit for this thing is you can hook the thing up to your truck, they sell a 2" ball adapter, though not street legal and I'm not sure what speed it could take. It'll hook up to a quad too. They sell a "wall" kit, made out of steel, that will expand the capacity to 35 cubic feet. Useful for hauling wood I'd say, but I haven't found the need yet.
The next thing I needed was the BCS trailer adapter, which is a given, I wasn't going to try and hack something together there. Only about $70 I think it was.
One of my goals was to not drill any holes in either the BCS adapter or the trailer, so I spent a good year trying to figure out that next step. I also wanted to make sure the trailer allowed a decent amount of articulation. and I wanted to build something myself. Kind of a tough set of specs.
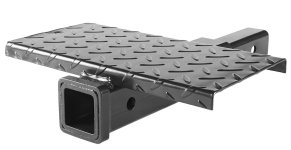
Then I realized - these guys sell ball hitch adapters - the thing must be made out of 2" square tube. I went out and double checked, what a beautiful thing, it's a standard size for trailer accessories. I spent some trying to figure out what kind of trailer accessories I could use to make the thing work, I figured a 2" tube extender with the trailer in the female side and the male side drilled out would do the trick. If I lined up the BCS trailer coupler's pin with the trailer hitch pin hole, the varied diameters would allow that articulation I needed. I found that Curt sells a solid steel 2" extender that's 18" long, perfect for the job. Ordered it and a bunch of new old stock drills off of eBay. Turns out that 1-9/32" is a perfect clearance hole for the BCS trailer adapter's 32mm shaft. I bought 1-9/32", 1-1/16", 7/8" drills and a 1/2" 12 inch long drill from Lowe's. Total cost of drills about $130. The adapter was $39.
I'm into this setup for about $620 total, I'm pretty happy with it. If I had to do it again, I'd just pay a machine shop to put the hole in it on a lathe. My drill press was not too happy about what I was doing to it. Even it's slowest setting ran out of torque a few times.
To drill the hole square and centered, I clamped a steel ruler to the tube and measured the distance from the drill to the tube at the top and bottom of the drill. This required constant adjustment as the setup was not nearly rigid enough for what I was trying to do. I just calculated 1-(drill diameter/2) to figure out what the reading on the caliper should be at top and bottom to make it square.


Articulation!

My dad riding it and shoveling from it. First project was filling the raised garden bed boxes.


I started by trying to figure out what trailer I should buy. I wanted a dumping trailer that had its axle offset towards the back to put more weight on the BCS. Most of the trailers I saw were centered, which is terrible for traction on the BCS - especially for pulling firewood uphill. I also could not allow myself to buy a junky product from the local Home Depot's garden tractor section. The plastic on those things were thinner than the plastic my blocks of cheese come wrapped in.
The trailer I settled on is the Polar HD 1500. 22 cubic feet, 1500lb capacity. Bought it on eBay from Northern Tool and had it delivered by freight in a few days. Total cost $380. Another benefit for this thing is you can hook the thing up to your truck, they sell a 2" ball adapter, though not street legal and I'm not sure what speed it could take. It'll hook up to a quad too. They sell a "wall" kit, made out of steel, that will expand the capacity to 35 cubic feet. Useful for hauling wood I'd say, but I haven't found the need yet.
The next thing I needed was the BCS trailer adapter, which is a given, I wasn't going to try and hack something together there. Only about $70 I think it was.
One of my goals was to not drill any holes in either the BCS adapter or the trailer, so I spent a good year trying to figure out that next step. I also wanted to make sure the trailer allowed a decent amount of articulation. and I wanted to build something myself. Kind of a tough set of specs.
Then I realized - these guys sell ball hitch adapters - the thing must be made out of 2" square tube. I went out and double checked, what a beautiful thing, it's a standard size for trailer accessories. I spent some trying to figure out what kind of trailer accessories I could use to make the thing work, I figured a 2" tube extender with the trailer in the female side and the male side drilled out would do the trick. If I lined up the BCS trailer coupler's pin with the trailer hitch pin hole, the varied diameters would allow that articulation I needed. I found that Curt sells a solid steel 2" extender that's 18" long, perfect for the job. Ordered it and a bunch of new old stock drills off of eBay. Turns out that 1-9/32" is a perfect clearance hole for the BCS trailer adapter's 32mm shaft. I bought 1-9/32", 1-1/16", 7/8" drills and a 1/2" 12 inch long drill from Lowe's. Total cost of drills about $130. The adapter was $39.
I'm into this setup for about $620 total, I'm pretty happy with it. If I had to do it again, I'd just pay a machine shop to put the hole in it on a lathe. My drill press was not too happy about what I was doing to it. Even it's slowest setting ran out of torque a few times.
To drill the hole square and centered, I clamped a steel ruler to the tube and measured the distance from the drill to the tube at the top and bottom of the drill. This required constant adjustment as the setup was not nearly rigid enough for what I was trying to do. I just calculated 1-(drill diameter/2) to figure out what the reading on the caliper should be at top and bottom to make it square.


Articulation!

My dad riding it and shoveling from it. First project was filling the raised garden bed boxes.


