rox
Veteran Member
Now compared to all your projects this is not that much of a project but I am still pretty happy with the way it came out.
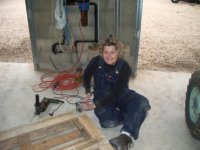
I bought some wheels at the hardware store and attached them to the bottom of a pallet to make a dolly for the rototiller. The Moracan farm worker had one but he did a poor job and the wheels were too small and he didn't apply thim onto a large enough piece of wood and it failed.
I work completely differently than my husband. I think through my whole project, get everything I need and then start. Which means I always apear to be slow starting. he on the other hand, jumps right in there with any old tool that is laying around and starts to work.
I'm int he store and thinking through the project visualizing how I am going to attach the wheels to the bottom of the pallet, visiualizing predrilling the holes for the screws, and looking at the wheel when I realize that I am never going to be able to get this big drill we have close in enough and down enough because the wheel si going to be in the way.
So I bough my first extra long drill bit. In Europe I bought a #4. Then I msut have spent 30 minutes looking at all the screws. I wanted a screw that would screw down flat against the metal plate of the wheel. I also wanted a thread along the whole screw. Well i had to compromise, man I miss my good hardware store Elliots Ace Hardware in Elm Grove Wisconsin, ont he screws because they didn't have what I wanted. I finally picked out a good long screw, that had a hex a nut like cap on it, however the threading didn't go the full length of the screw. I thought it would be more important to have the head of the screw flat against the plate for the wheel, and give up the idea of having it threaded all the way down. Because the rototiller is so heavy I put in an extra wheel int he center, which had a 6"x6" pice of block. And becaue of the other problems we ahd getting some parts off the tractor, I used an oil an and squeezed in oil on all the wheels to keep the bearigs oiled. They really whip around with that oil on them. /forums/images/graemlins/grin.gif One thing I did learn after my first wheel, don't screw thm on too close to the edge, else when the wheel swings around it is actually outside the pallet. A bit of practical experience I will remember the next time I am screw on wheels.
Then I used a crow bar, a hammer and some wood to block the hammer, and pulled out the nails and screws from the pallet that the morocan made. He had some really good 3/4" marine plywood that i was able to re-use on the new pallet.
I decided to screw on the plywood instead of nailing onto my new pallet. Hmm more decisions on screws. For the top of the pallet I didn't want those big heads on the screws I wanted it flatter so I found some real good screws about 4" long in the barn. The plywood was in 2 pieces. I put in 6 screws on each piece and I was done. I really anaylzed if I should add any more braces to the pallet but I left it as it was, becasue it really looked strong to me. It has 9 - 6"x6" blocks of wood between the top and bottem of the pallet and I jsut didn't see where any more wood was going to make it stronger.
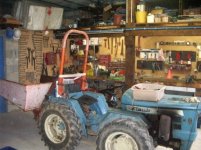
My hsuband has the rototiller on the tractor right now, I am most anxious for him to take it off to see how the Dolly/Pallet will work. I hope it doesn't tip over.
Because I enjoy photos so much when people share them I have a photograph of my Dolly/Pallet project.
Now I am busy prunning the olive trees and will be doing that until Mid May. The almond trees are in Pink Bud and my husband will spray them in 2 days.
Admittadly not much of a project compared to everyone else, but it was mine and I enjyed doing it. /forums/images/graemlins/grin.gif /forums/images/graemlins/grin.gif
I bought some wheels at the hardware store and attached them to the bottom of a pallet to make a dolly for the rototiller. The Moracan farm worker had one but he did a poor job and the wheels were too small and he didn't apply thim onto a large enough piece of wood and it failed.
I work completely differently than my husband. I think through my whole project, get everything I need and then start. Which means I always apear to be slow starting. he on the other hand, jumps right in there with any old tool that is laying around and starts to work.
I'm int he store and thinking through the project visualizing how I am going to attach the wheels to the bottom of the pallet, visiualizing predrilling the holes for the screws, and looking at the wheel when I realize that I am never going to be able to get this big drill we have close in enough and down enough because the wheel si going to be in the way.
So I bough my first extra long drill bit. In Europe I bought a #4. Then I msut have spent 30 minutes looking at all the screws. I wanted a screw that would screw down flat against the metal plate of the wheel. I also wanted a thread along the whole screw. Well i had to compromise, man I miss my good hardware store Elliots Ace Hardware in Elm Grove Wisconsin, ont he screws because they didn't have what I wanted. I finally picked out a good long screw, that had a hex a nut like cap on it, however the threading didn't go the full length of the screw. I thought it would be more important to have the head of the screw flat against the plate for the wheel, and give up the idea of having it threaded all the way down. Because the rototiller is so heavy I put in an extra wheel int he center, which had a 6"x6" pice of block. And becaue of the other problems we ahd getting some parts off the tractor, I used an oil an and squeezed in oil on all the wheels to keep the bearigs oiled. They really whip around with that oil on them. /forums/images/graemlins/grin.gif One thing I did learn after my first wheel, don't screw thm on too close to the edge, else when the wheel swings around it is actually outside the pallet. A bit of practical experience I will remember the next time I am screw on wheels.
Then I used a crow bar, a hammer and some wood to block the hammer, and pulled out the nails and screws from the pallet that the morocan made. He had some really good 3/4" marine plywood that i was able to re-use on the new pallet.
I decided to screw on the plywood instead of nailing onto my new pallet. Hmm more decisions on screws. For the top of the pallet I didn't want those big heads on the screws I wanted it flatter so I found some real good screws about 4" long in the barn. The plywood was in 2 pieces. I put in 6 screws on each piece and I was done. I really anaylzed if I should add any more braces to the pallet but I left it as it was, becasue it really looked strong to me. It has 9 - 6"x6" blocks of wood between the top and bottem of the pallet and I jsut didn't see where any more wood was going to make it stronger.
My hsuband has the rototiller on the tractor right now, I am most anxious for him to take it off to see how the Dolly/Pallet will work. I hope it doesn't tip over.
Because I enjoy photos so much when people share them I have a photograph of my Dolly/Pallet project.
Now I am busy prunning the olive trees and will be doing that until Mid May. The almond trees are in Pink Bud and my husband will spray them in 2 days.
Admittadly not much of a project compared to everyone else, but it was mine and I enjyed doing it. /forums/images/graemlins/grin.gif /forums/images/graemlins/grin.gif