5picker
Bronze Member
Here are a few photos of my recently converted, hydraulic chute rotator on my 3pt rear mounted snow blower.
I realize there are many different ways that manufacturers rotate their chutes but I decided I didn't want to change anything with the design of how LuckNow accomplishes this on my particular blower, only the way it is driven. (hand-vs-hydraulically)
Pic # 1 shows the original hand crank laying on top of the new hydraulic set-up.
Pic # 2 shows the way LuckNow utilizes aircraft cable, wrapped in alternating directions around a hollow shaft, to rotate the chute.
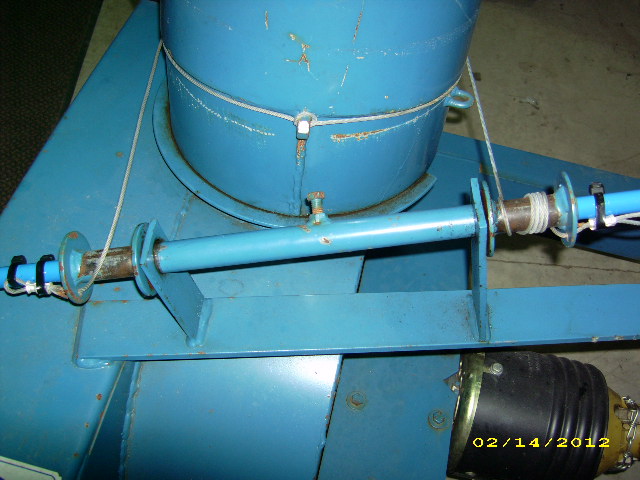
Pic # 3 shows the shorter, straight replacement inner shaft connected to the hydraulic motor.
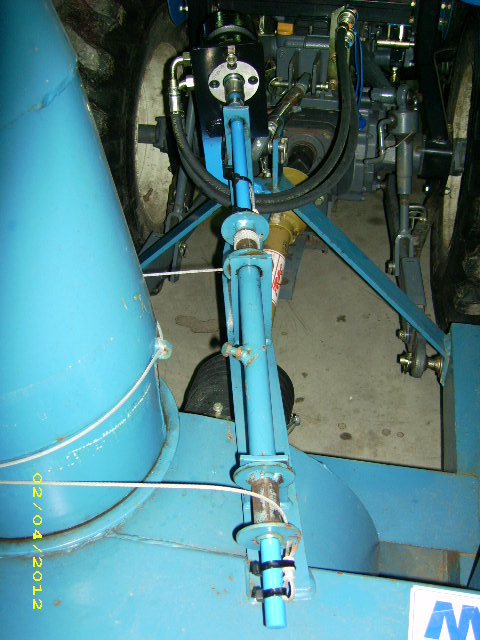
Pic # 4 shows the hydraulic lines running to my rear remote quick-connects.
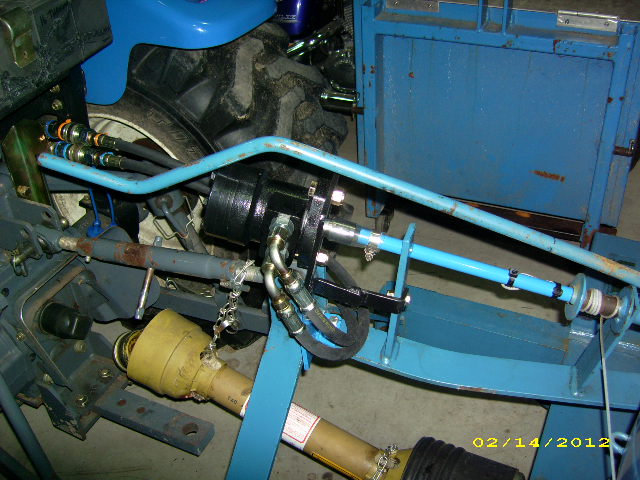
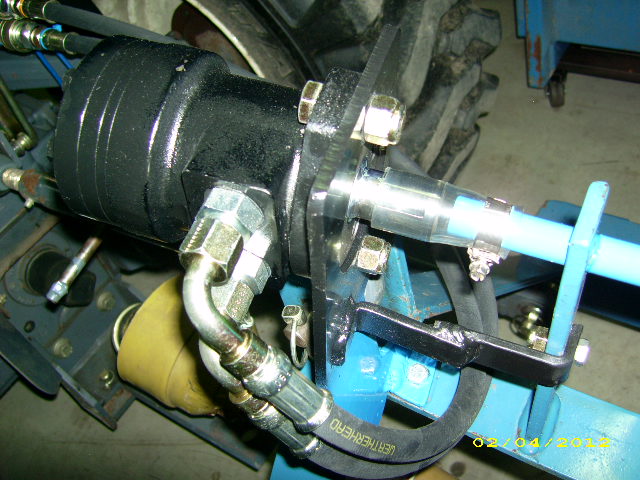
Pic # 5 shows the entire shaft/motor assembly.
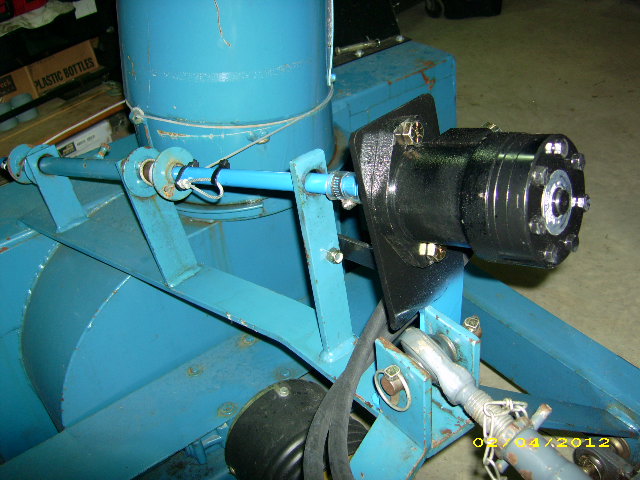
Pic # 6 shows the motor bracket I fabricated to bolt the hydraulic motor to the blower frame and the motor coupled to the shaft.
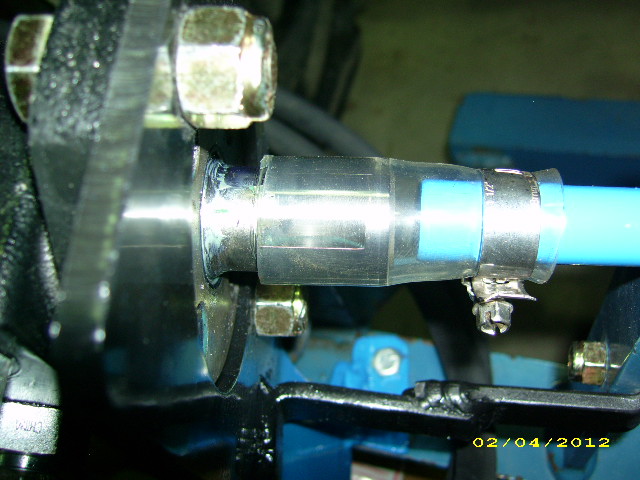
Pic # 7 shows the motor to shaft coupler.
I used a short piece of heavy wall poly tubing to connect the motor to the shaft.
I considered a LoveJoy coupler (and actually purchased one) before I decided I wanted something that would 'slip' if I accidentally ran the chute to the end limits. I didn't want to break the cable or bend anything as I'm sure the hydraulic motor has enough torque to do damage.
The poly tubing is 7/8" I.D. so I had to heat and stretch it considerably to fit the 1" O.D. of the motor shaft and it fits pretty tight. By removing the woodruff key from the shaft and exposing the sharp edges of key slot, it also provided some additional grip. The chute shaft is 3/4" O.D. so a small hose clamp was necessary there.
With the winter we've had, I haven't had an opportunity to use it in blowing action but when rotating it countless times while sitting in the garage, it works perfectly and I believe my 'clutch' mechanism will do what I want it to. I can always put a zip tie around the motor shaft if I think it will need some additional grip.
I am head of procurement & IT for a manufacturing facility so I drew up the bracket in CADD format, cut it on our plasma burn table and then bent the angles. The new shaft was scrap as were the hydraulic hose pieces so they were cheap enough. The hydraulic hose ends were a few bucks each and the hydraulic motor was just under $100.
All said, I have a grand total of about $125 in this and about 2 hours worth of time.
Hope you enjoy!
Next up... new, rotatable light brackets for my LED ROPS lights and a $79 golf cart enclosure into a soft tractor cab conversion.

I realize there are many different ways that manufacturers rotate their chutes but I decided I didn't want to change anything with the design of how LuckNow accomplishes this on my particular blower, only the way it is driven. (hand-vs-hydraulically)
Pic # 1 shows the original hand crank laying on top of the new hydraulic set-up.
Pic # 2 shows the way LuckNow utilizes aircraft cable, wrapped in alternating directions around a hollow shaft, to rotate the chute.
Pic # 3 shows the shorter, straight replacement inner shaft connected to the hydraulic motor.
Pic # 4 shows the hydraulic lines running to my rear remote quick-connects.
Pic # 5 shows the entire shaft/motor assembly.
Pic # 6 shows the motor bracket I fabricated to bolt the hydraulic motor to the blower frame and the motor coupled to the shaft.
Pic # 7 shows the motor to shaft coupler.
I used a short piece of heavy wall poly tubing to connect the motor to the shaft.
I considered a LoveJoy coupler (and actually purchased one) before I decided I wanted something that would 'slip' if I accidentally ran the chute to the end limits. I didn't want to break the cable or bend anything as I'm sure the hydraulic motor has enough torque to do damage.
The poly tubing is 7/8" I.D. so I had to heat and stretch it considerably to fit the 1" O.D. of the motor shaft and it fits pretty tight. By removing the woodruff key from the shaft and exposing the sharp edges of key slot, it also provided some additional grip. The chute shaft is 3/4" O.D. so a small hose clamp was necessary there.
With the winter we've had, I haven't had an opportunity to use it in blowing action but when rotating it countless times while sitting in the garage, it works perfectly and I believe my 'clutch' mechanism will do what I want it to. I can always put a zip tie around the motor shaft if I think it will need some additional grip.
I am head of procurement & IT for a manufacturing facility so I drew up the bracket in CADD format, cut it on our plasma burn table and then bent the angles. The new shaft was scrap as were the hydraulic hose pieces so they were cheap enough. The hydraulic hose ends were a few bucks each and the hydraulic motor was just under $100.
All said, I have a grand total of about $125 in this and about 2 hours worth of time.
Hope you enjoy!
Next up... new, rotatable light brackets for my LED ROPS lights and a $79 golf cart enclosure into a soft tractor cab conversion.
