New thumb for an old 'hoe.

   / New thumb for an old 'hoe. #1  

AKfish

Super Member
Joined
Oct 1, 2004
Messages
5,419
Location
Alaska
Tractor
JD 5115M; JD 110 TLB; JD 4720; Ford 9N; JD X300R
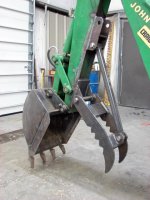
Here are some pictures of my "new" thumb on my "old" JD 8A backhoe.

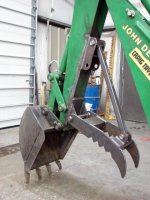
This is a basic thumb. It has 2 fixed positions and the lower position serves as the storage spot to place the thumb out of the way until you need it.

I was pleasantly surprised at how reasonable a job it was to tackle! 'Cause I'm not an professional (I can run a bead..) welder and have limited experience finding my way around a fabrication shop (I can spell band saw...).

Nonetheless, it worked out quite well.

AKfish
 

Attachments

  • DSC00216.jpg
    DSC00216.jpg
    56.6 KB · Views: 389
  • DSC00217.jpg
    DSC00217.jpg
    57.8 KB · Views: 325
  • DSC00218.jpg
    DSC00218.jpg
    56.8 KB · Views: 314
   / New thumb for an old 'hoe. #2  
Hey Larry, great job on the thumb. Is there a plan for this thumb?
Or is this a home brew design?
I could use something like this on my Bradco 408.

cheers,
keoke
 
   / New thumb for an old 'hoe. #3  
Doesn't your hoe have the box H cross section shape? Did you weld to the edges only or did you make brackets down to the flat section and weld there also? I have a #7 hoe which will be smaller than yours and has the boxed H cross section.
 
   / New thumb for an old 'hoe. #4  
Can You come put one of those on my 48?

Nice job..
 
   / New thumb for an old 'hoe.
  • Thread Starter
#5  
Thanks for the feedback.

It is a home-brew design. After numerous searches of the forums here on TBN -- Attachments, Projects, etc. I gleaned quite a bit of info; including various pictures (with dimensions) and went ahead with the idea. Hand drawn sickle shape (curved point) on 1/2 plate and cut out with a plasma cutter (lot's of grinding wheel work) and then cut the teeth out with a band saw. I also used hard-surface rod on the teeth edges and the wear edge of the jaws just before painting. Hard surfaced the bucket (not in picture), too.

Yup, the boom and the dipper have an H configuration with the sides extending beyond the inside plate. There are no welds inside the dipper boom either on the bottom mount or the top mount. On the top mount, the 3/8 plates extend down along the inside of the dipper wall plate and are super flush to the bottom plate. We used another 3/8 plate to reinforce the sides in an "I beam" like configuration. Hopefully, that will keep them from tending to bend inward. The bottom mount plate is flush to the edge of the side wall and has an upper "cap" that is super flush to the inside plate (quite a bit of grinding).

That was intentional for a couple of reasons. 1.) It was a bugger to get in there to do a quality weld. 2.) If anything should get damaged (bent or cracked) in the future, I wanted all the welds to be exterior or exposed to make it easier to remove/replace anything that might need to be fixed. 3.) Concerns about warping and changing dimensions while assembling that can occur if you're really "putting the steel to it" -- the pins (stainless steel) are quite snug and the thumb itself is pretty darn tight to avoid any slopping around and contacting a shank on the bucket or hitting the cutting edge of the bucket, etc.

AKfish
 

Tractor & Equipment Auctions

4- 6 DRILL COLLARS (A50854)
4- 6 DRILL COLLARS...
BUSH HOG 2810CD SINGLE FLEX WING ROTARY MOWER (A51406)
BUSH HOG 2810CD...
2019 Kubota F3990 72 in. Commercial Mower (A50324)
2019 Kubota F3990...
2015 KENWORTH T800 MID-ROOF SLEEPER (INOPERABLE) (A50854)
2015 KENWORTH T800...
2005 Pierce Enforcer Fire Truck (A50323)
2005 Pierce...
Super Material Lift MH1000 (A51039)
Super Material...
 
Top