3-Point Hitch Newb here: 3ph, is this right?

   / Newb here: 3ph, is this right? #1  

alhill

New member
Joined
Jun 15, 2011
Messages
6
Tractor
Branson 3510i
First of all, thanks for this forum, I'm a new tractor owner (Branson 3510i) and have already learned a lot from browsing and searching this forum.

I just picked up the tractor this last week, it had 125 hours on it and included the backhoe, a pto tiller, and rankin box scraper. The BH was attached and the other parts, 3ph, etc.were just in a pile... no owners manual or documentation.

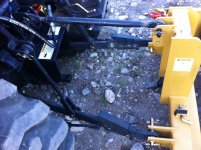
I was able to successfully unmount the BH and became a little confused as I tried to figure out how the 3ph attaches. If any of you experienced tractor owners out there could check out my attached pictures and answer the following questions, I'd be very appreciative!

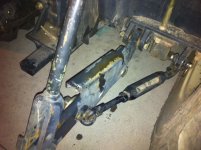
1) Does it look like the 3ph is attached correctly?
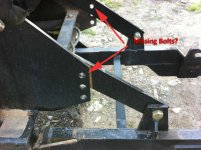
2) In the 2nd picture (1132), if I push down on the spring-loaded metal piece, the whole arm will extend a few inches, what the purpose of that? Should it be extended or not when attached to the tiller or box scraper?
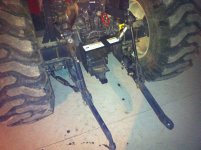
3) In the 3rd picture, there is a spring loaded wire over the bent rod sticking out, what's that for?
4) The hydraulic hose was damaged, like maybe it rubbed on the pto shaft or something. I'm going to replace it tomorrow, but what is the best way to route that from the left side over to the connector? Is there a good path? It seemed to just be hanging out the back under the backhoe attachment.

Thanks again!
-Al
 

Attachments

  • IMG_1131.jpg
    IMG_1131.jpg
    60.3 KB · Views: 283
  • IMG_1132.jpg
    IMG_1132.jpg
    57.9 KB · Views: 276
  • IMG_1133.jpg
    IMG_1133.jpg
    53.5 KB · Views: 248
  • IMG_1134.jpg
    IMG_1134.jpg
    59.1 KB · Views: 255
   / Newb here: 3ph, is this right? #2  
Hey Alhill, Welcome to the forum and congratulations on a fine purchase.
Answers:
1) Your 3pt arms are turned backward. The adjustable portion of the arm goes toward the implement and aids the operator in installing the implement by allowing that connector the ability to move forward and back to hook up the 3pt implement, rather than having to jockey your tractor around or manhandle the implement. Once you have an implement attached make sure the arms are fully retracted and locked in place.
2) The spring loaded rod is to lock to prevent the rod (adjuster/ crank handle) from changing its position. With the handle down and spring down on it it wont move. This adjuster is used to level or adjust implement to the tractors position; or aid in installing implement due to uneven terrain. Generally, I've always seen this adjuster on the right (passenger) side of tractor, but some models I've seen have one on each arm.
3) As for the hydraulic hose I use a little clip to hold the hose clear. You could use a small bungy strap if you like.

Here is a link on great "how-to" videos:

http://www.everythingattachments.com/category-s/2999.htm

Good luck and keep the pictures coming.
 
Last edited:
   / Newb here: 3ph, is this right?
  • Thread Starter
#3  
Zork, thank you! That link is a gem, I even saw a video with similar 3pt arms hooked up to a tiller. I'll try again tonight.

I've got a few more questions, but I'll search threads and start a new post if I can't find the answers needed.

Thanks again,
Al
 
   / Newb here: 3ph, is this right? #4  
You bet! Have fun and good luck.
 
   / Newb here: 3ph, is this right? #5  
Alhill, Zork is right and there is one more thing you need to do, when you turn the arms around, place them on the opposite sides of the tractor. That way the bends in the arms will allign properly with pins on your implements. You will enjoy the tractor. I have had the same size tractor in the Century brand since 2004 and would not trade it. Willie Jones
 
   / Newb here: 3ph, is this right?
  • Thread Starter
#6  
Zork and Willie,

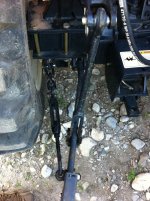
I think I've got it right now, check out the pics. I don't think the previous owner used it correctly, I had to adjust the turnbuckles drastically to get the arms to attach, but it looks a lot better now.

You can see the new hydraulic line I replaced today, still doesn't look like a very good route, I've zip-tied it in a couple places, but need to look at it some more, I'd hate to get it pinched or cut again.

More questions:
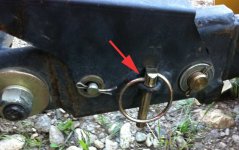
1) in the last picture, what is that pin for?
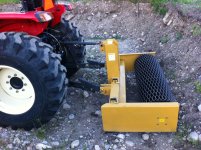
2) The 3rd pic shows my box scraper and roller. I've watched the video on everythingattachments.com about the box scraper, but I can't find anything on the web that talks about one like this with the roller. Any tips on how to use this implement properly?
3) I think I'm low on hydraulic fluid, do I just fill it until it's full? Is there a dipstick or site window for the reservoir anywhere? What kind if hydraulic fluid should I use?
4) I've got a couple BH questions with pics, see next reply...

Thanks again everybody!!
-Al
 

Attachments

  • IMG_1139.jpg
    IMG_1139.jpg
    101.9 KB · Views: 194
  • IMG_1138.jpg
    IMG_1138.jpg
    278.9 KB · Views: 217
  • IMG_1137.jpg
    IMG_1137.jpg
    248.7 KB · Views: 201
  • IMG_1136.jpg
    IMG_1136.jpg
    223.1 KB · Views: 243
   / Newb here: 3ph, is this right?
  • Thread Starter
#7  
When I took off the backhoe I noticed a couple of things that concerned me.

1) see first picture, this bolt was only hand-tight on both sides and seems like it only bolts to half the mount, shouldn't the bolt go all the way through?
2) 2nd pic, missing bolts there too?
3) anything else glaringly wrong?
4) notice how rocky/hard the ground is, I'm thinking I should start with box scraper and try to get a lot of the rocks, then till it up and remove rocks again, then use the roller to pack it back down? Or, should I just or a bunch of good (less rocky) soil and spread it out all over the rocky stuff?

If I should start another thread, feel free to lmk.

Thanks again!
-Al
 

Attachments

  • IMG_1141.jpg
    IMG_1141.jpg
    179.8 KB · Views: 230
  • IMG_1142.jpg
    IMG_1142.jpg
    167.8 KB · Views: 203
  • IMG_1143.jpg
    IMG_1143.jpg
    332.8 KB · Views: 200
   / Newb here: 3ph, is this right? #8  
Zork and Willie,

I think I've got it right now, check out the pics. I don't think the previous owner used it correctly, I had to adjust the turnbuckles drastically to get the arms to attach, but it looks a lot better now.

You can see the new hydraulic line I replaced today, still doesn't look like a very good route, I've zip-tied it in a couple places, but need to look at it some more, I'd hate to get it pinched or cut again.

More questions:
1) in the last picture, what is that pin for?
2) The 3rd pic shows my box scraper and roller. I've watched the video on everythingattachments.com about the box scraper, but I can't find anything on the web that talks about one like this with the roller. Any tips on how to use this implement properly?
3) I think I'm low on hydraulic fluid, do I just fill it until it's full? Is there a dipstick or site window for the reservoir anywhere? What kind if hydraulic fluid should I use?
4) I've got a couple BH questions with pics, see next reply...

Thanks again everybody!!
-Al

Sorry I cant answer most of your questions but I can help a little:
The pin in the third pix is just a spare pin, and a handy place to store it. The pins do occasionlly come off and are lost. Yes it looks like you have everything hooked up correctly. Now on the turnbuckles. they look like they have a small hole drilled thru the end of the threaded rod. If you find a small "hairpin" at Tractor supply that will fit that hole, you can push it in vertically into that hole, and it will prevent the turnbuckles from rotating on their own and loosening up. Some put a jamb nut on the rod to jamb up against the turnbuckle to accomplish the same thing, but the "hairpin" is faster to take off when you need to adjust them and put back in. They will rotate a little but when the inside of the turnbuckle hits the hairpin it will stop rotating. I am guessing you dont have a manual with the tractor, as for what hydraulic fluid, I dont know , but others here will. Yes there should be a dipstick, or sight glass, look around the seat, for a stick, or around the transmission tunnel for a sight glass. Make sure you are on flat ground, and all implements/loader are all lowered to check the level.

James K0UA
 
   / Newb here: 3ph, is this right? #9  
Nice setup!
On your first post everything looks good but I think I rout my hose under the 3pt; where you have it now will continue to raise and low and might bind.

The pin is in a holder to prevent loss and this pin is used on attachments that do not have the "full size" removable pin on your box scrape, many have a fixed pin that is secured by the pin resting in the holder.

I think what you are calling a box scrape is some kind of pulverizer, a box scrape has a scrape within,in front of a box.

On the backhoe I would feel more comfortable with the extra bolts in picture 2 but I do not think the hoe can go anywhere like it is. The other bolt is fine and I think the 2 holes are for the same type mount on your box scrape (pulverizer) with a full size removable pin. Use the sub frame and most advice is not to install the hoe on 3pt because the 3pt can be damaged; thats what I hear.

There should be a sight glass to the right of the PTO output shaft and it is filled just above that- should be an orange umbrella handled plug. I use TSC universal hydraulic fluid since it is used in the gear train and hydraulics.

You will probably damage that roller on that rocky soil, that's a nice tool to have and I would invest in an inexpensive box scrape or trade for one.

A personal preference of mine is to keep the arms tight and rigid from left to right with the turn buckles, use the nut to lock it in place where you want it. My theory is the less movement on my PTO shaft means less wear and potentially less damage, unless you turn into a tree in which case the arms wont sway.
 
   / Newb here: 3ph, is this right? #10  
Generally for ground engaging implements you want the turn buckles loose, maybe 2 or 3 inches of "slop" side to side for the implement. This allows the implement the chance to slide around if you run into something immovable in the ground, to prevent damage to the implement and the tractor.

For non ground engaging stuff, you want the turnbuckles tight to keep the implement from moving around. Helps you to make straight rows with the mower, etc.
 

Tractor & Equipment Auctions

2021 VOLVO A40G (A52472)
2021 VOLVO A40G...
New/Unused 7ft 20 Drawer Stainless Steel Workbench (A51573)
New/Unused 7ft 20...
Toro Workman Low Profile Spray system 175 (A50322)
Toro Workman Low...
1968 CHEVROLET C10 1/2 TON PICKUP TRUCK (A52576)
1968 CHEVROLET C10...
2014 CATERPILLAR CT660S SBA 6X4 DUMP TRUCK (A51406)
2014 CATERPILLAR...
Ford F250 Pickup Truck (A51694)
Ford F250 Pickup...
 
Top