mtg65
Bronze Member
- Joined
- May 29, 2007
- Messages
- 66
- Location
- Vermont
- Tractor
- Kubota MX5400, John Deere G110 Lawn Tractor
Here are pics of the chains I put on two weeks ago. I had to fit the chains to my tires which required cutting some of the links but aside from that everything went very smoothly. Some helpful tips to a successful install
1)Research the many posts on TBN regarding this topic Thanks to everyone who shared their knowledge and experience. It really helped me to decide on what type of chain and how to install.
2)Warm, dry, level work area I didn稚 have such a place, so I loaded her up and 澱orrowed a friend痴 garage for a few hours.
3)A heavy duty floor jack and stands
4)Ratchet binder, load binder and a handheld grinder / cutoff wheel ( the binders are a must)
5)An extra set of hands
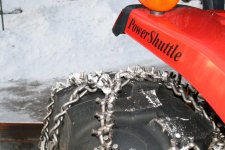
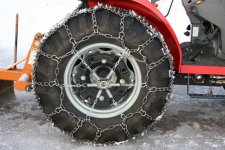
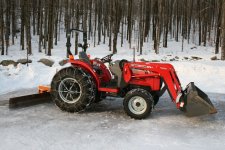
We laid the chains out on the garage floor, behind the back wheels, with the studs facing up. I put the front bucket down and jacked the tractor up so the rear wheels were up about 6 inches. With the help of my friend (help is strongly recommended because the chains are heavy and awkward) we draped the chain over the top of the tire and tied it off with twine to keep it in place. We rotated the tire forward slowly and adjusted the chain every few inches to keep the chain centered on the tire. Once we had a full rotation, and both ends met, the ratchet binder was used to tighten things up and hold the chain in place while I cut off the excess links and latched the chain together. After having the chain on as tight as I could get it, the tensioner was installed using the load binder.
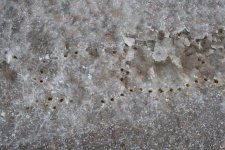
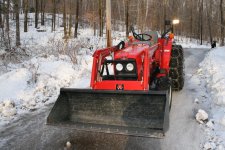
In 典racks on snow 1 picture, the left side track is the rear tire and the right side track is the front tire. As you can see the rear tread barely touches the road surface due to the height of the studs! Without those chains, my tractor would not have made it up my road in last week痴 icy conditions.
1)Research the many posts on TBN regarding this topic Thanks to everyone who shared their knowledge and experience. It really helped me to decide on what type of chain and how to install.
2)Warm, dry, level work area I didn稚 have such a place, so I loaded her up and 澱orrowed a friend痴 garage for a few hours.
3)A heavy duty floor jack and stands
4)Ratchet binder, load binder and a handheld grinder / cutoff wheel ( the binders are a must)
5)An extra set of hands
We laid the chains out on the garage floor, behind the back wheels, with the studs facing up. I put the front bucket down and jacked the tractor up so the rear wheels were up about 6 inches. With the help of my friend (help is strongly recommended because the chains are heavy and awkward) we draped the chain over the top of the tire and tied it off with twine to keep it in place. We rotated the tire forward slowly and adjusted the chain every few inches to keep the chain centered on the tire. Once we had a full rotation, and both ends met, the ratchet binder was used to tighten things up and hold the chain in place while I cut off the excess links and latched the chain together. After having the chain on as tight as I could get it, the tensioner was installed using the load binder.
In 典racks on snow 1 picture, the left side track is the rear tire and the right side track is the front tire. As you can see the rear tread barely touches the road surface due to the height of the studs! Without those chains, my tractor would not have made it up my road in last week痴 icy conditions.
Attachments
-
 Tracks on ice 1.JPG149.2 KB · Views: 897
 -
 Braking on ice.JPG149.2 KB · Views: 767
 -
 Ice Chains.jpg95.5 KB · Views: 928
 -
 Chain tensioner.JPG131.9 KB · Views: 1,254
 -
 Ice covered road.JPG148.3 KB · Views: 580
 -
 Ice covered road (2).jpg157.3 KB · Views: 505
 -
 Tracks on ice 2.JPG106.5 KB · Views: 504
 -
 Tracks on snow 1.JPG65.6 KB · Views: 558
 -
 Tracks on snow 2.JPG71.9 KB · Views: 531

