*!*#$@ Pin

   / *!*#$@ Pin #1  

DaveNay

Platinum Member
Joined
Aug 13, 2003
Messages
834
Location
Waterman, DeKalb County, Illinois
Tractor
John Deere 855 MFWD; Oliver 1850 Gas
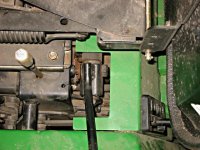
Went out to my tractor last night to move the manure pile around a bit, and the handle on my FEL control valve is broken! /forums/images/graemlins/mad.gif Well, it's not actually broken, but a part fell out. There is a linkage under the seat for the bucket curl, and the pin that connects the linkage to the handle fell out. It must have lost one of the retaining pins, and then vibrated out as I was driving from the machine shed to the manure pile. It's gonna be a bear to get the replacement back in place, as it will require lining up the holes in three pieces of metal that are about 8" under the seat, and only accessible with long nosed pliers (or take the entire fender apart /forums/images/graemlins/frown.gif) Never did find the pin, so I will need to find an equivalent replacement too.

Ahhh.....the joy of equipment ownership /forums/images/graemlins/grin.gif
 
   / *!*#$@ Pin #2  
Dave:

Sometimes you need an elf to do a job. The actuators for my remotes on my Kubota 5030 are like that. I canned the spring clips and replaced them with cotter pins after they came apart once. It took quite a bit of time and patience to get it back together (threw a few tantrums and tools), but now, it won't come apart again. I hope you can do the job inside like me. /forums/images/graemlins/confused.gif /forums/images/graemlins/grin.gif
 
   / *!*#$@ Pin #3  
I can identify with your situation, when I tried to remove the 60 inch MMM on my 4210 to perform the 50 hour service I followed the instructions in the manual EXACTLY. And it took me 15 minutes to remove the retaining pin at the right rear of the mower deck because it hit the PTO shaft before it would come out of the clevis. I was unable to remove the PTO shaft because the (censored) retaining pin prevented moving the deck far forward enough to remove the PTO shaft. I finally got the pin out by crawling between the rear wheels from the back and doing a lot of levering to move the deck and get the PTO shaft off. You would have learned some new words if you had been standing near me that day!
 
   / *!*#$@ Pin #4  
I think the engineers that design that stuff must be in a white clean room with a perfect scenerio setup in mind.. not out in a barn or a field like 'we are'

Just about every manufacturer has one or two of those 'gotcha' 'features' somewhere... just a matter of experiencing them...

Gives new meaning to the term 'interference fit'...

Soundguy
 
   / *!*#$@ Pin
  • Thread Starter
#5  
I went out this morning and took some pics of the offending objects in need of repair. This first one shows the seat lifted, and the FEL control lever at the bottom of the picture. The linkage with the missing pin is just below center of the picture.

At least it is warm today...and supposed to be in the 50s tomorrow!
 

Attachments

  • 356625-IMG_1084a.JPG
    356625-IMG_1084a.JPG
    58.3 KB · Views: 241
   / *!*#$@ Pin
  • Thread Starter
#6  
This second picture is a close-up of where I will need to put the replacement pin. The FEL control lever is the out of focus shaft, and the two fingers to the left of center need to go on either side of the control lever, and then a pin inserted through all three.

I figure I will need 4 arms and a trained monkey to get this done. /forums/images/graemlins/laugh.gif
 

Attachments

  • 356627-IMG_1082a.JPG
    356627-IMG_1082a.JPG
    36.4 KB · Views: 231
   / *!*#$@ Pin #7  
Needlenose pliers might work, but they have limited reach. Perhaps you can attach the new pin to a strip of wood (or ruler) by drilling a hole thru it so the pin is a tight fit and once the pin is started the wood can be broken off. Or use hot melt glue. I don't know how much tension the arms have where the pin inserts but if you cannot reach them by hand try using a magnetic or claw pickup tool to line them up. Or wrap some solid #14 wire around the arms to give you some grip for moving them.

Yup, I have all kinds of ideas, and if the moderators were not so dedicated I also would send you some of my favorite words for describing mechanical challenges like you have.
 
   / *!*#$@ Pin #8  
I broke that piece on my 855 a few years back. Take the fender off. It'll make the job much easier. There are only 4 bolts if I recall. You don't even have to remove it. Just unbolt it and slide it to the side.
If you haven't already, check out jdparts online - you can get a good idea of how each part goes together, and what cotter pins / washers etc. you might have lost.
 
   / *!*#$@ Pin #9  
By now, you may already have it fixed.
One suggestion that might work (if you think a piece of wire might be able to be threaded through the linkage holes where the linkage pin should go) is to fasten the linkage pin to the end of a short 16-18 ga wire (by running the wire through the cotter-pin hole of the replacement link pin). Then thread the other end of the wire through the linkage pin holes and pull the pin through the holes with the wire. It will give one hand (with fingers) free to guide the linkage pin on the wire through the three holes, lining the links up as you pull the pin through when pulling on the wire.
Not a sure thing, but the wire extends the hand doing the pulling while the other hand lines things up for the pin.
 
   / *!*#$@ Pin
  • Thread Starter
#10  
Nope, not fixed yet. I am unfortunately out of town all week (having a REAL JOB sucks).

The soonest I can get to it will be probably Thursday or Friday.

Dave
 

Tractor & Equipment Auctions

2006 Toyota Tundra 4X4 Pickup Truck (A50323)
2006 Toyota Tundra...
Morooka MST 660VD Tracked Dump Truck (A52128)
Morooka MST 660VD...
2015 KUBOTA M5660SU 4X4 FARM TRACTOR (A51243)
2015 KUBOTA...
2014 VOLVO VNM DAY CAB (A51222)
2014 VOLVO VNM DAY...
Quick Attach Pallet Forks (A47384)
Quick Attach...
Gehl 1870 Round Baler (A50514)
Gehl 1870 Round...
 
Top