mlinnane
Silver Member
I got this from the radiant heating page for slabs.
This look like a good idea to me until someone said well
you know the concrete guys are going to walking on the
wire mess they may place holes in it. I plan on using the pex tubing and I know it must be under pressure when we do
the concrete as any holes must be patched. This looked like
a great weay to do it, but I am asking for trouble with the
wire mess placing holes in the tub, or is this stuff so tough
this is not a concern. I really liked the idea of the bricks.
Please read below the direction I planned on following. The radiant tubing people said this is the best way to lay it. Has anybody used this approach and how did it work out?
Lay Out the Reinforcing Steel
The heating system will perform better, and will be easier to install if some steel is placed both above and below the tubing. The slab will be very strong in the vicinity of the tubing and the steel will help to distribute the heat away from the tubing more effectively. Steel below the tubing gives the installer something to tie the tubing to. Steel above makes the tubing less likely to float to the surface and guards against potential damage from the power trowel.
The following procedure works well for many slabs and can be modified to suit different structural needs.
1. Find the type of bricks with three holes in them and bust them into four pieces at the holes.
2. Lay out a grid with reinforcing rod spaced four feet apart. Hold the rod up with the brick pieces.
3. Lay out the tubing and tie it to the rerod.
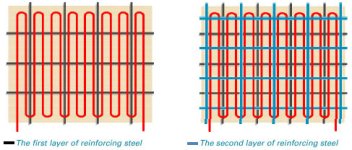
4. Lay out another grid of reinforcing rod spaced four feet apart but offset two feet so that the bird’s eye view would be of a grid with two foot spacing (see below).
5. Instead of bricks, other alternatives are available to hold up your rerod, such as chairs, pieces of leftover insulation, or blocks of wood.
6. The tubing may also be sandwiched between two sheets of wire mesh.
Arrange the Tubing According to the Layout
1. Inspect the tubing as you lay it out. Manufacturing defects in the tubing are uncommon, but they can happen. Shipping damage is also possible. Minor scratches or abrasions are permissible but deep gouges are not.
2. Do not kink the tubing. Refer to the minimum bending radius for the tubing that you are using. 1/2” tubing has a bending radius of 6 inches. 7/8” tubing has a bending radius of 1 foot.
3. Tubing may be concentrated in bathrooms and other areas where added heat and air circulation is wanted.
4. Tubing may be placed closer together around the outside perimeter walls beneath picture windows, and other high heat loss areas if you want. Any improvement in the evenness of the heating, however, will be insignificant if the building is energy efficient
5. Work with the tubing at room temperature whenever possible.
6. Tie the tubing to the reinforcement steel with whatever you want. Inexpensive twine or (concrete) wire ties are both acceptable. Do not select something that is hard to undo, like some plastic ties. Tie the tubing very well (approx. every 2 ft.) to prevent floating if the concrete mix will be very soupy, and if the tubing will not be covered with another layer of steel. (Note: The concrete mix should not be soupy. A mixture of 3-4” of slump will be stronger)
REVERSE RETURN SPIRAL
This look like a good idea to me until someone said well
you know the concrete guys are going to walking on the
wire mess they may place holes in it. I plan on using the pex tubing and I know it must be under pressure when we do
the concrete as any holes must be patched. This looked like
a great weay to do it, but I am asking for trouble with the
wire mess placing holes in the tub, or is this stuff so tough
this is not a concern. I really liked the idea of the bricks.
Please read below the direction I planned on following. The radiant tubing people said this is the best way to lay it. Has anybody used this approach and how did it work out?
Lay Out the Reinforcing Steel
The heating system will perform better, and will be easier to install if some steel is placed both above and below the tubing. The slab will be very strong in the vicinity of the tubing and the steel will help to distribute the heat away from the tubing more effectively. Steel below the tubing gives the installer something to tie the tubing to. Steel above makes the tubing less likely to float to the surface and guards against potential damage from the power trowel.
The following procedure works well for many slabs and can be modified to suit different structural needs.
1. Find the type of bricks with three holes in them and bust them into four pieces at the holes.
2. Lay out a grid with reinforcing rod spaced four feet apart. Hold the rod up with the brick pieces.
3. Lay out the tubing and tie it to the rerod.
4. Lay out another grid of reinforcing rod spaced four feet apart but offset two feet so that the bird’s eye view would be of a grid with two foot spacing (see below).
5. Instead of bricks, other alternatives are available to hold up your rerod, such as chairs, pieces of leftover insulation, or blocks of wood.
6. The tubing may also be sandwiched between two sheets of wire mesh.
Arrange the Tubing According to the Layout
1. Inspect the tubing as you lay it out. Manufacturing defects in the tubing are uncommon, but they can happen. Shipping damage is also possible. Minor scratches or abrasions are permissible but deep gouges are not.
2. Do not kink the tubing. Refer to the minimum bending radius for the tubing that you are using. 1/2” tubing has a bending radius of 6 inches. 7/8” tubing has a bending radius of 1 foot.
3. Tubing may be concentrated in bathrooms and other areas where added heat and air circulation is wanted.
4. Tubing may be placed closer together around the outside perimeter walls beneath picture windows, and other high heat loss areas if you want. Any improvement in the evenness of the heating, however, will be insignificant if the building is energy efficient
5. Work with the tubing at room temperature whenever possible.
6. Tie the tubing to the reinforcement steel with whatever you want. Inexpensive twine or (concrete) wire ties are both acceptable. Do not select something that is hard to undo, like some plastic ties. Tie the tubing very well (approx. every 2 ft.) to prevent floating if the concrete mix will be very soupy, and if the tubing will not be covered with another layer of steel. (Note: The concrete mix should not be soupy. A mixture of 3-4” of slump will be stronger)
REVERSE RETURN SPIRAL