rear worklights--where

   / rear worklights--where #1  

Mike_S

Silver Member
Joined
Feb 8, 2001
Messages
155
Location
South of Kansas City
Tractor
JD4400HST
I am considering the purchase of a TC40D and do not see anywhere that factory rear worklights mount on the ROPS and the salesman was unable to tell me. Therefore, where do the factory rear worklights mount on a TC40D?
 
   / rear worklights--where #2  
Mike,

I can't say for sure on TC40, but on TC45, two dealers mounted them two different places. First dealer mounted them on the notch at rear of fenders. I presume he had to drill holes for the lights. Second dealer mounted them beside the flasher lights with a strap iron bracket that looks like it bolts to the flasher lights. This is the setup I have. Will try to get photo soon and post it if you're interested.

Bill
 
   / rear worklights--where
  • Thread Starter
#3  
Bill--thanks for the info--a picture would be very much appreciated.
 
   / rear worklights--where #4  
Let's see if this works. I don't have much experience with camera or attachments either one.

Bill
 

Attachments

  • 13-32948-HQ10.JPG
    13-32948-HQ10.JPG
    47.6 KB · Views: 200
   / rear worklights--where #5  
Mike

My TC service manual (for the 35D, 40D & 45D) shows it mounted on the opposite side of the ROPS from the flashers (inside) & at the same hight. I don't know what they charge for it as a factory option, but it is just a single 50 watt light. I just installed extra lights & an accessory power outlet on mine this weekend & am just itching to put them to the test on a long snowy night time workout. I chose to install them on the bottom side of the top of the ROPS because the factory headlights are pretty useless when you have the loader on & in a carry position. (if you put them on the top side of the ROPS you can no longer fold your ROPS down fully) I put four lights on total. Two facing forward & two rearward @ 55 watts per bulb. I have one flood & one trapazoid beam facing each direction for close & more distant illumination. Works pretty well as near as I could tell from the short trial I gave them. If you do it yourself, be prepaired to spend some time if you want to make it look nice & clean. I think the money & time I stuck into mine is well worth it. FYI the alternators put out 40 amps & the setup I described above pulls just over 18; so you can still run the factory head lights too & everyting should still be all right. I don't think I would want to add too many more than I did though without looking for a more powerfull alternator. Happy lighting.

Troy
 
   / rear worklights--where
  • Thread Starter
#6  
Troy--you provided some quality information about extra worklights--thanks. If I trade my JD4400 in on a TC40D, I would probably keep the JD rear worklights and mount them in the same position (as on my JD4400) on the inside of the ROPS just below the hinge--these are probably 30 watts each as a guess and two of these lights provide enough rear lighting for me. I am curious as to how you mounted the worklights to the under side of the top of the ROPS since I would also like to add front lights in a similar way for the same use as you. Also--did you come directly off the battery for power and use separate rocker switches (for front and rear lamps) in the blanks in the dash?? AND a final question--did you fish the wires from the four lights down through the ROPS?
 
   / rear worklights--where #7  
Mike -

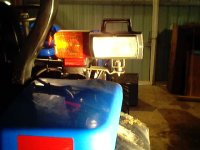
-- The ROPS appear to be almost 3/16 wall tube so I simply drilled & tapped four 1/4 - 20 holes, added a dab of locktight for added piece of mind & bolted the lights directly to the tube. The weld seam of the tube just happened to be right in the center where I drilled & tapped so there really wasn't an issue with having enough thickness for the tapping. -- As for power, I did come directly off the battery & installed a 30 amp fuse in line to handle the lights & power outlet. I split the line after the fuse running constant power to the outlet & switched power to the lights. -- I decided to only install one switch for all four lights. You certainly could switch them separately if you chose to. It's just a matter of installing one more switch & pulling one more wire. My thought was - when I work in the dark, I always need to be able to see in both directions - to go forward, to back up & / or keep an eye on the implement behind me. The only exception I can think of for that logic is if you have a backhoe & would only be working from the rear. If I am just transporting / traveling I can still just use the factory front lights if I want. -- As for running the wires I chose to run all my wire in flexible plastic conduit (available in most good automotive or electrical departments). That way it has a little extra protection & matches the factory wiring perfectly. (look at the wires running to the rear flashers / signal lights) I ran the wire outside the ROPS in the flexible conduit for three reasons. 1) There appeared to be a real pinch hazard for the wires with the extra slack needed to fold & unfold the ROPS if your not paying attention to what your doing. 2) Ease of maintenance in the future if the wires decide to go bad at the folding point after a few years (which is probably fairly likely after a lot years of bending) or if your needs change & you want to add or delete wires. 3) Being in the conduit on the outside alows for minimal slack in the wires while still allowing & forcing the wires to make a more gradual bend at the fold point. I know thats a long answer but... Hope it helps.

Good luck with your new machine. You'll like it.

Troy
 
   / rear worklights--where #8  
Mike and Troy:
I just wanted to let you both know that your questions and answers regarding front and rear lighting mounting on the ROPS was very helpful. As I wanted to do the exact same thing as Troy, 2 forward - 2 rear facing, all mounted on the ROPS, when I was negotiating the puchase of my TC40D recently, I requested that the dealer install and wire the lights. I printed out Troy's detailed discriptions and instructions and gave them to the dealer. They wired everything just as Troy explained it. They even added the 2 factory dash switches on the instrument panel right behind the steering wheel! 1 for forward and 1 for rear. It is a neat/clean setup! Now I can't wait for the snow to arrive here in Minnesota!!!Yippee!
Thanks to you both for making it easier for the wiring/setup to be done on my new blue toy!
 
   / rear worklights--where #9  
NH also makes a bracket that mounts just to the other side of the flasher in the picture you have. so that the light mounts behind the seat between the rops bar its in the parts book under work lights if your dealer can not find it
 

Tractor & Equipment Auctions

RIGID 150 PSI AIR COMPRESSOR (A50854)
RIGID 150 PSI AIR...
2012 MAGNUM TRAILER (A50854)
2012 MAGNUM...
2013 COACHMEN CATALINA TRAVEL TRAILER (A50854)
2013 COACHMEN...
PALLET OF AIR CHISELS (A50854)
PALLET OF AIR...
2012 FREIGHTLINER CASCADIA (INOPERABLE) (A50854)
2012 FREIGHTLINER...
2010 Gleaner 9250 Draper Head  30' with Crary Air Wind System (A51039)
2010 Gleaner 9250...
 
Top