Venturabass
Bronze Member
I've been posting on here a lot lately. I just bought a used X500 earlier this year that was a 2007 model but in great shape with only 225 hours on it. I like many noticed that the fuel gauge didn't work and always read empty with the machine on. From what I've gathered on the forums it seems this repair is regarded as being rather difficult as the tank is under the fuel pan. Also I wasn't successful in determining what causes the majority of failures. So in my case I thought I'd share what I found and how I fixed mine. I wanted to fix this as the tractor always runs out of fuel when I'm away from the house (obviously), and didn't want to be burdened with filling the tank every time I used it. However I was bummed that new sender is about $70.
First off I have the service manual and learned that the rear fender panel and seat attaches to the tractor frame with only 6 bolts. Flip up the seat and there are 2 on either side. There are then 2 more on each side under the rear of the foot rests, that bolt the foot deck and rear fender together in a flanged arrangement. Just make sure to disconnect the seat switch and feed the conduit through the panel when removing. Once this is done it provides all the access you need to you fuel tank.
One side note, while this step only took 5-10 minutes, I did have some difficulty removing the rear fender panel once unbolted as the rear edge of the foot deck rolls over a groove in the front of the rear fender deck. I later realized the foot deck attaches underneath to the frame with one bolt on the left and right side. If these are removed you can lift foot deck 2" or so and tie up to the steering wheel without having to remove all the foot pedal linkages, and would make removing the rear fender panel much easier.
The fuel gauge/hour meter is a joint device. Switched voltage enters the meter through the thicker yellow wire from the key switch. The white wire sends a voltage signal from the ignition coil to provide input to the hour meter. The smaller yellow wire is the voltage out to the fuel sender in the tank, and black is ground. I checked all these connections and found no faults here.
Next at the fuel sender in the tank make sure you have voltage at the yellow wire when the key is on. You can do a simple check if your system is working by sticking a paperclip across the leads on the harness going to the fuel sender. With key on if this shows a full tank, then the problem is in your sender, like mine was.
The sender bolts to the tank in a 6-bolt flanged connection with a rubber gasket. I removed mine and I could here the float slide up and down perfectly fine when I turned it upside down and right side up. With sender removed, when upright (empty tank), the resistance across the sender terminals should be about 242 ohms, and upside down (full tank) about 32 ohms. Again mine was fine.
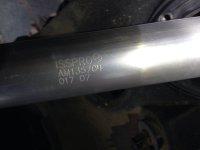
Next take the 2 screws off the bottom plate that holds the float inside. I removed my float, put it in a cup of gas, and it sunk immediately. Bingo! That was my problem. I also found that the mfg of the sender had their name and JD part # and date code etched right onto the body of the fuel sender, so I decided to look them up and give them a call. A step I hadn't seen anybody describe on the forums before.
My sender was manufacturered by ISSPRO (ISSPRO.com - Quality Gauges, Tachometers, Speedometers and more!). I called them, asked for tech support, and described my problem. They asked for the JD part number of my sender and the mfg date code (See in photo), and were able to mail me a replacement float and I opted for a new gasket as well. The float was $25 which seemed a little ridiculous to me, but at the end of the day the sender works fine otherwise so it still saved me about half the cost of a new sender. Gasket was $5, shipping was about $7.
One other thing that interested me was that I weighed the new float on a kitchen scale and read 1/4 oz. I could not see any holes in the old float, and even after sitting out of the tank for 2 days I couldn't hear any fuel swashing around inside, and I couldn't get gas to pour out from anywhere. However when I weighed the old float I got 3/8 oz. I have no idea why it would weigh more if it didn't have a leak.
Despite what I've read on the forums this was relatively an easy fix, and the rear fender panel wasn't nearly as daunting to remove as folks seem to perceive. Below are a few pics. I'll try to attach more later of the bolts to be removed.
 Fuel sender where mfg is identified.
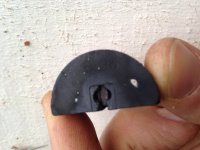
 This is what the float looks like. It has a magnet on the top and bottom within that notched section.
First off I have the service manual and learned that the rear fender panel and seat attaches to the tractor frame with only 6 bolts. Flip up the seat and there are 2 on either side. There are then 2 more on each side under the rear of the foot rests, that bolt the foot deck and rear fender together in a flanged arrangement. Just make sure to disconnect the seat switch and feed the conduit through the panel when removing. Once this is done it provides all the access you need to you fuel tank.
One side note, while this step only took 5-10 minutes, I did have some difficulty removing the rear fender panel once unbolted as the rear edge of the foot deck rolls over a groove in the front of the rear fender deck. I later realized the foot deck attaches underneath to the frame with one bolt on the left and right side. If these are removed you can lift foot deck 2" or so and tie up to the steering wheel without having to remove all the foot pedal linkages, and would make removing the rear fender panel much easier.
The fuel gauge/hour meter is a joint device. Switched voltage enters the meter through the thicker yellow wire from the key switch. The white wire sends a voltage signal from the ignition coil to provide input to the hour meter. The smaller yellow wire is the voltage out to the fuel sender in the tank, and black is ground. I checked all these connections and found no faults here.
Next at the fuel sender in the tank make sure you have voltage at the yellow wire when the key is on. You can do a simple check if your system is working by sticking a paperclip across the leads on the harness going to the fuel sender. With key on if this shows a full tank, then the problem is in your sender, like mine was.
The sender bolts to the tank in a 6-bolt flanged connection with a rubber gasket. I removed mine and I could here the float slide up and down perfectly fine when I turned it upside down and right side up. With sender removed, when upright (empty tank), the resistance across the sender terminals should be about 242 ohms, and upside down (full tank) about 32 ohms. Again mine was fine.
Next take the 2 screws off the bottom plate that holds the float inside. I removed my float, put it in a cup of gas, and it sunk immediately. Bingo! That was my problem. I also found that the mfg of the sender had their name and JD part # and date code etched right onto the body of the fuel sender, so I decided to look them up and give them a call. A step I hadn't seen anybody describe on the forums before.
My sender was manufacturered by ISSPRO (ISSPRO.com - Quality Gauges, Tachometers, Speedometers and more!). I called them, asked for tech support, and described my problem. They asked for the JD part number of my sender and the mfg date code (See in photo), and were able to mail me a replacement float and I opted for a new gasket as well. The float was $25 which seemed a little ridiculous to me, but at the end of the day the sender works fine otherwise so it still saved me about half the cost of a new sender. Gasket was $5, shipping was about $7.
One other thing that interested me was that I weighed the new float on a kitchen scale and read 1/4 oz. I could not see any holes in the old float, and even after sitting out of the tank for 2 days I couldn't hear any fuel swashing around inside, and I couldn't get gas to pour out from anywhere. However when I weighed the old float I got 3/8 oz. I have no idea why it would weigh more if it didn't have a leak.
Despite what I've read on the forums this was relatively an easy fix, and the rear fender panel wasn't nearly as daunting to remove as folks seem to perceive. Below are a few pics. I'll try to attach more later of the bolts to be removed.
 Fuel sender where mfg is identified.
 This is what the float looks like. It has a magnet on the top and bottom within that notched section.
