AzChopp3r
New member
Recently I had to dig into my MFWD on my JD4300 a bit in order to replace a leaky spindle seal. Talked about it here a bit. I thought I would snap some pictures and share it with you. Mind you I am not a certified mechanic and I am sure that I probably did some things the hard way but the outcome was good. So this is how an average Joe with a set of mechanical skills to become scary does this job.
Here is my leaky MFWD seal at the spindle joint-

And with that the first thing to do is to identify which front end you have. Scrape off the paint around the fill hole to get the serial number. Mine is the SB20BZ107.

Ordered the parts from my JD dealer. The spindle seal (2 part) was $57 bucks. I ordered spindle seals, wheel seals and bottom plugs for both sides. In my opinion, the spindle seal is a bad design as dirt will always work itself into this joint from above with the help of gravity.
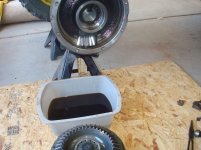
Next, obviously you need to raise the tractor off the front wheels and support with jack stands. Note: if you offset the height of the stands a notch where the front end tilts down away, you will not lose as much fluid when draining. The drain plug is at the bottom of the spindle housing. I had to heat it up a bit with propane in order not to strip it. Remove the 8 bolts holding the wheel cover onto the spindle housing. There are two pry points on each side. I used a wide face flat bar and hammer to tap out on both sides until it was free.


I used a long punch to drive out the plug on the bottom through the opening in the housing.

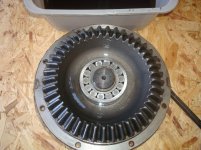
Reach up into the bottom and remove the small snap ring and the bevel gear will fall out. Next, remove the large snap ring. THIS SNAP RING IS MANLY. My cheap chinese set of snap ring pliers couldnt do the job and I ended up with a blood blister. Had a buddy bring over his Channel Lock snap ring pliers and they did work well. Remove the big snap ring and the shaft and bearing will fall out.
Below, from right to left, small external snap ring, bevel gear will fall out, large internal snap ring, shaft and bearing falls out.

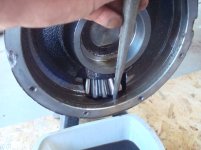
reach up into the housing and remove the spindle nut. The lock washer will need the tab driven out of the slot in the nut with a punch. Alot of people either order the special JD tool for this nut, which is alot like a spindle nut on a 4wd chevy, I used a set of locking needle nose pliers and a crescent wrench. Worked great and even well enough to tighten it back up during reassembly and get a good pre-load on the bearing.

The spindle nut comes off along with lock washer, bearing and then the housing. Place the housing on a bench, remove the old seal. Pull out the bearing and clean everything up. (I sucked out about a gal of diesel from mama's duramax to use as cleaning solvent.) reinstall the bearing and new seal. I apply a thin layer of silicone to the housing before installing the seal. The new seal will press in by hand. Most large seals will do this.
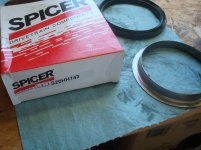
Remember this is a two piece seal. The second half, (the metallic seal surface or inner seal) goes onto the spindle after the old one is tapped off with a hammer and punch. I found a 4" PVC pipe fitting that fit around this inner seal perfectly allowing me something to drive it on with.
Below on left shows newly installed seal into spindle housing, right pic shows old seal and old inner seal next to new set in box with part # (hint...hint)


Reassembly is pretty straight-forward... however...
I left the spindle housing on the front end. In doing so it made it challenging to reassemble with gravity making it where you needed a couple extra arms to grow out of your body and hold the bearing, lock washer, and spindle nut back on. I had a buddy come over with his two arms instead and help with reassembly. It wasnt too bad after the extra help arrived. One person holds the spindle housing and assembles it onto the spindle. Be sure to put the steering linkage into the hole first. Carefully hold up the housing and align the housing, bearing and seal until it is all the way on. 2nd person installs the cone bearing, lock washer and spindle nut from the bottom.
Again I think that removing the spindle from the front-end would make reassembly alot easier. Thoughts?
Tighten the spindle nut allowing for a good pre-load on the bearing. Install shaft, big internal snap ring, bevel gear, small external snap ring. I installed a new bottom cap with a little silicone and tapped it in. Apply thin layer of silicone to surface of spindle housing where the wheels shaft cover mounts. Install wheel shaft cover and tighten the 8 bolts to spec. Install drain plug and fill with recommended fluid.
Thats it. You will have a nice dry spindle joint.

Again, I am no expert. Just an average Joe and am sure you will find areas I did things the extra hard way. It took me 3 hours, start to finish to do this. The wheel seal was no leaking and I decided not to replace it which would require pressing out the shaft from the bearing to get to that seal which requires a bit more attention to detail in installing that seal.
Here is my leaky MFWD seal at the spindle joint-
And with that the first thing to do is to identify which front end you have. Scrape off the paint around the fill hole to get the serial number. Mine is the SB20BZ107.
Ordered the parts from my JD dealer. The spindle seal (2 part) was $57 bucks. I ordered spindle seals, wheel seals and bottom plugs for both sides. In my opinion, the spindle seal is a bad design as dirt will always work itself into this joint from above with the help of gravity.
Next, obviously you need to raise the tractor off the front wheels and support with jack stands. Note: if you offset the height of the stands a notch where the front end tilts down away, you will not lose as much fluid when draining. The drain plug is at the bottom of the spindle housing. I had to heat it up a bit with propane in order not to strip it. Remove the 8 bolts holding the wheel cover onto the spindle housing. There are two pry points on each side. I used a wide face flat bar and hammer to tap out on both sides until it was free.
I used a long punch to drive out the plug on the bottom through the opening in the housing.
Reach up into the bottom and remove the small snap ring and the bevel gear will fall out. Next, remove the large snap ring. THIS SNAP RING IS MANLY. My cheap chinese set of snap ring pliers couldnt do the job and I ended up with a blood blister. Had a buddy bring over his Channel Lock snap ring pliers and they did work well. Remove the big snap ring and the shaft and bearing will fall out.
Below, from right to left, small external snap ring, bevel gear will fall out, large internal snap ring, shaft and bearing falls out.
reach up into the housing and remove the spindle nut. The lock washer will need the tab driven out of the slot in the nut with a punch. Alot of people either order the special JD tool for this nut, which is alot like a spindle nut on a 4wd chevy, I used a set of locking needle nose pliers and a crescent wrench. Worked great and even well enough to tighten it back up during reassembly and get a good pre-load on the bearing.
The spindle nut comes off along with lock washer, bearing and then the housing. Place the housing on a bench, remove the old seal. Pull out the bearing and clean everything up. (I sucked out about a gal of diesel from mama's duramax to use as cleaning solvent.) reinstall the bearing and new seal. I apply a thin layer of silicone to the housing before installing the seal. The new seal will press in by hand. Most large seals will do this.
Remember this is a two piece seal. The second half, (the metallic seal surface or inner seal) goes onto the spindle after the old one is tapped off with a hammer and punch. I found a 4" PVC pipe fitting that fit around this inner seal perfectly allowing me something to drive it on with.
Below on left shows newly installed seal into spindle housing, right pic shows old seal and old inner seal next to new set in box with part # (hint...hint)
Reassembly is pretty straight-forward... however...
I left the spindle housing on the front end. In doing so it made it challenging to reassemble with gravity making it where you needed a couple extra arms to grow out of your body and hold the bearing, lock washer, and spindle nut back on. I had a buddy come over with his two arms instead and help with reassembly. It wasnt too bad after the extra help arrived. One person holds the spindle housing and assembles it onto the spindle. Be sure to put the steering linkage into the hole first. Carefully hold up the housing and align the housing, bearing and seal until it is all the way on. 2nd person installs the cone bearing, lock washer and spindle nut from the bottom.
Again I think that removing the spindle from the front-end would make reassembly alot easier. Thoughts?
Tighten the spindle nut allowing for a good pre-load on the bearing. Install shaft, big internal snap ring, bevel gear, small external snap ring. I installed a new bottom cap with a little silicone and tapped it in. Apply thin layer of silicone to surface of spindle housing where the wheels shaft cover mounts. Install wheel shaft cover and tighten the 8 bolts to spec. Install drain plug and fill with recommended fluid.
Thats it. You will have a nice dry spindle joint.
Again, I am no expert. Just an average Joe and am sure you will find areas I did things the extra hard way. It took me 3 hours, start to finish to do this. The wheel seal was no leaking and I decided not to replace it which would require pressing out the shaft from the bearing to get to that seal which requires a bit more attention to detail in installing that seal.