Road Grader

   / Road Grader #1  

LetsRoll

Gold Member
Joined
Jun 4, 2005
Messages
301
Location
Kentucky
Tractor
2005 New Holland TC48DA 2wd 12x12 tranny
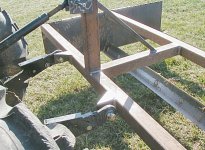
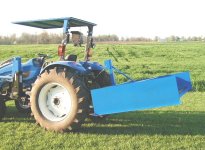
I finally got around to building a road grader. It turned out better than I expected. Also, performes rather well too. I've already plowed up the field in front of my house. So, I needed an implement to smooth it out in a timely manor. I tried using a rock rake, but I wasn't happy with the outcome.

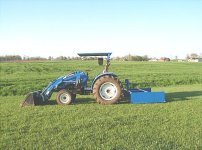
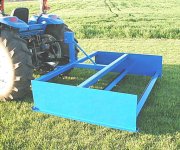
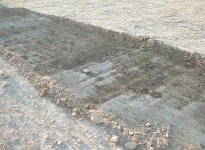
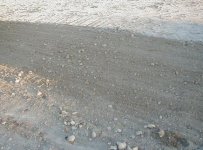
So, I finally ordered the cutting edge blades and bought the bolts from my New Holland dealer. It took a week to get the blades. Two 7ft blades, 16 bolts lock washers nuts, 2 cat II pins, and a quart of blue New Holland paint cost me $300. The skids are 5ft long and 18inchs high. The skids, the angle iron that the blades are bolted to and the flat steel that the skids ride on while being pulled cost me $300. The 3inch square tubing and the 1inch square tubing used for support, I already had that on hand. Total bill was $600 to build. It took me a total of three days to build this road grader. I haven't painted it yet cause I wanted to see how well it works. So, if I had to modify it, I didn't have to deal with the paint. I've used it to smooth out the front field and the side field next to the house. Over all, I'm happy with it.

sideview.jpg


289adced.jpg
 
   / Road Grader
  • Thread Starter
#2  
Another picture
 

Attachments

  • 837739-front view.jpg
    837739-front view.jpg
    84.8 KB · Views: 4,325
   / Road Grader
  • Thread Starter
#3  
Picture showing how low the front blade sets below the skid.
 

Attachments

  • 837741-front blade.jpg
    837741-front blade.jpg
    54.1 KB · Views: 3,246
   / Road Grader
  • Thread Starter
#4  
The back blade sets level with the skids. It doesn't do any cutting, just smooths things out.
 

Attachments

  • 837744-back blade.jpg
    837744-back blade.jpg
    47.9 KB · Views: 2,892
   / Road Grader
  • Thread Starter
#5  
Just a beautiful weld. /forums/images/graemlins/wink.gif
 

Attachments

  • 837745-weld.jpg
    837745-weld.jpg
    52.3 KB · Views: 4,006
   / Road Grader #7  
You did a GREAT job. That thing looks like it would cut very well and smooth nicely.

I don't have use for something like that, but what you built looks like it would 'get 'er done".

Around here, people seem to have trouble with the sides of the drives needing to be brought back to the center. Some of the implements I've seen angle the front blade to pull the dirt from the sides to the center, and the rear (straight) blade smooths it.

I like the way your cutting blade is below your sides.

ron
 
   / Road Grader
  • Thread Starter
#8  
Ron

I got the idea from the dura grader. I was going to buy the dura grader, but the price of the unit and the shipping price drove me to just build one. I have horses that just love to tear up the land. This field is one of them. I plowed it first and use my road grader to smooth it out. I haven't used it yet on my drive way. I dont think it will help my drive cause its hard as a rock right now. It would smooth the rocks on top, but that about it. Its calling for rain here in a couple days, I'll try it out after it rains. As for the angling the front blade. I was going to do that, but after seeing SonnieP pictures of how his dura grader performed, I decided to mount them straight.

Thanks for the comment.

Cliff
 
   / Road Grader
  • Thread Starter
#10  
</font><font color="blue" class="small">( Great looking welds, indeed!
Nice job on the project. How heavy did it turn out to be? )</font>

I have to guess 1000 pounds cause I cant move it at all or even tilt the front up a little. By the way, that picture that shows the weld was done with a 100amp mig welder.
 
   / Road Grader #11  
As already commented; Great Looking welds, really nice fabrication technique! /forums/images/graemlins/grin.gif

Egon /forums/images/graemlins/grin.gif
 
   / Road Grader #12  
Looks really nice. <font color="blue">Even nicer after the paint job. </font> .

How did you make the decision to make the blades straight across rather than angled as I've seen on the commercial units? Those seem to have the front blade angled and the rear blade straight.
 
   / Road Grader #13  
NICE JOB.
I also looked at the Duragrader link.
Are there plans for this project ?
(Dare I ask this ?) - Is it "scaleable" to wider/narrower ?
 
   / Road Grader #14  
Nice Job!
I have rounded up all the steel I need to build something similar. I am planning on modeling mine after the "Big-Boy" grader with a swing down gate above the rear blade so I can use it like a box scraper also. I was also thinking about a removeable angle blade that can be placed between the first and second blades to shift material that the first blade cuts to one side
 
   / Road Grader
  • Thread Starter
#15  
The reason I chose to go with the straight blade cause after seeing SonnieP's (TBN member) pictures of how well his duragrader performed. I decided to mounted them straight. The unit can be scaled down if that is what is needed. The reason I chose the 7 ft model was cause UPS will not deliver anything bigger than 7 ft. Anything bigger than 7 ft, they would have to be shipped on a semi truck which was a whole lot more for shipping. The 7 ft model covers my tractors tracks and it allows me to get up closer to what ever I'm working on (fence line for example). The blades I am using are for a RB84 woods grader blade (back blade is what most call them). The blades are flat on the back side and round on the front side. This allows the dirt or gravel rocks to roll on the blade. I had thought about making a removable shield behind the last blade to help move more dirt or gravel rock. Glade I didn't cause adjusting the angle of the front blade will cause it to cut allot of dirt and will build up in front of the blade allowing you to drag more. When the front blade cutts allot of dirt, your going to need allot of horsepower from the tractor. Mine is 48 horse power (TC48DA) and there was a few times I had to dump some of the load cause the tractor would spin. Keep in mind how much dirt weighs if it has some moisture in it. Word of advise to those that are going to build one. Once people find out that you built one or see you using it. They will want you to do there driveway or some type of landscaping for them. Been there and done that. I've had mine built for a month now, and I have done several peoples places. You can make allot of money using this type of implement. I finally got to take my blades off mine yesterday so that I could wash it down and put some paint on it. If I get a chance today, I'll take a few pictures of it while it is still clean.
 
   / Road Grader
  • Thread Starter
#16  
Few pictures after I painted it.
 

Attachments

  • 865410-fullside.JPG
    865410-fullside.JPG
    73.6 KB · Views: 1,430
   / Road Grader
  • Thread Starter
#17  
Another view.
 

Attachments

  • 865412-liftedside.JPG
    865412-liftedside.JPG
    71.1 KB · Views: 1,144
   / Road Grader
  • Thread Starter
#18  
Another view from the back.
 

Attachments

  • 865415-backside.JPG
    865415-backside.JPG
    96.7 KB · Views: 1,132
   / Road Grader
  • Thread Starter
#19  
I took the front end loader bucket and dug up the top surface just to give an idea how hard the soil is.
 

Attachments

  • 865419-before.jpg
    865419-before.jpg
    39.6 KB · Views: 1,172
   / Road Grader
  • Thread Starter
#20  
This picture shows one pass. It will give you an idea just how the front and back blades works. The front digs up the surface and as the material goes over the front blade. The back blade sets level with the skids (side panels). As the material gets to the back blade, the back blade smooths out the material. If there is allot of material, the back blade will allow some of the material to go over the blade.

Since I had to fill in the area that I dug up. I had to adjust the front blade so that it would cut the hard surface of the dirt. Adjusting the front blade is done by adjusting the top link for the three point hitch. I see a hydraulic cylinder and some rear remotes coming real soon.
 

Attachments

  • 865431-after.jpg
    865431-after.jpg
    39.1 KB · Views: 1,344

Tractor & Equipment Auctions

Jaw Crusher (A59228)
1987 CATERPILLAR D6H HIGH TRACK CRAWLER DOZER (A59823)
1987 CATERPILLAR...
(INOP) 2016 CATERPILLAR 259D SKID STEER (A52707)
(INOP) 2016...
Challenger MT275B 40HP 4WD Utility Tractor w/ 76in. Rotary Brush Cutter Attachment (A59228)
Challenger MT275B...
Alamo SHD96 Flail Mower
Alamo SHD96 Flail...
2013 Ford Taurus Sedan (A59231)
2013 Ford Taurus...
 
Top