xzcVAbc5
Gold Member
When my parents built their house they had some problems with the sewer early on. To get a snake into the pipe a guy dug down to the line and drilled (or otherwise created a hole) in the line. Then added clay tiles to get the cleanout back to ground level prior to adding the dirt back to the hole.
As you can imagine this is a non-ideal solution and the cleanout wasn't useful over time. Fortunately, they never had sewer problems over the years after the first encounter.
I decided to upgrade the cleanout since I have the backhoe and the cleanout is unusable. It was also warm out, but not too hot.
A couple pictures to get this thread rolling:
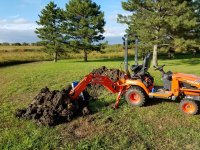
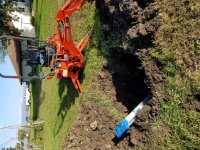
After digging down I hooked the top of the pipe with the backhoe and tore it open. I didn't totally destroy it so it was still somewhat useful. This is what it looked like after I got out the shovel and cleaned up the hole a little to get an idea what size pipe I'm dealing with and able to figure out what parts I need to buy.
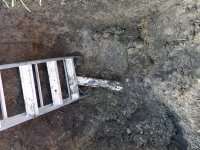
The existing pipe is 4" SDR35 (thin wall). The store I was able to get parts sold 4" Sch40 DWV pipe. The connectors that I used adapt the 4" thin wall to 4" Sch40. The connectors are pretty hard to find on the internet. Only supplyhouse.com had them in any quantity less than 6 where I could order and not have to call every business.
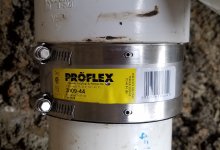
This type of coupling is called a "shielded coupling". It has a stainless band with hose clamps rivited to it and then slipped around the rubber gasket. This is the type of coupling you want to use if burying pipe like this. It makes the connection very ridgid. Without the stainless band the rubber would be likely to shift or tear after it's buried.
The coupling:
It was very important to me to keep the ends of the pipe clean where I connected the couplings to the cleanouts. Notice the pipe cleaned on one end all the way to the side of the hole and the other end I cleaned about the same distance. Water and a rag is good enough to do the job. Also, while I had the section of pipe removed I used the rubber caps to keep from pushing any mud into the line while digging with a shovel to make more room.
The pipe assembly:
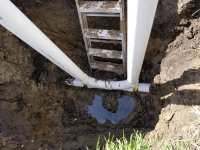
Next I added some gravel to the hole and pushed the rocks under the pipe to support it before fill was added back to the hole. I packed it with my feet until stomping on one side of the pipe would push rocks out the other side.

Adding some good fill:
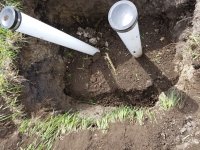
Just before adding the final fill I compacted the dirt in the hole with the backhoe. I finalized the hole by getting the crappy clay soil I dug out moved to another spot and added some more good fill dirt back in and flattened it off with the BX loader.
The final product:
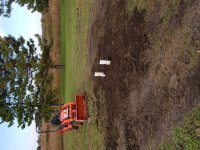
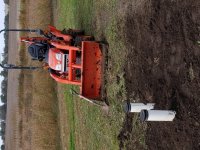
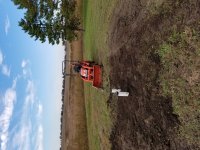
The rubber caps aren't a long term solution to keep the pipes covered. I believe they will rot in the sun. Since I already had them to cover the pipe ends while digging I put them on. Eventually, there will be some PVC caps put on or screw-on cleanout caps added.
Edit: I have no idea why some of the thumbnails are rotated in a weird orientation. When clicking the pictures they are rotated correctly.
As you can imagine this is a non-ideal solution and the cleanout wasn't useful over time. Fortunately, they never had sewer problems over the years after the first encounter.
I decided to upgrade the cleanout since I have the backhoe and the cleanout is unusable. It was also warm out, but not too hot.
A couple pictures to get this thread rolling:


After digging down I hooked the top of the pipe with the backhoe and tore it open. I didn't totally destroy it so it was still somewhat useful. This is what it looked like after I got out the shovel and cleaned up the hole a little to get an idea what size pipe I'm dealing with and able to figure out what parts I need to buy.

The existing pipe is 4" SDR35 (thin wall). The store I was able to get parts sold 4" Sch40 DWV pipe. The connectors that I used adapt the 4" thin wall to 4" Sch40. The connectors are pretty hard to find on the internet. Only supplyhouse.com had them in any quantity less than 6 where I could order and not have to call every business.
This type of coupling is called a "shielded coupling". It has a stainless band with hose clamps rivited to it and then slipped around the rubber gasket. This is the type of coupling you want to use if burying pipe like this. It makes the connection very ridgid. Without the stainless band the rubber would be likely to shift or tear after it's buried.
The coupling:

It was very important to me to keep the ends of the pipe clean where I connected the couplings to the cleanouts. Notice the pipe cleaned on one end all the way to the side of the hole and the other end I cleaned about the same distance. Water and a rag is good enough to do the job. Also, while I had the section of pipe removed I used the rubber caps to keep from pushing any mud into the line while digging with a shovel to make more room.
The pipe assembly:

Next I added some gravel to the hole and pushed the rocks under the pipe to support it before fill was added back to the hole. I packed it with my feet until stomping on one side of the pipe would push rocks out the other side.

Adding some good fill:

Just before adding the final fill I compacted the dirt in the hole with the backhoe. I finalized the hole by getting the crappy clay soil I dug out moved to another spot and added some more good fill dirt back in and flattened it off with the BX loader.
The final product:


The rubber caps aren't a long term solution to keep the pipes covered. I believe they will rot in the sun. Since I already had them to cover the pipe ends while digging I put them on. Eventually, there will be some PVC caps put on or screw-on cleanout caps added.
Edit: I have no idea why some of the thumbnails are rotated in a weird orientation. When clicking the pictures they are rotated correctly.
Last edited:
