B58Hustler
Bronze Member
- Joined
- May 18, 2011
- Messages
- 79
- Tractor
- John Deere 3320
A first-time post. I am pleased to join this forum which I have followed for a year. I am impressed with the members knowledge, mechanical skills and temperment in dealing with each other.
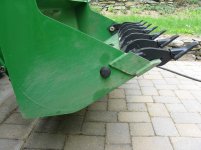
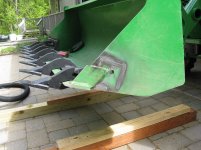
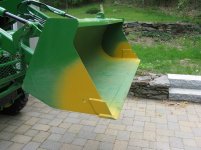
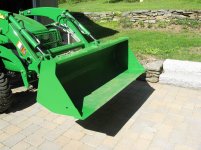
The purpose of this post is two-fold. To show a W.R. Long toothbar install on a 300cx loader and to give my opinion on the metal quality of the bucket.
This toothbar, as the pictures show is certainly HD and well made. I like the pin-on teeth and the tight fit to the cutting edge on the bucket. When I ordered the bar I thought I might brace from the inside so I gave an inside dimension 1/2 inch shorter than the 60 3/4 inch measure. However when the bar arrived at 60 1/4 I found that the side panels are slightly bowed out 6 inches from the from the front of the bucket. (so be sure to measure your inside dimension in the two different positions)
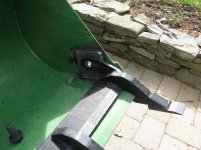
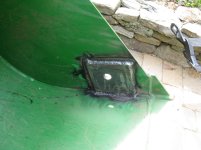
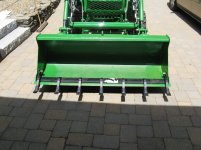
During the mock-up for the install I center punched the bucket side panels for a pilot hole so I could drill a 3/4 inch hole from the outside of the panel. I was surprised by the softness of the 1/8 inch thick side panel. My feeling is that those panels alone would not handle the stress of using the bar. So I had a 4x4 inch piece of 1/4 inch plate welded on the inside of the right panel and a 4x4 piece of 3/8 inch plate welded on the inside of the left panel which left me a .025 gap on the right side with the left side bolted up. That gap closed up nicely when the right side got bolted.
I used 3/4 inch grade 8 hardware (of note is using flange bolts because the diameter of the flange is at least 3/8 inch smaller diameter than a flat washer. This is meaningful to reduce the chance of interference with the 1/4 inch piece welded on the corner of the bucket at joint of the bucket cutting edge, bucket bottom and bucket side panel.) I also point out that your mounting bolts should be placed as far to the back of the slotted plate as possible to reduce future slop developing.
Last point is metal strength. I traded my JD 5200 and 540 loader that I bought new 16 years ago. I moved at least 700 yards of crushed stone, sand, topsoil and 4-8 inch rip/rap. Thrown in logging chains, skidding tongs and felling wedges...The lack of wear to that bucket was amazing compared to 90 hours of use on the standard 300cx bucket. Here's what happened with drilling the 3/4 inch holes in the 4x4 plates and bucket end plates.
Using a new Silver & Demming cobalt 3/4 inch, 1/2 inch shank...it took about 2 minutes on a 1/2 horsepower drillpress with cutting fluid to drill the 4x4 plates. It took less than 20 seconds using a 14.4 Makita hand drill with no cutting fluid, no chatter, no smoke to drill each end plate with the same drill bit. I thought I was drilling a sheet of pewter.
Hope I didn't bore you with the gory details. Being a first time poster hope the pictures show up. I'll need your help if they don't.
The purpose of this post is two-fold. To show a W.R. Long toothbar install on a 300cx loader and to give my opinion on the metal quality of the bucket.
This toothbar, as the pictures show is certainly HD and well made. I like the pin-on teeth and the tight fit to the cutting edge on the bucket. When I ordered the bar I thought I might brace from the inside so I gave an inside dimension 1/2 inch shorter than the 60 3/4 inch measure. However when the bar arrived at 60 1/4 I found that the side panels are slightly bowed out 6 inches from the from the front of the bucket. (so be sure to measure your inside dimension in the two different positions)
During the mock-up for the install I center punched the bucket side panels for a pilot hole so I could drill a 3/4 inch hole from the outside of the panel. I was surprised by the softness of the 1/8 inch thick side panel. My feeling is that those panels alone would not handle the stress of using the bar. So I had a 4x4 inch piece of 1/4 inch plate welded on the inside of the right panel and a 4x4 piece of 3/8 inch plate welded on the inside of the left panel which left me a .025 gap on the right side with the left side bolted up. That gap closed up nicely when the right side got bolted.
I used 3/4 inch grade 8 hardware (of note is using flange bolts because the diameter of the flange is at least 3/8 inch smaller diameter than a flat washer. This is meaningful to reduce the chance of interference with the 1/4 inch piece welded on the corner of the bucket at joint of the bucket cutting edge, bucket bottom and bucket side panel.) I also point out that your mounting bolts should be placed as far to the back of the slotted plate as possible to reduce future slop developing.
Last point is metal strength. I traded my JD 5200 and 540 loader that I bought new 16 years ago. I moved at least 700 yards of crushed stone, sand, topsoil and 4-8 inch rip/rap. Thrown in logging chains, skidding tongs and felling wedges...The lack of wear to that bucket was amazing compared to 90 hours of use on the standard 300cx bucket. Here's what happened with drilling the 3/4 inch holes in the 4x4 plates and bucket end plates.
Using a new Silver & Demming cobalt 3/4 inch, 1/2 inch shank...it took about 2 minutes on a 1/2 horsepower drillpress with cutting fluid to drill the 4x4 plates. It took less than 20 seconds using a 14.4 Makita hand drill with no cutting fluid, no chatter, no smoke to drill each end plate with the same drill bit. I thought I was drilling a sheet of pewter.
Hope I didn't bore you with the gory details. Being a first time poster hope the pictures show up. I'll need your help if they don't.
")