I was so inspired by all the photos and discussion threads on this site that I decided to use the post-winter inactivity period to start customizing my 3120tractor. I included some minor upgrades like, the right step off the cab, vertical exhaust, and then put some major work into the lighting and electrical system.
Pictures: Picasa Web Albums - Deere - Trick-my-Tractor
The right step; yep, just like the left step... I realize it's not recommended, but hey, the mounting plate comes stock, and I'm going to get in on that side of the tractor whenever needed anyhow. It's nice to have a step on both sides.
Vertical exhaust: Just because it looks cool... Alright, I did tell my wife she wouldn't end up with oil residue in the garden and the exhaust wouldn't start a fire now... something had to justify the $165 expense!
Accessory Fuse Block: 6-fuse blade block and relay from Napa auto parts. Fuse block mounted on a custom mounting bracket. I wanted to elevate the fuse block above any potential water that may drip into the pan area. I've seen where people have connected directly to the battery... I didn't want to poke another hole into, or go around the radiator mounting plate. Instead, I traced the large AWG (gauge) wire from the battery to the starter... the same place that the existing fuse block gets its power... I started at the starter electrical connection and ran a 5" lead to a weatherproof 30 AMP fuse, and then a 10 AWG wire through the dash, past the existing fuse block, and then followed the existing wires (under the right foot floor pan) towards the rear of the tractor and into the switch area on the right rear fender. All connections soldered, heat-shrinked, and then wrapped in the plastic flex-sleeve for the entire distance. The fuse block does not activate until the key is turned on. The red wire that goes to the cruise control switch is activated with 12V when the tractor key is on. I'm simply using the 12V from this to activate the relay and permit the higher amps to flow from the battery to the fuse block.
Lighting: Such a simple idea and ever so needed, but what a pain in the rear to wire in! Basically, here's how I did it:
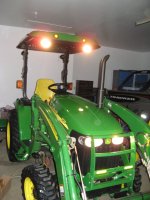
Marker lights: I never really liked the reflectors on the canopy so I decided on some illumination! Parts came from Big-R Ranch Supply. Simple trailer clearance lights, rubber grommets, and 16 AWG wire. All marker lights wired in a common ground and power. Power derived from the factory purple working light sockets under the seat. Headlights come on, and tada... marker lights come on too.") No useful purpose for the marker lights... i just like the look!
No useful purpose for the marker lights... i just like the look!
Front and rear work lights: Lights and switches came from John Deere. I custom made the rear mounting brackets. I didn't want to drill holes in the ROPS. The ladder in the front of the canopy cab came from a data center 6" wide wire ladder rack that happened to have perfect spacing for bolting to the canopy frame. The lights bolted nicely to it. All wiring was ran through the canopy tubes and inside the ROPS through factory drilled holes. The switches connect to the accessory fuse block, one switch for the front, and the second for the rear.
Future... I already ran the ground, cab light wire, and 12V radio wire for the "tractor tunes" unit to the top of the ROPS. Outside of that, I still need to have someone weld more steel on my weak "standard duty" bucket. If I only knew... i would have spent the extra on the upgraded heavy duty bucket!
Pictures: Picasa Web Albums - Deere - Trick-my-Tractor
The right step; yep, just like the left step... I realize it's not recommended, but hey, the mounting plate comes stock, and I'm going to get in on that side of the tractor whenever needed anyhow. It's nice to have a step on both sides.
Vertical exhaust: Just because it looks cool... Alright, I did tell my wife she wouldn't end up with oil residue in the garden and the exhaust wouldn't start a fire now... something had to justify the $165 expense!
Accessory Fuse Block: 6-fuse blade block and relay from Napa auto parts. Fuse block mounted on a custom mounting bracket. I wanted to elevate the fuse block above any potential water that may drip into the pan area. I've seen where people have connected directly to the battery... I didn't want to poke another hole into, or go around the radiator mounting plate. Instead, I traced the large AWG (gauge) wire from the battery to the starter... the same place that the existing fuse block gets its power... I started at the starter electrical connection and ran a 5" lead to a weatherproof 30 AMP fuse, and then a 10 AWG wire through the dash, past the existing fuse block, and then followed the existing wires (under the right foot floor pan) towards the rear of the tractor and into the switch area on the right rear fender. All connections soldered, heat-shrinked, and then wrapped in the plastic flex-sleeve for the entire distance. The fuse block does not activate until the key is turned on. The red wire that goes to the cruise control switch is activated with 12V when the tractor key is on. I'm simply using the 12V from this to activate the relay and permit the higher amps to flow from the battery to the fuse block.
Lighting: Such a simple idea and ever so needed, but what a pain in the rear to wire in! Basically, here's how I did it:
Marker lights: I never really liked the reflectors on the canopy so I decided on some illumination! Parts came from Big-R Ranch Supply. Simple trailer clearance lights, rubber grommets, and 16 AWG wire. All marker lights wired in a common ground and power. Power derived from the factory purple working light sockets under the seat. Headlights come on, and tada... marker lights come on too.
No useful purpose for the marker lights... i just like the look!Front and rear work lights: Lights and switches came from John Deere. I custom made the rear mounting brackets. I didn't want to drill holes in the ROPS. The ladder in the front of the canopy cab came from a data center 6" wide wire ladder rack that happened to have perfect spacing for bolting to the canopy frame. The lights bolted nicely to it. All wiring was ran through the canopy tubes and inside the ROPS through factory drilled holes. The switches connect to the accessory fuse block, one switch for the front, and the second for the rear.
Future... I already ran the ground, cab light wire, and 12V radio wire for the "tractor tunes" unit to the top of the ROPS. Outside of that, I still need to have someone weld more steel on my weak "standard duty" bucket. If I only knew... i would have spent the extra on the upgraded heavy duty bucket!