Gentlemen,
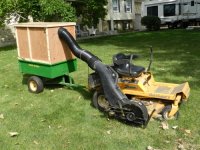
The promised pictures of the completed leaf collection system.
First off, the center deck pulley has a bolt longer than the other two spindles, to accommodate two stacked pulleys. You will need one this length as well as with the fine thread. As well, you will need another pulley (3/4 inch diameter center) to stack on your outer deck spindle, and somewhat smaller in diameter than the deck spindle pulleys. (JD does it with their Power Flow system, so I did as well.)
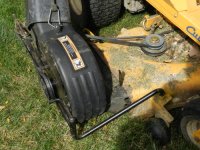
The fan assembly (John Deere Power Flow 54 in or 62 in) mounts at the front with a 3/4 inch ( inside diameter) tube that can be bolted to the deck or in this case welded to the deck bogey wheel. The fan assembly then just swings into the discharge opening of the deck.
Notice the straight bar at the fan assembly's rear that just fits into a hole on a rear bracket (fabricated and welded to the deck). On a JD this is the rear bogey wheel mount. Its purpose is not to carry any weight of the fan assembly, but rather to act as a tension against the spring loaded drive belt to the deck, and to position the fan assembly in the discharge opening.
Notice that the drive belts and pulleys are all exposed. There is a plastic cover for it, but leaving it off allows me to watch for belt wear, etc. And yes, there are no safety concerns, as I'm the only one using the unit, and there are no children living within a mile of my county home.
The fan assembly doesn't entirely cover the deck discharge opening at the rear, and a small strip of mulched leaves and grass is left behind with each pass, only to be picked up by overlapping on the next pass down the lawn. Not perfect, but close enough.
JD states to attach the entire system to a deck that is properly levelled, and then to lower the bogey wheels on the discharge /fan assembly side, front and rear, one notch. This basically keeps the right side of the deck from scalping the lawn because of the additional weight of the fan assembly on that side, and prevents the plastic bottom of the fan assembly from scalping the ground and wearing through. (I might pop rivet a thin sheet of metal to the bottom of the fan assembly, if I find the plastic is wearing through.
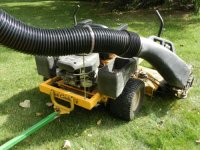
From there I attached the plastic chute to the fan (notice the factory bungee cord at the fan) and connected the 7 inch diameter hose to its end and the top of the collection trailer. (The fluted hard plastic bellows-like sections at both ends of the hose are from the original grass bagger system. I cut it in two, fastened one end into the trailer box by just a press fit, and used a hose clamp at the discharge chute end.
The hose just press fits into each end and doesn't require a fastener. The 7 inch hose is EXPENSIVE, but is the best you can buy at almost $20 a foot. I had to purchase 10 feet, but only required 5 feet, so I guess I have an extra for down the road. Note the hose support part way down the hose, simply part of the original JD bagger system. Two small bungee cords in vinyl hose circle the hose and clip onto the support rod.
The hitch is simply part of the bagger assembly frame that I hacked off and bolted to the Z Force.
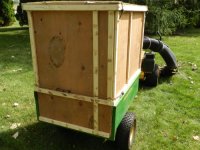
The collection box is not a beauty but is made from 3/8 plywood I had stored from other projects. The 1 x 2 inch strapping allowed me to connect the smaller sheets together and allow for strength at ends and corners, where bungee cords and carriage bolts with wing nuts allow for the entire box to be taken apart and stored for next year.
The top cover is vented with ordinary screening, and the rear door lifts completely off for emptying the box when full, using a garden rake. My trailer has a dump function, but doing so to empty it would require much longer hose. I hope to some day fabricate the box from galvanized steel sheeting. We'll see.
Gene


