OP
fxrs55
Gold Member
- Joined
- Jan 21, 2013
- Messages
- 384
- Location
- New Jersey FOR NOW
- Tractor
- Sold. Craftsman gt6000, Craftsman gt6000 Hydro, Cub cadet LT1050. Bolens G154/Iseki TX1300F
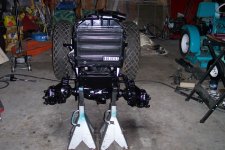
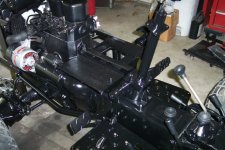
This is the rest of the story from Wednesday when I first put
the two halves together. After I checked all the bell housing
to engine block bolts I removed The beam from my A frame
and proceeded to fold up the ladders and put away
anything no longer needed. I was plotting the assembly order
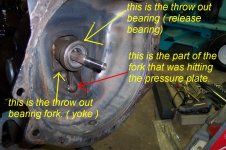
and I decided to check the clearance between
the throw out bearing and the fingers on the pressure plate.
Well there was none and its is suppose to be around .020 hummm.
I backed the adjustment rod out to the end of the threads
and still no clearance. And now the spring towers on the pressure plate were hitting the clutch linkage inside the bell housing
when I turned the engine over by hand.
Dang it! Its around 9:00 pm Wednesday night so I've had enough.
I go in the house take a shower and find something for dinner.
Now I hear the tractor out in the garage mocking me so I go back out, put the A frame back together and split the darn
thing in half again. Then back in the house and go to bed.
My alarm goes off at 4:00 AM.
Thursday I look at the parts manual to see what
all is in the bell housing that is part of the throw out bearing
and linkage or the arm which they call the yoke.
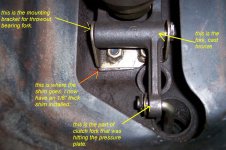
They list a shim that goes between the mount for the yoke
and the bell housing. If I could move that assembly
back in the bell housing It would help with the clearance.
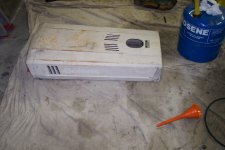
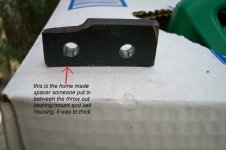
So when does a shim become a spacer?
That shim someone put in there was home made
and 7/16" thick! Where I come from that it is a spacer.
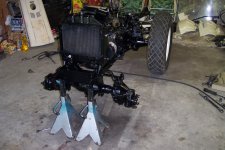
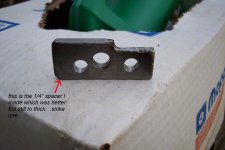
I made a new "shim" that was 1/4" thick and put it in
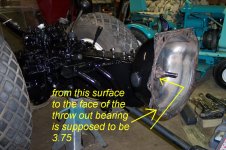
and assembled yoke back on the bell housing. That helped but not enough. I made another shim out of 1/8" thick steel and put that
in where it goes and re assemble the yoke assembly and checked the dimension and now its at 3.75 which is what its suppose to be. I don't know why someone made that spacer so thick but that threw everything out. They adjusted the fingers on the pressure plate to get clearance between the bearing and the pressure plate fingers but that threw them out of tolerance to the point where the pressure plate fingers were almost hitting the clutch disk when clutch pedal was pushed in. Now I preceded to put the two halves back together and while I was trying to get front drive shaft into
the universal joint yoke I see that it moves out
from diff housing when I turn it clockwise
and pulls back in when I turn it counter clockwise.
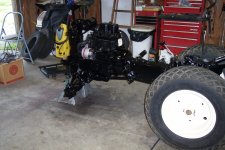
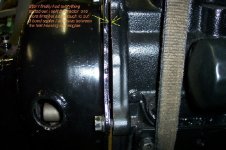
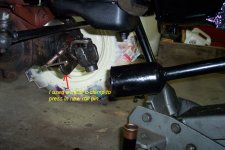
Now I'm thinking the bearings are bad on the front pinion gear.
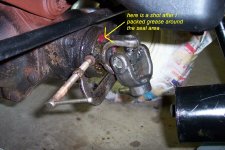
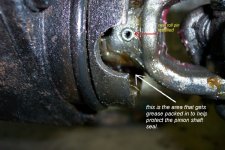
I cleaned all of the grease out from around the pinion shaft.
Note! that grease is from the factory and it helps
protect the seal on the pinion shaft from dirt and water
or whatever else could get in there. Now I can see better
and realized that the splined u joint yoke is just sliding
back and forth on the splined pinion shaft.
They didn't put in the roll pin! It was just coincidental
that the yoke was moving in or out relative to rotation.
Just an FYI I pressed the roll pin in while I had the
tractor split apart because I though it would be easier,
but with pin in I couldn't slide the yoke on pinion shaft
while putting the two halves back together and that made
it harder to get everything lined up.
And after I had everything in place with the bolts
in the bell housing I realized I could have put roll pin
in after assembling the two halves and without the pin in
it would have been easier to get drive shaft into yoke
and line up the input shaft to the clutch disk
all at the same time. Lesson learned.
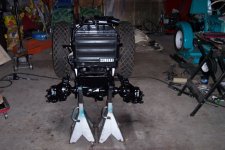
At this point I loosened the bolts in the bell housing
just enough to split tractor and put the 3 bond sealer
in between the two halves as per the factory manual.
I just wanted to share with anyone some of problems
I'm having thanks to someone else's rig job.
Also if you are ever trying to fix a problem
and your efforts aren't working, check if you can
to see if someone else's lack of knowledge or quick
fix methods are part of the problem.
the two halves together. After I checked all the bell housing
to engine block bolts I removed The beam from my A frame
and proceeded to fold up the ladders and put away
anything no longer needed. I was plotting the assembly order
and I decided to check the clearance between
the throw out bearing and the fingers on the pressure plate.
Well there was none and its is suppose to be around .020 hummm.
I backed the adjustment rod out to the end of the threads
and still no clearance. And now the spring towers on the pressure plate were hitting the clutch linkage inside the bell housing
when I turned the engine over by hand.
Dang it! Its around 9:00 pm Wednesday night so I've had enough.
I go in the house take a shower and find something for dinner.
Now I hear the tractor out in the garage mocking me so I go back out, put the A frame back together and split the darn
thing in half again. Then back in the house and go to bed.
My alarm goes off at 4:00 AM.
Thursday I look at the parts manual to see what
all is in the bell housing that is part of the throw out bearing
and linkage or the arm which they call the yoke.
They list a shim that goes between the mount for the yoke
and the bell housing. If I could move that assembly
back in the bell housing It would help with the clearance.
So when does a shim become a spacer?
That shim someone put in there was home made
and 7/16" thick! Where I come from that it is a spacer.
I made a new "shim" that was 1/4" thick and put it in
and assembled yoke back on the bell housing. That helped but not enough. I made another shim out of 1/8" thick steel and put that
in where it goes and re assemble the yoke assembly and checked the dimension and now its at 3.75 which is what its suppose to be. I don't know why someone made that spacer so thick but that threw everything out. They adjusted the fingers on the pressure plate to get clearance between the bearing and the pressure plate fingers but that threw them out of tolerance to the point where the pressure plate fingers were almost hitting the clutch disk when clutch pedal was pushed in. Now I preceded to put the two halves back together and while I was trying to get front drive shaft into
the universal joint yoke I see that it moves out
from diff housing when I turn it clockwise
and pulls back in when I turn it counter clockwise.
Now I'm thinking the bearings are bad on the front pinion gear.
I cleaned all of the grease out from around the pinion shaft.
Note! that grease is from the factory and it helps
protect the seal on the pinion shaft from dirt and water
or whatever else could get in there. Now I can see better
and realized that the splined u joint yoke is just sliding
back and forth on the splined pinion shaft.
They didn't put in the roll pin! It was just coincidental
that the yoke was moving in or out relative to rotation.
Just an FYI I pressed the roll pin in while I had the
tractor split apart because I though it would be easier,
but with pin in I couldn't slide the yoke on pinion shaft
while putting the two halves back together and that made
it harder to get everything lined up.
And after I had everything in place with the bolts
in the bell housing I realized I could have put roll pin
in after assembling the two halves and without the pin in
it would have been easier to get drive shaft into yoke
and line up the input shaft to the clutch disk
all at the same time. Lesson learned.
At this point I loosened the bolts in the bell housing
just enough to split tractor and put the 3 bond sealer
in between the two halves as per the factory manual.
I just wanted to share with anyone some of problems
I'm having thanks to someone else's rig job.
Also if you are ever trying to fix a problem
and your efforts aren't working, check if you can
to see if someone else's lack of knowledge or quick
fix methods are part of the problem.
Attachments
-
 sealer1.JPG130.1 KB · Views: 315
 -
 bellhousing1.JPG136.8 KB · Views: 366
 -
 bellhousing2.JPG141.4 KB · Views: 344
 -
 eigthspacer.JPG224.3 KB · Views: 382
 -
 grease1.JPG152.5 KB · Views: 718
 -
 fourspacer.JPG134.9 KB · Views: 266
 -
 quarter1spacer.JPG89.6 KB · Views: 206
 -
 rollpin1.JPG159 KB · Views: 287
 -
 rollpin2.JPG185.8 KB · Views: 313
Last edited: