Container Weld Shop build -

   / Container Weld Shop build -
  • Thread Starter
#21  
Cleaned up a couple scraps of the same tubing the cart's made out of, these are the first 4 beads using the new MM211 - to me, the autoset tends to run hot so if I use it I set it for one size thinner than I'm welding - but I messed up and wuz thinking the test pieces were .120" wall and they're .095" - beads woulda looked better if I'd NOT done that, or just moved faster. Oh well, caught it before doing any ACTUAL welds -

Second pic (woulda been first one, but pic uploader is STILL retarded) shows that I understand the unwritten law that "thou shalt use thine new welder to maketh its own conveyance", other 4 just show how NOT to turn off BRAIN before turning ON welder :rolleyes:

Probly also woulda helped if I'd done ANY welding in the last month (that's my story an' I'm stickin' to it :mur: ...Steve
 

Attachments

  • DSCN2886.JPG
    DSCN2886.JPG
    1.5 MB · Views: 387
  • DSCN2887.JPG
    DSCN2887.JPG
    1.6 MB · Views: 448
  • DSCN2888.JPG
    DSCN2888.JPG
    1.5 MB · Views: 436
  • DSCN2889.JPG
    DSCN2889.JPG
    1.6 MB · Views: 381
  • DSCN2890.JPG
    DSCN2890.JPG
    1.5 MB · Views: 367
   / Container Weld Shop build - #22  
Sometimes the easiest way to convert cad to images for a forum post is a screen capture. Alt-PrtScn for older windows boxes, you can the paste into "paint" and trim it down if you want.

Win 7-8-10 also have "snipping tool" which does something similar using the mouse, and you can just pick anything on the screen in one go without having to edit it first.
My daughter showed me how to do that just last spring, now I cant begin to figure out how to snip anything unless it's sheet metal.
 
   / Container Weld Shop build - #23  
3-d - tried to catch onto Sketchup a few years ago, but it took me almost 2 years to get where I could draw something decent in Generic Cadd- it's an old DOS program that useta be $199 when Autocad was $1400 - only runs on ONE of my WinXP laptops, takes ZERO screen real estate for menus 'cause nearly everything is a 2 letter command (some are 3) and it exports DXF files (older Autocad format) - I've got a few newer windoze based ones, but haven't wanted to invest the time to re-learn EVERYTHING til that old laptop finally croaks. So for now I only use the newer progs for "file conversion". I could get a newer version of the old DOS prog that runs on modern computers and can use the same commands I'm used to, but they want $600 for the basic program and it's been a LONG time since I've done any drawing for anyone but me - there's other things I could use that $$ for.

I WILL have some better drawings/more angles up sometime after I finish the cart for the mm211 - just gotta experiment with different ways of converting DXF's to JPG's for best results. I'll be making a couple changes to the way the bridge sits on the rails (stronger) so I'll convert THOSE when they're done. Also a "side" view showing legs, bracing, and another trolley detail.

I had the earlier transformer version of the mm211 too, sold it to a buddy for as good a deal as I got when I found the MM252 with dual running gear, a never-used 30A spool gun, 3 bottles (2 were full) all for $2200 - I liked the early 211, but would have liked it MORE if it could handle a 15' gun without voiding the warranty, and had more options on the autoset, etc -

The newer version's autoset does .024 up to .035 wire, flux core, mild steel (with either C25 or straight CO2), stainless, and aluminum. The drive rolls are rated for a 15' gun (NOT included, no option to swap, you just gotta buy a separate one of you want the length) and the rolls are down-firing like the other newer machines, and without a spool of wire it weighs about 50 pounds LESS than the older version, and will run full amperage using less than 25 amps @ 240 volts, either 50 OR 60 hZ (another advantage of inverters)

Speaking of which, got just about ready to tack pieces together for the cart - right now everything's clamped down to the 1" thick table and will only get UN-clamped when it's stone cold - when it's done, the 211 will sit on neoprene pads and be strapped in place, the 150 CF bottle will get locked into the corner beside the welder, and the two tallest uprights will get 1-1/4" tube inserts and a cross bar that's about 2" taller than the top of the gauges - it'll act as both a "roll bar" and a "hand truck handle", wheels will be 2 13" tires (offroad use, sorta) and 2 locking urethane wheeled casters for when it's upright.

I should get most, if not all, the welds done manana (doesn't mean I WILL :laughing: ) Anyway, here's today's doodles... Steve

(Oh, the unistrut is NOT part of the design, it's just holding the spacing between the rear uprights til it's welded out)

At the rate you're going on this weld cart build, the crane picture pitcture upgrade wont happen till............At least we have this weld cart on steroids to look at, almost looks like you're a clamp-a-holic, of course I would've painted it after I welded it, hope you're not violating any Union labor laws by doing your own paint removal before welding, your secret safe with me.

That new M211 looks alot smaller, easier to move around. I've always found that a longer weld gun like 15' makes the wire feed harder with a lot of arc pulsating, wire stub outs on contact tip and causing me to speak in tongues. One of the first aggravating problem I had with the older 211, had it a week, turned it on and it wouldn't weld, getting ready to call Miller when my son looked threw the manual and said the on switch on front is for that Boulder SPOOL GUN and the ON ON ON ON switch is on the back, boy that ----------me off, got the marker out and I went to town marking marking marking and marking some more, now I know where ON is. and it's not that stupid I-O symbol it's ON for ON, it's OFF for OFF.........that's my story and I'm stuck with it.
 
   / Container Weld Shop build -
  • Thread Starter
#24  
Clamp-a-holic??!? What gave it away? :laughing:
ClampRack-3.jpgDSCN2415.JPG

IMO, ya can't EVER have too many clamps; just maybe not enough room ta STORE 'em :D

Oh, made a little bit more progress on the cart - one thing that's nice about a 1" thick table and a couple dozen good weld clamps is bein' able to only be about HALF as careful pickin' your next weld when doing the tack-up and weld-out... Steve
 

Attachments

  • DSCN2891.JPG
    DSCN2891.JPG
    1.7 MB · Views: 316
  • DSCN2892.JPG
    DSCN2892.JPG
    1.7 MB · Views: 289
  • DSCN2893.JPG
    DSCN2893.JPG
    1.7 MB · Views: 307
  • DSCN2894.JPG
    DSCN2894.JPG
    1.8 MB · Views: 383
   / Container Weld Shop build - #25  
Dewalt DWHT83186 24 in. Extra Large Trigger Clamp - - Amazon.com <<<<<<<<<For wood working these are the best clamps I have, in several lengths, but for steel have to becafull with hot work. I like those steel bar clamps in your second picture, I need to get couple of those, what are they called, steel bar clamps?

What size wire you using on this thin tubing, .030 70s?, if I use use .024 I have to use the 120v adapter plug or my M211 is to hot.
 
   / Container Weld Shop build -
  • Thread Starter
#26  
4-3/4" Deep Throat, 8-1/2" Max Capacity, 4 74553926 - MSC

Price, if you're a previous Enco customer (I am) is less than HALF of MSC's mega-inflated one - I just bought a few at a time so the pain didn't quite cause me to pass out :rolleyes: - I now have 12 of the ones in the link and 10 of the longer ones

4-3/4" Deep Throat, 12-1/2" Max Capacity, 4 74553918 - MSC

Even at my "half-price deal" that's about $570 in clamps :eek: (which is why I did the "few at a time" thang...

I also tried a couple of these

4-3/4" Deep Throat, 7" Max Capacity, 7122677 - MSC

I use THOSE quite a bit for "quickie" things, and if you have pretty good manual dexterity they really ARE "one hand" - useful for "work alone" guys like me...

I have a couple of Wilton's versions of the second link - half again the price, NONE of the nice "extras" (pipe adapter, "step over" extender with each clamp) and the screws are harder to turn. NOT impressed...

MM211 - I don't do "body work", and .035 wire's cheaper than the smaller sizes so that's what I keep in both machines, AND in the 30A spool gun most of the time (use the spool gun ONLY for things I can't reach with the 15' gun (no feed problems if I watch for kinks)) - the little 2# spools cost more to run than 44# or 12# spools.

My older MM211 was too hot on autoset too, so's the NEW one - .095 wall tube is 13 ga., and I had the autoset down to the lower side of the 16 ga. setting before I was happy. Burned one small hole in the tubing til I got it right...

Casters - the back wheels are 13", so they'll set the frame bottom on the cart about 6-1/2" off the floor - I like Woodcraft's double locking urethane casters for shop stuff, no flat spots and lock better than most -

5" Caster, Double Locking, Swiveling with 4 Hole Mounting Plate

so when they go on sale (like NOW) I make sure I have at least one extra set of 4" and 5" ones "in stock" - the 5" ones give 6-1/4" of floor clearance, so I'll tack a piece of 1/4" FB at the back corners of the cart (front is where the 13" and the handle go) that'll keep the cart level when on flat floor, and the "offroad handtruck" approach will work on my "not so flat" ground between various shops/containers/trailers... Steve

Oh, I found this chart helpful; don't always remember these equivalents -

Also, if you DON'T have a previous Enco deal at MSC, Amazon has them about $10 cheaper than MSC - STRONG HAND 4-IN-1 CLAMP KIT~ 8-1/2" 12lbs ~ UG85-C3 - Bar Clamps - Amazon.com
 

Attachments

  • ThicknessChart2.JPG
    ThicknessChart2.JPG
    82.4 KB · Views: 352
Last edited:
   / Container Weld Shop build -
  • Thread Starter
#27  
Now that I got my lift stuff improved on the weld tables maybe I'll get more done on the cart - then on to the container awning then the crane/steel rack - Found out I didn't have any more 5" casters for the front, those should be here in a few days - for now, just a rough mock-up of where the 13" wheels will go, I'll clamp that allthread in place and test with everything on board til I find a good compromise between standing and tilt-back for travel... Steve
 

Attachments

  • DSCN2900.JPG
    DSCN2900.JPG
    1.7 MB · Views: 325
   / Container Weld Shop build -
  • Thread Starter
#28  
Been fighting a crappy sinus cold the last couple weeks, not a lot of initiative to brave what passes for winter around here; but the 5" casters FINALLY showed up yesterday so I drug my sorry butt out and made a little progress - since the mm211 cart's gonna be its own "trailer" that can be towed with the mower, I wanted the small casters to be out of harm's way when it was in "trailer mode", so they get an "UP" position (towing) and a "DOWN" position (rolling on flat smooth places) - in "smooth mode" the hitch will pivot up to keep the (relatively) small footprint.

Hitch design itself is still rattling around in my head, but got both 2-position caster mounts fabbed up today and clamped one to the cart to check fit - looks like it'll work as intended, here it is in up and down modes... SteveWeldCartCasterDown.jpgWeldCartCasterUp.jpg

Hoping the sinus crap's almost done screwin' with me so I can get the rest of the cart done pretty soon...
 
   / Container Weld Shop build - #29  
Sounds like you need some of my wife's homemade chicken soup. That weld cart looks plenty strong enough for the light M211, nice idea on the casters, can it be moved like a hand truck also? Looking good.......
 
   / Container Weld Shop build -
  • Thread Starter
#30  
Sounds like you need some of my wife's homemade chicken soup. That weld cart looks plenty strong enough for the light M211, nice idea on the casters, can it be moved like a hand truck also? Looking good.......

Hot clam chowder with a LOT of pepper, figger I kin BURN it out :eek: -

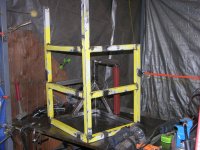
Strong - yeah, the part I "re-purposed" is .095" wall 1-1/2" tubing, should be fine with that light a load. Most of what I had for add-ons is .120" wall :rolleyes:

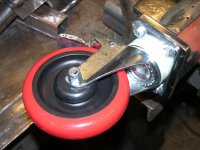
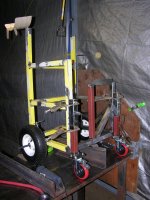
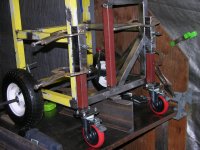
Casters - 2 positions, up has the bottom of the wheels FLUSH with bottom of cart frame, down puts 'em against the floor when the cart is level.

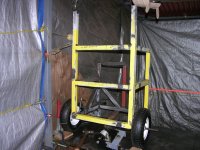
Handtruck - yeah, that's one of THREE modes - the two tallest uprights at the front are the .095" wall, makes for a slightly loose fit for 1-1/4" tube nested. Once the rest is done I'll add a hand truck handle that slips into those uprights and STAYS, top of the cross-bar will be just high enough to protect the tank regulator WITHOUT obscuring the gauges. The big tires axle will likely end up right at the front corners.

Then, on the BACK side I'll add a 1-1/2" .120" wall square tube "trailer tongue" just under the frame bottom - 1/4" plates on both sides just where it exits the cart, with a pivot and 2-position pins - down for trailering (2" hitch ball) and up for "flat country" - the tongue will be long enough for easy maneuvering, it can stick up at least 4 feet without getting in the way of anything. It'll also make a nice "lever" so I can take the weight off the casters for raising/lowering. With the hitch pinned UP, footprint of the cart will stay minimal (container, remember?:laughing:)

I figure "trailer mode" will get it up/down the slope between house/garage and the 2 shops (towed by the ZTR), "hand truck mode" will get it up ramps to the container, a trailer, etc, and "flatlander" mode for actual use.

Good thing I don't plan on FLYING anywhere to weld, THAT might get a bit more complicated :rolleyes:

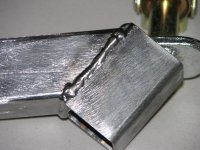
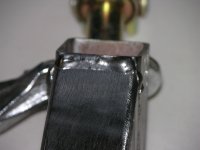
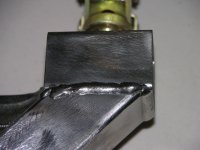
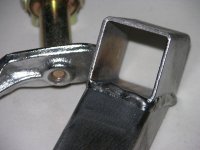
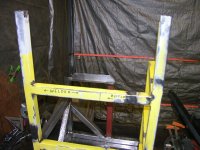
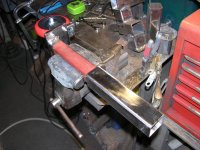
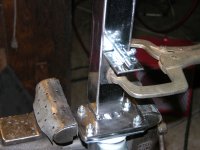
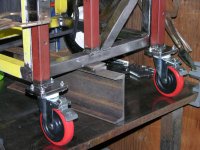
Here's today's progress - finished the second caster mount; the mounting plate needs to be FLUSH with the 1-1/2" tubing it's welded to so it'll retract alongside the cart vertical corner. Didn't wanna mess with gussets, had some 3/8" FB. Figured it'll be plenty strong that way. A small piece of 2" angle mounts the small barrel bolts, didn't wanna mess with more screws but 4 holes told me it wuz OK to do quick plug welds :cool2: I plug welded (more like a quick tack) the barrel bolts AFTER drilling the locator holes, bit tricky OTHERWISE :rolleyes:

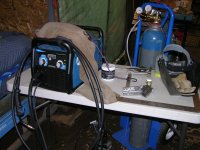
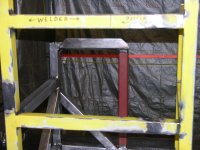
From the back, the left side gets the 150 CF C25 tank (locked into the YELLOW corner, right next to the big wheel) and the welder goes on the right - This will keep the side door accessible WITHOUT having to remove the welder.

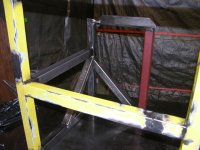
Between the frames there's about 1/2" left over (that isn't taken up by either the welder or the bottle) - kinda snug, but doable. The trailer tongue (fixed part) will exit just under the bottom of the frame, center is between the red upright and the shiny gusset piece. I'll get everything else (including the welder) in place BEFORE deciding how much stick-out the tongue's pivot point will need - I'm keeping a "pick-point" in mind as I do the hand truck handle part AND the trailer tongue part, it'd be nice if I wanna set the whole thing somewhere with the loader.

OK, 'nuff blather - here's the dirty pitchurs y'all been waitin' fer :D ...Steve
 

Attachments

  • DSCN2908.JPG
    DSCN2908.JPG
    1.6 MB · Views: 307
  • DSCN2909.JPG
    DSCN2909.JPG
    1.5 MB · Views: 328
  • DSCN2911.JPG
    DSCN2911.JPG
    1.5 MB · Views: 334
  • DSCN2912.JPG
    DSCN2912.JPG
    1.6 MB · Views: 406
  • DSCN2913.JPG
    DSCN2913.JPG
    1.6 MB · Views: 333
  • DSCN2914.JPG
    DSCN2914.JPG
    1.7 MB · Views: 382
Last edited:
 
Top