Container Weld Shop build -

   / Container Weld Shop build - #31  
I figure "trailer mode" will get it up/down the slope between house/garage and the 2 shops (towed by the ZTR), "hand truck mode" will get it up ramps to the container, a trailer, etc, and "flatlander" mode for actual use.

Good thing I don't plan on FLYING anywhere to weld, THAT might get a bit more complicated :rolleyes:

From the back, the left side gets the 150 CF C25 tank (locked into the YELLOW corner, right next to the big wheel) and the welder goes on the right - This will keep the side door accessible WITHOUT having to remove the welder.

Between the frames there's about 1/2" left over (that isn't taken up by either the welder or the bottle) - kinda snug, but doable. The trailer tongue (fixed part) will exit just under the bottom of the frame, center is between the red upright and the shiny gusset piece. I'll get everything else (including the welder) in place BEFORE deciding how much stick-out the tongue's pivot point will need - I'm keeping a "pick-point" in mind as I do the hand truck handle part AND the trailer tongue part, it'd be nice if I wanna set the whole thing somewhere with the loader ...Steve

Yup, we dont need the Fling Mode yet, maybe in a 100 years from now. I'm still having visual difficulty on where the welding machine is going, probably cause I cant see the side door in the pictures or maybe it's an invisible door and the trailer hitch cant quite see where which how that's going is either, I know you haven't made that movie yet. Pick point, now that's good planning.............PS Thanks for posting the pictures, looking like an awesome weld cart!
 
   / Container Weld Shop build -
  • Thread Starter
#32  
"I'm still having visual difficulty on where the welding machine is going, probably cause I cant see the side door in the pictures or maybe it's an invisible door and the trailer hitch cant quite see where which how that's going is either, I know you haven't made that movie yet. Pick point, now that's good planning.............PS Thanks for posting the pictures, looking like an awesome weld cart! "

I re-read my post, wasn't very clear - I was referring to the side door of the WELDER - didn't wanna hafta remove it from the cart to change wire, adjust tension, etc -

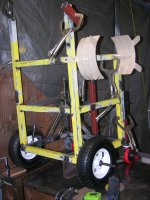
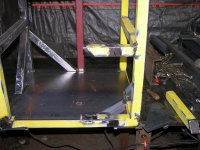
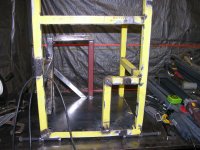
Positioning - check the first 4 pix on the first post of this thread, they are "pre-surgery" - as in, BEFORE I started "removing everything that isn't an elephant" (oops, I meant isn't a weld cart :D)

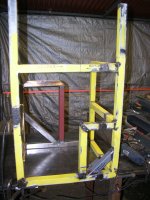
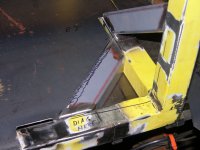
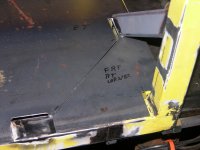
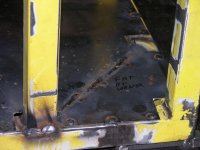
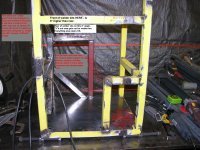
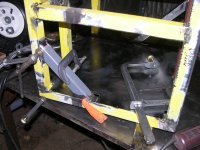
Also, look close at this one DSCN2900.JPG - it's marked where welder and bottle go; face of the welder will be angled up for better visibility, rear sets on that un-painted piece of angle at the back.

I'll add two "rails" along the sides of the welder (1" angle) so the welder can be positively strapped in place (Handtruck mode might get ugly otherwise) - Anywhere the welder touches the cart will get 1/4" neoprene glued in.

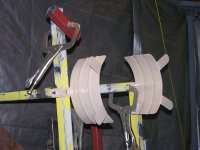
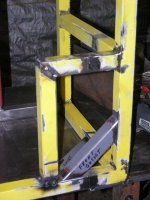
Also, because of the "offroad" options I didn't want the leads to be flopping around much, hence the dual hose hangers (no, they are NOT on wrong - mig gun will exit the welder front, wrap over the top of both, back around til it's almost all wrapped, then the gun goes in that piece of clamped on tubing (also used as a gun holder BETWEEN welds). Similar for ground and power leads: I typically plug in power, then ground, then gun, open gas, power up, set purge flow, go - so for shutdown, torch lead wraps first, then ground, then power.

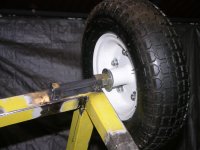
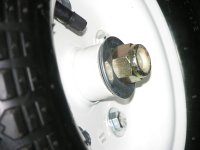
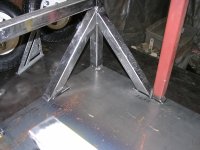
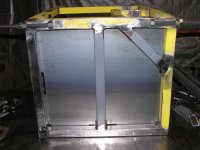
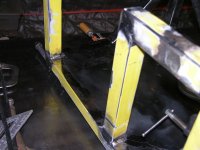
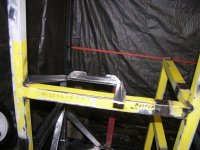
Couple more pics, all I did today was set the axles for the 13" wheels and weld in place, clean up a bunch of flash rust, punch the hose hangers for mounting screws, weld a few tacked joints I'd missed - Tomorrow I need to cut out about 60% of the front middle cross-bar and reinforce what's left for bottle cage - that way there'll be room for a good-sized drawer under the welder that'll hold leathers, hood, gloves - and if it's tall enough, another Short drawer for nozzle gel, mig pliers, etc...

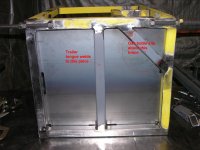
Trailer tongue will be 2 pieces - one piece will have FB on both sides, drilled for pivot and position pins, and will be welded to the underside of the frame - from center on the front to about 3" OUTSIDE of the rear bottom of frame. Second piece will have a hitch on outer end and will pin into the first piece. Both halves are 1-1/2"x.120" wall square tube. And you're right, the script for THAT movie is "still in re-write" :rolleyes: -

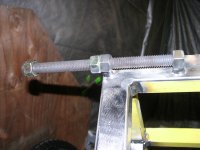
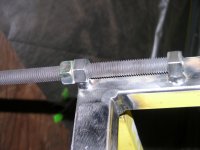
But in my head, the horizontal handle for the hand truck will get a sleeve that can move left-right to balance between welder and bottle, as well as one that slides front/back on a tube that'll connect the hand truck handle to the hitch end of the tongue when it's in vertical position. That should let me compensate for balance in BOTH directions so the picking eye will let it hang level. Both of those "leveling sleeves" will get set screws consisting of 5/8" dog pointed wing bolts for locking the sleeves to the picking frame parts.

Might get far enough tomorrow or the next day to set everything in place, then it oughta be clear as mudddd... Steve
 

Attachments

  • DSCN2915.JPG
    DSCN2915.JPG
    1.7 MB · Views: 141
  • DSCN2916.JPG
    DSCN2916.JPG
    1.7 MB · Views: 121
   / Container Weld Shop build -
  • Thread Starter
#33  
OK, who am I kidding - I'm old, tired and just a teensy bit OCD, no WAY I'm EVER gonna get as much done in a day as I THOUGHT I would :rolleyes:

Oh well, probly woulda got MORE done if some bozo hadn't forgot and welded out a joint that was gonna get partially cut away :confused: - finally got THAT cleared out, and the changes lightly tacked. Then made 2 gussets for the bottle area. Those will NOT get welded in til the FLOOR is in place (piece of 16 ga. 20" x 22") - ONE of those gussets will go UNDER the floor where the bottle sits, other one will brace the corner where the bottle goes. By putting the floor in first, I only have to notch out for 4 corners and TWO other "intrusions", instead of three.

Having to re-think the pick point design, previous idea woulda made the trailer tongue almost 5 feet long, I really don't want it more than about 36". Gotta get a couple more things done before I get back into that - But it WILL happen :D

Anyway, today's pics are of axle mounts (5/8" gr. 8 allthread) and the way the front is after I made room for my deep drawer. The 13" tires are at the FRONT of the cart/front of the welder, BTW... Steve
 

Attachments

  • DSCN2919.JPG
    DSCN2919.JPG
    1.6 MB · Views: 124
  • DSCN2920.JPG
    DSCN2920.JPG
    1.6 MB · Views: 117
  • DSCN2921.JPG
    DSCN2921.JPG
    1.5 MB · Views: 134
  • DSCN2922.JPG
    DSCN2922.JPG
    1.2 MB · Views: 127
  • DSCN2923.JPG
    DSCN2923.JPG
    1.7 MB · Views: 123
  • DSCN2924.JPG
    DSCN2924.JPG
    1.7 MB · Views: 119
   / Container Weld Shop build -
  • Thread Starter
#34  
Three steps forward today (right AFTER at least TWO BACK :rolleyes:)

I cut out a piece of 16 ga. for the "floor" of the cart - marked and cut out all the "interference" parts where uprights and angle braces are - which is when I found out for SURE that the diagonals shoulda NOT been welded in til AFTER the floor was in place...

tried every angle I could think of, NOTHING worked. Not even close. So then I looked at the corner brace that goes beneath where the bottle sits (rather than expect 16 ga. to handle that all by itself) - and marked where it'll contact the floor piece - then I cut that corner OFF of the floor piece and tried again.

STILL no cigar, but ALMOST - another minor trim on the floor piece and it fit :cool2:

So the new "plan" is to weld in the diagonal that goes under the bottle, then plug weld the larger piece of the floor in place, and finally plug/seam weld the triangular piece whose ABSENCE lets me "win" - the plug welds will be easy - I bought one of those HF pneumatic punch/flangers a while back, with a 20% coupon got it for $30 and some change

Air Punch Flange Tool

16 gauge is its max, but that's limited more by the slot size; it has no problem punching 16 ga. steel. Once the edges of my floor are punched every 2-3 inches around the perimeter, I'll lay the floor back in and mark thru the holes with a sharpie so I'll know where to shine up the frame for best plug welds.

Once the floor's in and welded, those "notches" around the perimeter will let me put the REST of the bracing back, welded to the FRAME instead of to the 16 ga. floor.

I guess as long as I manage at least ONE more step forward than back, I shouldn't get TOO depressed - but I think it'll BE awhile before I "wing it" on another project, instead of actually PLANNING what I wanna do :rolleyes: ...Steve
 

Attachments

  • DSCN2925.JPG
    DSCN2925.JPG
    1.6 MB · Views: 122
  • DSCN2926.JPG
    DSCN2926.JPG
    1.6 MB · Views: 115
  • DSCN2927.JPG
    DSCN2927.JPG
    1.6 MB · Views: 122
  • DSCN2928.JPG
    DSCN2928.JPG
    1.6 MB · Views: 132
   / Container Weld Shop build - #35  
"tried every angle I could think of, NOTHING worked. Not even close." Sounds like a lot of things I do, that's how I learn to speak in tongues. I'll pass on the cigar and have a hotdog. I watched the video on HF, looks to me that punch flange tool is good way of making holy steel, does it come with different size punches?
 
   / Container Weld Shop build -
  • Thread Starter
#36  
"I watched the video on HF, looks to me that punch flange tool is good way of making holy steel, does it come with different size punches? "

Nope, it's basically a "two-trick pony" - the throat on the hole punch isn't very deep, puts a 3/16" hole about 1/4" from the edge, max is 16 ga. I haven't used the other side much, just on a piece of scrap but it seems to work well too.

I used it earlier today around the perimeter of the cart "floor" as I mentioned earler, did about 16 holes in under a minute. I also used it a while back to pre-punch holes in some 16 ga. panels for the "clerestory" parts of the container roof, made it MUCH easier to get those up using self-drilling screws - DSCN2758.JPG - the bottom row of screws had to be too far in from the edge and got drilled, but both ends and the top edge of each 2'x8' panel were done with the air punch.

I have an ancient Roper Whitney Junior hand punch that does from maybe 1/16" up to 9/32", but at the larger sizes it (and me) struggles with 16 ga. - I've looked, but I don't think anybody makes a pneumatic version of that Roper Whitney punch - I keep thinking about playing with that and my 20ton press (as a sort of booster) but haven't got to it yet.

I see a LOT of hydraulic punches, but so far they ALL require you to first drill a hole for a pilot, then assemble male/female punch pieces on the pilot, THEN you get to pump a porta-power pump up. Think I'll keep lookin' on CL for an iron worker instead.

I was ready to start welding in the floor and the rest of the braces today, but it's supposed to freeze tonite and my pump freeze protection wasn't working. Fixed that and discovered the tank's air pad had bled down to zip - fixed that (bad valve core), should get back to makin' sparks manana. (fingers/toes/eyes crossed :=)... Steve
 
Last edited:
   / Container Weld Shop build -
  • Thread Starter
#37  
It finally warmed up to 37 about 3pm, so decided to get a couple braces and the floor welded - it's 'sposed to be dry but cool here for the next week or so, 30's at nite and about 40 tops midafternoon. Old and cranky wuss that I am, it sounds like a good time to do more drawings :rolleyes:

Meantime, here's 2 from topside and a couple from the bottom; I'll do cleanup manana, maybe more if a rare fit of machismo strikes (yeah, right :laughing:) ...Steve
 

Attachments

  • DSCN2929.JPG
    DSCN2929.JPG
    1.7 MB · Views: 129
  • DSCN2930.JPG
    DSCN2930.JPG
    1.6 MB · Views: 113
  • DSCN2931.JPG
    DSCN2931.JPG
    1.6 MB · Views: 114
  • DSCN2931b.JPG
    DSCN2931b.JPG
    695.9 KB · Views: 109
   / Container Weld Shop build - #38  
It finally warmed up to 37 about 3pm, so decided to get a couple braces and the floor welded - it's 'sposed to be dry but cool here for the next week or so, 30's at nite and about 40 tops midafternoon. Old and cranky wuss that I am, it sounds like a good time to do more drawings :rolleyes:

Meantime, here's 2 from topside and a couple from the bottom; I'll do cleanup manana, maybe more if a rare fit of machismo strikes (yeah, right :laughing:) ...Steve

That's what the woodstove is for that you was suppose to make last year. I'm a 60° welder myself but at the shipyard I've been outside welding on 10° day, not fun.
Drawings<<<most likely code for tic tac toe. Marking out the weld cart helps with my orientation of how it sits, so that first picture must be the back as back of the welding machine? And dont forget the shelves underneath for the consumables.

How many hours was budgeted for this weld cart anyways, I'm thinking this project is getting way behind schedule and over budget, might want to re-evaluate the blueprints at the next board meeting see what management says, a good time to bring up "machismo strikes", out here we call that Murphy's Law.
 
   / Container Weld Shop build -
  • Thread Starter
#39  
"How many hours was budgeted for this weld cart anyways, I'm thinking this project is getting way behind schedule and over budget" - That's how I know I'm gonna be HAPPY with a project :laughing: 'sides that, I'm RETIRED; it's done when it's DONE :drink:

Already GOT a woodstove, ain't quite portable enough for my "porta-shed" but the 6kw 240 volt heater plugs into a weld outlet just fine - it at least keeps my FEET thawed out, but tarps ain't much fer insulation.

Just finished supper, might work a bit more (and get a couple more pics) before I put stuff to bed - meantime, here's a (hopefully) better markup of the pic you mentioned. Dunno if you've discovered this yet, but if you right click on the small pic you can choose "open in a new tab" - then click THAT tab, your mouse pointer will show a "+" Click again to see full-size picture... Steve
 

Attachments

  • MM211CartMkUp.JPG
    MM211CartMkUp.JPG
    1.3 MB · Views: 132
   / Container Weld Shop build -
  • Thread Starter
#40  
OK, you just HAD to bring up Murphy's Law, dintcha??!? - I went back out after supper and checked a few measurements, discovered the piece of angle I so carefully fitted and WELDED, was NOT square to the rest of the frame - it wouldn't be a big deal, but I MUST have a minimum of 7-1/2" clearance on the BOTTLE side or it won't FIT - so manana, I'll cut the outside piece of 1" angle and do a bit of surgery on that back corner tube (Thank God for thin slicer disks), then I can add 2" onto the angle I need to cut off and move that lower end OUTBOARD about 3/8" - that way, the two pieces of angle will be parallel AND square, and I'll STILL have just enough room on the bottle side to make it work....

Today's pics; making another corner brace, using the 45* adapter I fabbed for the smaller saw - I also made one for the bigger Jet saw, best thing I ever did - Then, brace ready to weld; floor plug welds smoothed off; Angles set in place showing where the welder will sit.

I think instead of 1/4" neoprene strips I may cut 1" pipe insulation in quarters (lengthwise) - it'll take a little less room between those angles and keep things a snug fit... Steve
 

Attachments

  • DSCN2932.JPG
    DSCN2932.JPG
    1.6 MB · Views: 115
  • DSCN2933.JPG
    DSCN2933.JPG
    1.6 MB · Views: 107
  • DSCN2934.JPG
    DSCN2934.JPG
    1.6 MB · Views: 110
  • DSCN2935.JPG
    DSCN2935.JPG
    1.6 MB · Views: 112
  • DSCN2936.JPG
    DSCN2936.JPG
    1.6 MB · Views: 121
  • DSCN2937.JPG
    DSCN2937.JPG
    1.5 MB · Views: 111
  • DSCN2938.JPG
    DSCN2938.JPG
    1.6 MB · Views: 121
 
Top