John Deere 4300 complete rebuild

   / John Deere 4300 complete rebuild
  • Thread Starter
#131  
Now I need to remove the kingpin.

This MFWD system requires the removal of the kingpin housing end cap
to get the kingpin out. Some systems let you get it apart from above,
where the bevel gear connects to the top of the kingpin.

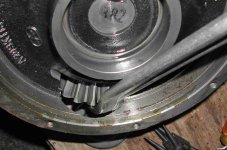
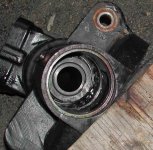
To remove the end cap, this tractor does not provide any "cheater slot"
on the outside to get a screwdriver in there, so you need to push from the
inside. The first photo shows me using a tire iron against the bevel gear
that drives the hub ring gear. Hopefully the bottom of the housing is free
of dents from rock incursions. Mine was fine, and it came off easily.

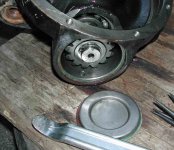
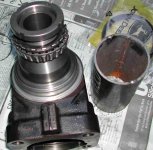
In the 2nd photo, you see the cap, just removed. The bevel gear has a
small snap ring and it comes right out. You can see the end of the kingpin.
Notice the hole in the end? It is threaded and I will need it for the next
step. After the bevel gear is out, there is a large snap ring about 4 inches
down inside the housing. This was very tough to remove.

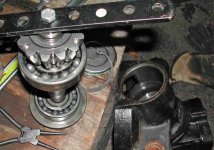
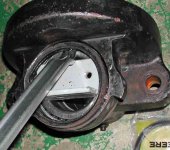
The third photo shows part of how it did it, with the removed snap ring.
Once the installed snap ring is partially retracted (with pry bars), I needed
some way to pull on the kingpin. That is what the bar and bolt did for me.
The bolt was threaded into the hole, and it put just enough upward force on
the snap ring to allow it to come out. I don't know how clear my
explanation is, but it sure goes in a lot easier!

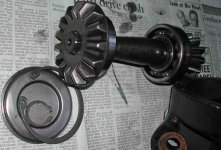
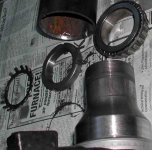
Finally, there is my kingpin. Very beefy, but a little corrosion on it. The
gears are not noticably warn, and all the rest of the bearings are OK.

I still don't have access to the last seal....that is the last step (next).
 

Attachments

  • kingpin_cap.JPG
    kingpin_cap.JPG
    53.5 KB · Views: 607
  • cap_open.JPG
    cap_open.JPG
    64.3 KB · Views: 577
  • kingpin_removal.JPG
    kingpin_removal.JPG
    64 KB · Views: 594
  • kingpin.JPG
    kingpin.JPG
    64.4 KB · Views: 584
   / John Deere 4300 complete rebuild #132  
My grandfather worked at the Deer factory in Dubuque, IA for his entire life. I did not know him well, but he was a tinkerer. When he tore down odd stuff to repair, he always had a notepad and a pencil. He made elaborate drawings of his teardowns, so he could get them back together again.

So, how do you keep track of all of this? You have a shop manual? Use these photos? or are you just one of those with a photographic memory?

Great project BTW. Thank you again for taking the time to share.
 
   / John Deere 4300 complete rebuild #133  
I'm also followin' this very interestin' post from day to day.....I'd like to know where I could get a set of those same type tire irons your usin' in the first photo....I have'nt seen any of these around for ages...keep up the good work...and take care....Ampa
 
   / John Deere 4300 complete rebuild
  • Thread Starter
#134  
My grandfather worked at the Deer factory in Dubuque, IA for his entire life. I did not know him well, but he was a tinkerer. When he tore down odd stuff to repair, he always had a notepad and a pencil. He made elaborate drawings of his teardowns, so he could get them back together again.

So, how do you keep track of all of this? You have a shop manual? Use these photos? or are you just one of those with a photographic memory?

I was hoping to get a tour of the JD tractor factory in Waterloo, IA when I
was nearby a few years ago. Went to the combine factory in E. Moline, Il
instead. Very enjoyable, highly recommended.

When I take things apart, I don't make drawings, and the photos I take are
not to help me with reassembly. Mostly I go by memory, but I try to figure
out how an assembly is supposed to work, which means I don't have to
DEPEND on memory when it goes back together. All fine in theory, but
I also lay out complicated things (engines, trannies) is a very organized
manner. I tried to illustrate that in a previous posting showing my engine
parts. I did not want to depend too much on memory there, as it was
more than a month between disassembly and reassembly. Also, some
things need to go back just so: pistons are oriented one way, valves
must go back in the same guide, etc.

As to shop manuals....I always get them for any tractor, car, or truck I
own. They are necessary in some cases (specs, special procedures,
adjustments, etc.), but they are woefully incomplete in many areas. The
parts diagrams are almost more important. These are fortunately free for
Kubotas and Deeres, as PDF files, or pix captured off the JD Parts site.
I buy the JD parts PDFs off eBay, however, since they are more usefull
than the pix on JDParts.

I dread a project that has been completely disassembled by someone else
first, since analysis is so important to me. As a side note, I bought a BMW
M3 coupe 6 years ago, mostly for the wife to commute with. That is
despite my research that said how unreliable BMWs were. Little did I know
that BMW DID NOT PUBLISH A SERVICE MANUAL! DIY owners buy a
manual from a 3rd party and make do with that. The Bentley BMW manual
is not as bad as other 3rd party manuals (I&T, Haynes, Clymer, Chilton, etc),
but it was woefully inadequate. Fortunately, there are many, many self-
published how-tos on the WWW that show hardcore DIYers how to fix the
many common BMW problems. I have never posted on a BMW forum, but
I have used them SO many times.

AMPA: I have bought tons of HarborFright stuff, and here is a clear winner:
Item#93230, 24" tire iron, $5.99. This product works very well, and it is
so cheap that I bought a pile of them to use the tough steel in welding
projects, as well as for their intended use.
 
   / John Deere 4300 complete rebuild
  • Thread Starter
#135  
Now that the kingpin is out, I can get the last two housings apart to get
at that blasted kingpin seal. Note: my hub seal was leaking badly, but my
kingpin seal was not. I decided to change the latter seal out anyway
because I wanted to assess the condition of the other bearings. Happily,
JD uses large tapered roller bearings in there, and they are in fine shape.

To get these last two housings apart, you can see (first photo) a large
nut with four slots. Special tool alert! :-( I am not a fan of special tools,
but nevertheless, I had to use one. I first used a large screwdriver to
retract the staking collar (not visible). To make my tool, I found a chunk
of schedule 40 pipe, which has a slightly smaller ID than the OD of the
nut. With a die grinder/carbide cutter tool, I beveled the edge, then
welded two small beads on opposite inside edges. Now I can grab two of
the nut slots and use a large channel lock pliers grab the pipe and unscrew
the nut. It worked great, and the 2nd photo shows the results. The 3rd
photo shows the staking collar, nut, and roller bearing.

Finally, I removed the large seal with my trusty tire iron. Voila.

Assembly, as they like to say, is a reverse of this process. (500 times
easier, too.)

A final note on DIY replacement of these seals: this was tough, and it taxed
the limits of my abilities and tools. Other seal replacements I have done
on MFWD axles were many many times easier. I can not recommend that
MOST people attempt this project for this tractor. I saw this process as a
personal challenge.....others may only be frustrated.
 

Attachments

  • special_nut.JPG
    special_nut.JPG
    80.7 KB · Views: 493
  • special_tool.JPG
    special_tool.JPG
    71.7 KB · Views: 627
  • parts.JPG
    parts.JPG
    68.7 KB · Views: 489
  • kingpin_seal.JPG
    kingpin_seal.JPG
    68 KB · Views: 505
   / John Deere 4300 complete rebuild #136  
This is amazing what your doing. I was wondering how many hours youve put into this tractor so far?
 
   / John Deere 4300 complete rebuild #137  
Dave, After all your rebuilds how do you rate the Tractors in order of best to worst.
Thanks
John
 
   / John Deere 4300 complete rebuild
  • Thread Starter
#138  
I was wondering how many hours youve put into this tractor so far?

I don't keep track. I fit in an hour here and and hour there, between other
projects. There is no question that I will have more hours in this project
than I can justify, based on the anticipated final value of the tractor.
Besides, counting hours would not be enjoyable.
 
   / John Deere 4300 complete rebuild
  • Thread Starter
#139  
Geez, that almost looks like ATF coming out of that hub. JD specs out the same hydraulic oil for the front axle as the main system.

Mystery solved. It was my camera making that fluid look red....it is really
red-brown like my own Chevron THF. It is the same effect you sometimes
get using flash that makes peoples' eyes look red. I use 2 Nikons, one, a
CoolPix 885 for flash pix, and a Nikon L18. The latter will automatically fix
"redeye".
 
   / John Deere 4300 complete rebuild
  • Thread Starter
#140  
Dave, After all your rebuilds how do you rate the Tractors in order of best to worst.

I have not done that many rebuilds, John. I certainly like to compare the
different design approaches used by different manufacturers, but to be
fair, I don't want to make sweeping generalizations. Besides, if I did, I
would be taken to task by vigilant TBN members, and rightly so.

Also, how do you compare one tractor with some good features and some
not-so-good features to one with a whole different set of goods and bads?

Then there is the initial cost and the cost to own. The real world is full
of trade-offs, and most of us vote with our pocketbook. When it came to
buying new, I chose a Kioti over all the others. Is it the best in every way?
No. I think it is still the best combination of features and costs. Others
may have other priorities than I do, as well as being able to wrangle a
better deal.
 
 
Top