John Deere 4300 complete rebuild

   / John Deere 4300 complete rebuild #142  
What a great post. I am humbled and impressed by your ability. And if you get bored I do have a case 550 dozer that runs well but could still use some mechanical love! I'll even let you work on it for free!!

Peter
 
   / John Deere 4300 complete rebuild
  • Thread Starter
#143  
Your next project I vote for is a Dozer... A nice old ugly dozer...

Like this?

This is a 1931 Caterpiller 28 that belongs to a friend. I rebuilt the old
bronze carb and fabbed up an intake manifold for it, but it remains dead in
a field. Long story, but it is prectically worthless even running. I do prefer
modern stuff that I can work on here where I have all my tools. That
old Ensign carb WAS a work of art, however.

Right now I am negotiating for a tired 1998 Bobcat 753 skidsteer, and I have
a new Bobcat CT230 tractor on order.
 

Attachments

  • DSCN9810.JPG
    DSCN9810.JPG
    190.3 KB · Views: 510
   / John Deere 4300 complete rebuild
  • Thread Starter
#144  
And if you get bored I do have a case 550 dozer that runs well but could still use some mechanical love! I'll even let you work on it for free!!

Thanks, Peter, for the opportunity.

In building my house, I hired out most of the excavation, and the first guy
I used had a fantastic Case 850 crawler/TLB. The guy who dug my leach
field had a Case 350 crawler/TLB...what a rolling disaster THAT was....
 
   / John Deere 4300 complete rebuild #145  
This thread alone is one of the most interesting ones ive read (in my opinion). I learn a lot from these types of threads and love to read them. Keep up the good work.:)
 
   / John Deere 4300 complete rebuild
  • Thread Starter
#146  
Thanks for your support Jacob. On your 3720, JD has added some
steel elements to the aluminum axle housing to control the inevitable
damage one gets with the design used on the 4x00s and the 4x10s.

I am literally this minute about to take my 2 rear axle castings over to
an expert certified welder I know to do some TIG repair. I plan to
enhance my casting with steel somehow....I have not decided the details
yet.

How are your 3-pt arm holes holding up?
 
   / John Deere 4300 complete rebuild #147  
I am literally this minute about to take my 2 rear axle castings over to
an expert certified welder I know to do some TIG repair. I plan to
enhance my casting with steel somehow....I have not decided the details
yet.

I'm looking forward to seeing what you come up with.
 
   / John Deere 4300 complete rebuild
  • Thread Starter
#148  
OK, now let's get back to the drive train.

In the first photo, I have just removed the bell housing from the driveline
tunnel. The pump side of the HST is visible, as well as the forward/reverse
control rods, which are attached to the swash plate control. The swash
plate angle determines how much oil is pumped by the pump, and in which
direction. This Eaton HST uses no separate charge pump; the power
steering pump mounted to the front of the engine does double duty as
a charge pump. The charge pump is necessary to pre-charge the inlet of
the piston pump, as well as to provide make-up oil for the substantial amount
used by the HST to lubricate the piston slippers.

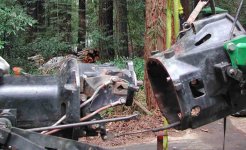
In the 2nd photo, the HST is out. The pod-shaped section in the center
is the HST motor housing, terminated with the main drive spline shaft. You
can see the PTO drive above it, which is also the shaft that runs straight
thru the pump.

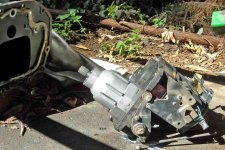
In the 3rd photo, you can see inside the tunnel, which contains the three
drive shafts (PTO, MFWD, and main) and gallons of oil. To get all of these
shafts to line up properly, JD is considerate enough to give us an access
port on one side....good thing! The red bulkhead in the back of the tunnel
supports all of the range shift gears and shafts. You can also see the
horizontal shaft that shifts the MFWD on and off.

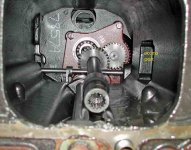
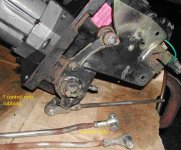
The 4th photo shows a closeup of the HST controls. The rods are terminated
at both ends with swiveling connections (aka Heim joints). I will replace
them as they were all getting a little loose. You can also see three places
where the control rods rubbed on various components. This is due to a
sloppy repair job that was missing a couple of washers and an improperly
installed neutral switch. I will eliminate the switch since it offers little
value or safety, and will eventually fail again. You can also see a weld
repair if you look closely at the upper control rod. It is very important that
these rods are tight and well lubricated so that the HST control will not
bind (a common complaint).
 

Attachments

  • HST_1.JPG
    HST_1.JPG
    74 KB · Views: 868
  • HST_2.JPG
    HST_2.JPG
    83.2 KB · Views: 778
  • HST_3.JPG
    HST_3.JPG
    76.5 KB · Views: 822
  • HST_4.JPG
    HST_4.JPG
    61.9 KB · Views: 758
   / John Deere 4300 complete rebuild #149  
Good Afternoon Dave,
Great job, keep the pics and progress comming ! :)

BTW I know what you mean about some of those real old dozers, the darn things will throw you out of the seat coming over a rise ! :( Not operator friendly at all ! ;) Would much rather have something like a JD 450 than an old tank ! JMO !
 
   / John Deere 4300 complete rebuild #150  
Dave, in that third pic on your last post, you show the inside of the tunnel. Any idea what the hyd/trans fluid level would be in a normally full condition? Mostly just curious as to how much gets submerged in there. Thanks, and great job of documenting the rebuild!
 
 
Top