my winter project

   / my winter project
  • Thread Starter
#11  
Lookin' good SG. Where did you find this one?

south florida ( vero beach ) was about an 8 hr round trip including loading time and stopping to eat and get a cold drink.

soundguy
 
   / my winter project
  • Thread Starter
#12  
well.. got home at 4:pm.. ate dinner, went out around 5:15, just came in at 7:20... got ALL the sheet metal off the 950.. chased some more bolt holes, cleaned, adjusted and lubed the steering box ( pulled the steer wheel off and cleaned up the splines and never seized them.)

drained the block and installed a new petcock. will likely remove the radiator wednesday afternoon to get at yet another pair of broken bolts in the front of the head that will be needed for the front fuel tank bracket and the genny top bracket.. ho hum.

got the front pedistal cleaned up, and ran out of time filling it with lube.. ( ran out of lube too! ).. started to rain again.. had already removed the air cleaner, so i taped of fthe carb and manifold / muffler and thru a can over the steering colyumn and called it a day...
 
   / my winter project #13  
Nice. Can't wait to see this project go along.
 
   / my winter project
  • Thread Starter
#15  
here's a pic from yesterday.
 

Attachments

  • a22864.jpg
    a22864.jpg
    79.9 KB · Views: 311
   / my winter project #16  
Man on mission going at it tooth and nail. ;)
 
   / my winter project
  • Thread Starter
#17  
had a couple hours to work on the tractor and decided to focus on the last 3 broken bolts that needed to come out to attach the gas tank brackets and genny brackets.

one was a breeze.. 5 minutes, pulle dright out, and threads were fine.

then there is one that came out on the right side that has some damage to the rim of the hole. i have decided to not mess with trying to further repair that one till I see how the bracket fits and what, if anything I can or need to do to it.

last hole was in the front for the top geny bracket.. pulle dthe rad and fan, and started at it with a carbide bit, then a lefty. it fialed to budge even on an extractor, so I kept drilling up/ original hole was 3/8 and I finally got the bolt thin enough so that a chase broke it and I dug it out with a pick.. bad news.. hole was already cross threaded some time inthe past, and was likely why the guy broke this bolt off trying to force it.. i ran a chase in.. but there simply weren't enough threads or metal left to do any good. I made the decision to oversize to 7/16 and tap. got 3/4" of solid threads doing it that way, and I fell that should be fine.

STILL have not finished filling the steering pedistal.. but at least I *think* I got all the broken bolts and studs out that i can find.

soundguy
 
   / my winter project #18  
Lookin' good. I love seeing that old iron coming back to life. Wish I had more time to do that kind of work.

Keep it up, and excellent work!

Jim
 
   / my winter project
  • Thread Starter
#19  
pulled rad and fan off.. doctored a couple more bolts and broken studs.. ho hum..

soundguy
 

Attachments

  • a23113.jpg
    a23113.jpg
    91.7 KB · Views: 196
   / my winter project
  • Thread Starter
#20  
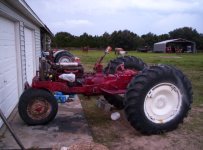
well, finally finished lubing the steering pedistal. then started to look at the front wheel hubs.. hub ont he left appears to be from a later model.. it has the small cast in ears with a grease fitting between them like my 5000 does. also someone had drilled the cap for a zerk and proke it off. i extracted it and instead installed an inverted hex 1/8" pipe plug. while down there I notices some play in the right side so jacked her up toinspect and repack the front bearings. both sides had 2-part repair nuts on them.. and I'm not sure why.

left side had perfectly good threads.. right side had the first few threads wore down, but the threads after that were fine.. a castly nut would have had NO issues holding it all together. oh well.. cleaned it all up, packed and reassembled. front end is decenlt tight now.

decided it was time to start taking the beat up tin apart and salvage those doglegs. removed the gas tank tied tot he hood with a garden hose and bailing wire... set it safelt FAR aside.

got the o/a bottles out and started on the hood. there was some brazings on the outside connections, and the internal flanges were tack welded every few inches.

got it all apart.. and Imust say.. I am getting DARN good with that torch. glad I got it. so far it is my favorite tool purchase this year. one thing though. I did find out that once you torch the doglegs off the hood, and then you go to rotate the hood around to get the other side.. don't let the inside of yer right arm contact the hood near the warm spot! Yep.. it was so hot outside today I didn't wear my welding jacket.. only my long welding gloves.. got a nice half dollar round spot burned on the underside of the right forearm.. dropped the torch! torch stayed lit and landed right on the hoses!!.. snatched it up quick.. man.. that woulda been bad.. :( oh well.. no melted hoses.. but Imust say.. I won't have hardly any grinder work on the doglegs... I torched them out nearly perfectly.. I'm still tickled with myself..

that was pretty much it for today.. had to go in.. wash up wrap the arm and get to work!
 
 
Top