PA160 STH unboxing!

   / PA160 STH unboxing!
  • Thread Starter
#51  
I went to a small welding workshop/get-together today, and one of the guys who came brought a bunch of aluminum drops from his work, and let everybody spend, literally like five hours playing on his machine while he looked over their shoulder and gave them tips. It was pretty sweet! From somebody who's never really TIG welded at all straight to aluminum on my first day? Man, I'm still grinning.

I hoped to get my 160 hooked up to a borrowed argon tank and try it out some today, but no luck. I'm missing the barb fitting on my regulator that will connect it up to the welder. One of the guys there had a hose with a thread on one end and a barb on the other, but it was leaky. I struck the first arc and immediately toasted my tungsten. Shielding gas is not optional, you know? C'est la vie...
 
   / PA160 STH unboxing! #52  
I went to a small welding workshop/get-together today, and one of the guys who came brought a bunch of aluminum drops from his work, and let everybody spend, literally like five hours playing on his machine while he looked over their shoulder and gave them tips. It was pretty sweet! From somebody who's never really TIG welded at all straight to aluminum on my first day? Man, I'm still grinning.

I hoped to get my 160 hooked up to a borrowed argon tank and try it out some today, but no luck. I'm missing the barb fitting on my regulator that will connect it up to the welder. One of the guys there had a hose with a thread on one end and a barb on the other, but it was leaky. I struck the first arc and immediately toasted my tungsten. Shielding gas is not optional, you know? C'est la vie...

pretty exciting without argon isn't it? Since my setup is a 17V torch I have forgotten to turn on the argon a couple of times.. You know it right away:shocked:

James K0UA
 
   / PA160 STH unboxing!
  • Thread Starter
#53  
I got some quotes for an argon cylinder the other day. I don't remember the exact numbers, but Airgas only sold up to 80 cf cylinders, for something like $190, or a 5 year lease for $220. I was surprised that the lease price was basically the same as the purchase price, and was due up front, so kind of... what's the point of the lease, you know? Praxair was cheaper and sold both 80 and 150 cf. I don't remember the exact prices.

I know that the bigger a cylinder you get, the cheaper the refills are. Is 150 too big to put on a rolling welder cart? It seems like mostly everywhere I see selling for personal use (like on eBay or whatever) is 80 cf or smaller.
 
   / PA160 STH unboxing! #55  
Mine is 125, and 150 would be easily doable.
 
   / PA160 STH unboxing!
  • Thread Starter
#56  
I did some work with my nemesis, E6011, tonight. In order to maximize my chances of success, I did careful joint prep, including beveling and *gasp* even cleaning a spot for the ground clamp. I had been having trouble running 6011 with my new welder--having to maintain very tight arc length to keep the arc from going out, for example--but that all seems to have been related to poor grounding. With my new work table, I get a little lazy with just setting items on the tabletop and counting on contact to provide a ground.

(EDIT TO ADD: Now that I think of it, these were 1/8" Blackstone rods, and the ones I had previously been having trouble with were 3/32" Hobart rods, but I still think poor grounding was the problem and not the rods.)

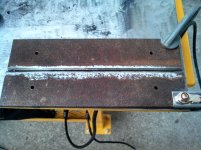
Joint prepped and tacked.
2013-04-16 19.56.35.jpg

It's 3/8" bar, ground to perhaps about a 1/8" land on a double-bevel. I would have done a smaller land if I wasn't running out of daylight and wanting to get some welding in before nightfall.

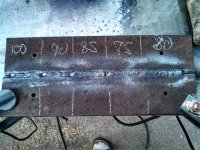
The first thing I did was try to dial in the best output. This is Blackstone 1/8" E6011. The box calls for between 80-120 amps, so I started at 100 and worked towards success.
2013-04-16 20.05.59.jpg

At 100 amps, there was plenty of penetration. The bead profile was flat in the bevel. The rod ran a little too fast for me to keep up with it, however, and I had problems with undercutting.
2013-04-16 20.06.07.jpg

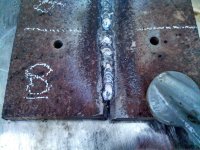
90 amps. Less undercutting. The rod was still a little too fast for me, as can be seen in my uneven and too-fast travel speed. It seemed like it was burning in so fast that I had to go fast to keep up with it, although this may not have actually been the case.
2013-04-16 20.06.13.jpg

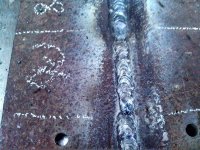
85 amps. Now we're getting somewhere. Very little undercut and almost no slag at the toes. This may have been the best 6011 bead I'd ever run.
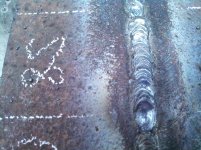
2013-04-16 20.06.17.jpg

Still 85 amps. Trying for a more consistent travel speed and an explicit wet-in of the toes on the "pause" part of the whip-and-pause.
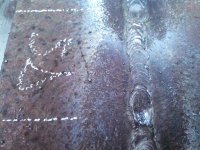
2013-04-16 20.06.22.jpg

85 amps felt pretty good, but I figured I'd better go for 80 just to see what it was like. It felt too cold, although it ran okay. The bead was taller and it wasn't significantly easier to run than at 85. I suspect this one has less penetration.
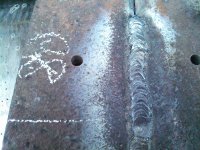
2013-04-16 20.06.26.jpg

The backside shows that none of the beads burned totally through the 1/8" land, not even the 100 amp one. Apparently, I wasn't as close to burning through as I imagined on those hotter passes. I never did see a keyhole. The reason I kept moving was because the bead was cratering out the toes and sinking into the bevel--although, now that I think about it, that's supposed to happen if you're going to do a cover pass next. Maybe this was just more bevel than I should have tried to fill with a single run of 1/8" rod.
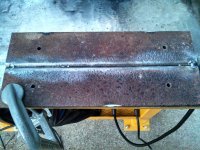
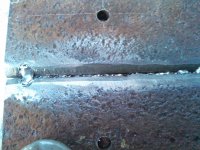
2013-04-16 20.07.50.jpg

2013-04-16 20.07.58.jpg

Finally, I flipped the bar over and did another four beads on the back side bevel. These two were the best of them. Again, I really tried to focus on pushing the puddle back into the crater and watching it wash out to the toes of the weld. I think I did okay compared to my previous efforts in my short career as a hobby weldor.
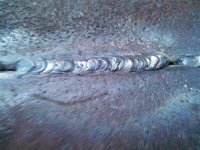
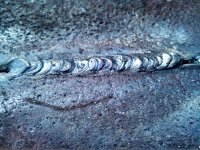
2013-04-16 20.18.59.jpg

2013-04-16 20.19.08.jpg

As always, feedback is welcome!
 
Last edited:
   / PA160 STH unboxing! #57  
You know those 80, and 85-amps welds don't look that bad.

If you're shooting for open root? Cut down on the thickness of the land, and open up the gap. When welding open root, you want all the sparks on the inside / backside, and you shouldn't see much of the light from the arc. If the gap closes up on you, point the rod in the direction you're traveling, and open up the arc length. If you're burning through, point the rod back into the metal already deposited, and shove the rod in tight, (close up the arc length).
 
   / PA160 STH unboxing!
  • Thread Starter
#58  
If you're shooting for open root? Cut down on the thickness of the land, and open up the gap.

What land and gap would you suggest, assuming a 1/8" rod?

Do you think it'd be reasonable to try to fill a 1/8" deep bevel with a single pass of 1/8" E6011? Generally, I would say that the bead height should be less than the size of the rod, but in a bevel, I'm not sure.
 
   / PA160 STH unboxing!
  • Thread Starter
#59  
One other question: Is 6011 slag supposed to be a real PITA to clean off? I always hear people talk about how 7018 has heavy slag and 6011 has light slag, but at least with 7018, it all chips off in a few pieces. It seems like with 6011, unless I break out the wire wheel, it's impossible to get the slag off the bead. I'm just pecking and tapping at it with the hammer forever, picking out every little bit. I think one reason I have such a bad impression of my 6011 beads is that I am often looking at them through a patina of slag. Once I get a wire wheel on them, they pretty up a little.
 
   / PA160 STH unboxing! #60  
Josh, two words - "needle gun"... :=) Steve
 
 
Top