You are using an out of date browser. It may not display this or other websites correctly.
You should upgrade or use an alternative browser.
You should upgrade or use an alternative browser.
Removing JD 540 loader Joystick mechanism to replace broken valve controllers
- Thread starter peterlindsay
- Start date
/ Removing JD 540 loader Joystick mechanism to replace broken valve controllers
#11
OP
peterlindsay
New member
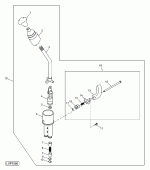
Thanks JD5210 and Tx Jim. Appreciate your help for this non-mech guy. It turns out that the nut I showed in my second pic is the second nut with one above it, so all I had to do was put two sets of wrenchs on them and twist opposite and the second nut released enough I could then turn by hand and unthread it. Undid both nuts which took 3 minutes and off the unit came. You diagrams let me to another diagram that kept showing one nut only in this location so thus I tried what I did. Again, appreciate the help.!!
johnwgisme
New member
OP
peterlindsay
New member
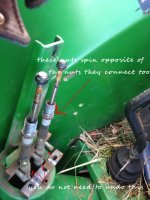
Hi John. I ended up having to buy a whole new unit after replacing just one of the broken plastic topped valves - they have replaced them now with metal ones - but with just one of the new ones in the other side just kept sliding out of the other older version so I just bought a whole new one as obviously it was just going to be a problem.  in the attached pic it shows the nut at the bottom of the unit that spins opposite of the nut it is attached to. Pull the black unit up to expose both nuts so you can get wrenches on both and twist opposite. The new unit comes with a new joystick as well as the old joystick does not fit the new fab parts well. Hope that helps
 in the attached pic it shows the nut at the bottom of the unit that spins opposite of the nut it is attached to. Pull the black unit up to expose both nuts so you can get wrenches on both and twist opposite. The new unit comes with a new joystick as well as the old joystick does not fit the new fab parts well. Hope that helps
johnwgisme
New member
Thanks. Helped immensely! Much easier sometimes to just buy the whole thing!
Hjalbert
Member
I know this is an old post, but I have the same problem with the broken plastic parts. Do I have to buy the entire new unit, or will the new metal control valves (#4 in pic) fit in my original joystick housing? Also on the jdparts sie it says to buy the shields also if you buy the joystick kit, is that necesarry?
The metal parts should fit, but I have found there is usually enough wear in the hosing that it makes sense to replace entire unit. The shields are recommended since the safety lock mechanism is different on the new unit. The old shields can be easily modified to fit the new joystick if you don't mind the hole in the shield where the old lock mechanism fit through.
Hjalbert
Member
I went ahead and replaced the entire unit, the dealer had it and the shields in stock, but only one valve. After taking the old one off there is no way I would want to do it again. I'm glad I did, the housing on the old one was cracked in addition to the valves. My only complaint is the lock out now rubs my fender when unlocked. I may grind that corner off. Thanks for confirming my choice.
Mistyridgefarm
Silver Member
I been through your pain before and glad you made it through! The new lever on mine sat too close to the seat, so I used the vise to "adjust" it.
HarmonyFarmWV
New member
I have a JD 5400 with the 540 Loader Hydraulic Setup.
The pistons (Part RE55057) broke and I am having trouble with the repair.
And have tried to work through the repair but I am having trouble figuring out how to remove the piston.
I removed one Snap Rings from each piston behind the nuts. But the nuts still don't come off. Am I missing something? I looks like there might be 2 sets of snap rings per piston, is that true? Is there anything else holding them in place?
Is it worth springing for the whole joystick assembly? Where do I disconnect it from? Same place as for piston replacement?
Thanks for your help!

