Repair/mechanic tricks and or tips?

   / Repair/mechanic tricks and or tips? #431  
Skyco said:
I've always heard running the alternator without it hooked to the battery will damage it. Never had the desire to try it and see though:eek:

You don't have to disconnect the battery if you use higher gain on the o'scope.

I haven't kept up with recent technology (Last decade or so) in general aviation (small/private planes) instrumentation but there used to be an instrument (panel mounted) that gave a check on your alternator by monitoring the waveform. The waveform with a diode out is more irregular and can be differentiated by its frequency components so a simple meter with a green and red zone was the indicator.

Pat
 
   / Repair/mechanic tricks and or tips? #432  
patrick_g said:
RedDirt, Very interesting collection of hints. The washer spacer pencil thing and the sawhorse parallel to the saw blade were the only ones that I haven't used at one time or another in one form or another.

Maybe you could give a little more detail on the sawhorse thingy. I struggle quite a lot trying to get full sheets of 3/4 MDf onto my table saw. The table with 52inch extension handles a full sheet nicely but I don't handle it so nicely getting it up there and handling it as it comes off the back side is a hassle. I have the adjustable roller stands on tripods and sometimes they help and sometimes they are in the way or get knocked over.


Pat

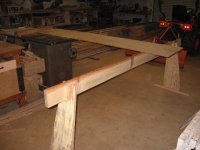
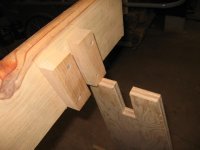
Pat, Here is a photo to show the set up. The second photo is a close up of the leg detail of the horse.

The picture shows just a 16" wide x 8ft piece of ply on the saw table but you get the idea. (No, the lights on the tractor are not "on"; it's the flash of the camera.)
PlyHorse1_sm.JPG

PlyHorseDetail_sm.JPG

Now a 4x8x3/4 sheet of MDF is a tidy load indeed. For this heavy of a sheet I will have the saw off, place the ply on the ground, on edge, in front of the saw, and tilt/lift it onto the saw table and horse. I'll push it tight to the fence and position it just in front of the blade. The full sheet should be supported by the saw table and horse. When all is set I'll turn on the saw.

I feed standing fairly to the left of the blade, sometimes near the horse, feeding with a good amount of pressure against the fence. Near end of the cut I'll reposition myself closer to the fence and push the piece straight through to last few inches and clear of the blade, then turn off the saw.

Note the use of a rear table in conjunction with the long horse. A table is a much more stable platform than rollers. The table needs to be long enough to support the cut piece while the the ply off-fall is fully supported by the table and horse.

Throughout this process you shouldn't need to balance the sheet at all. It is fully supported before, during and after the cut. The only "heavy work" is getting it to the saw and getting it onto the saw and horse. A couple of rollers set on an angle iron with a "T" handle can help getting the ply from the pile to the saw. (Similar to the sheet rock carriers you see occasionally in HF or other mail order catalogs). The "tilt/lift" onto the saw eliminates having to bear the full weight of the heavy MDF.

BTW - For those of you that use rollers to balance long stock notice that unless the rollers are perfectly aligned perpendicular to your fence the action of a roller will either drive your piece toward or away from the fence as you are pushing your long piece forward. For this reason I don't use rollers for my woodworking. Instead I just use a scrap of 3/4" ply clamped to a sturdy saw horse. The top edge of the ply is shaped 1/2 round and waxed and set level each way with the saw table. The board it is carrying can travel in both the x & y direction without the tendency of rollers to it drive away or toward the fence. If you prefer rollers use a strip of the ball type rollers set on the edge of a horizontal board.

Also - When I rip 16' long stock say, a 2x10, I place the above type board in front of the saw (behind me) close the balance point of the board. On the off-fall side, beyond my off-table, I set an off-fall "ramp". This is just an "L" shape of two ply pieces screwed together at less than 90 degrees, maybe about 75 degrees. The top of the ramp is level with the table. Now when the 2x10 is ready to be cut it is placed on the saw table in front of the blade but is supported by the horse behind me. I have no balancing act to perform and can concentrate on fence pressure and feeding. When the board comes off the back horse it is fully supported by the saw table. Before it wants to dive off the off-table, the end rides up the ramp and again the board is completely supported end-for-end.

Ray
 
   / Repair/mechanic tricks and or tips? #433  
Skyco said:
I've always heard running the alternator without it hooked to the battery will damage it. Never had the desire to try it and see though:eek:

Yes.. it will/can.

Soundguy
 
   / Repair/mechanic tricks and or tips? #434  
patrick_g said:
The rectified alternator output is a series of sinusoidal pulses which vary from zero volts up to their max value and then back to zero. An alternator can still have an output even if one of the diodes is not contributing and its "hump" is missing. You used to be able to replace an individual diode quite inexpensively. I don't know if that is possible now as everything tends to migrate toward throw away and away from DIY.

Pat

Modern alternators are easily fixed by the DIY mechanic. The usual failing
components are the brushes, the regulator, or the rectifier. Each is often
easily replaced as a module, and costs about $35 from an alternator parts
disti. The rectifier test only requires a continuity tester. Rotor and stator
failures....forget it as those parts cost more than a rebuilt unit.

I have read most of this thread and it has been interesting. Here it my
automotive diagnostic tip:

If anyone still has a car or truck with a distributor and spark plug wires,
and you suspect an ignition problem, I have sometimes been able to
SEE the electrical fault by running the engine in total darkness. It takes
a bit of time to let your eyes adjust, but often I have seen disti cap leaks
and marginal leaking wires.
 
   / Repair/mechanic tricks and or tips? #435  
dfkrug said:
If anyone still has a car or truck with a distributor and spark plug wires,
and you suspect an ignition problem, I have sometimes been able to
SEE the electrical fault by running the engine in total darkness. It takes
a bit of time to let your eyes adjust, but often I have seen disti cap leaks
and marginal leaking wires.

Yeah, I've done this and it does work! Still got a couple of rigs w/distributors, wires.

Heres a couple more tips:

To straighten a length of wire cut it to length and clamp one end in a vise. With pliers or vise-grips grab the free end and "twang" it (wire a bit slack then jerk to tension it). Do this a couple of times and the wire will be almost perfectly straight. Works great for straightening wire off a coil or a length that has kinks.

For my small fasteners (1/4" and less- nuts, washers, lock washers, etc) I'd need too many bins to keep them segregated. I string them on the old-style cheepo shower curtain "safety pin" type hangers. You can get a good amount of nuts, washers on these rings and it is easy to tell when you need to re-stock.

These, like most of the "tricks" we've all developed, seem so obvious to us because we've done them so long we forget this is not "universal knowledge". I've enjoyed this post and hope others will continue to add as they remember their tricks that might not be so obvious to others.
 
   / Repair/mechanic tricks and or tips? #436  
I have sometimes been able to SEE the electrical fault by running the engine in total darkness.

It's been many years ago since I owned a 1972 Chrysler Town & Country station wagon with a 440 4-bbl engine with which I towed an 18' travel trailer. It's the only vehicle on which I observed the fire running outside the wires and distributor once at night. Another time, that engine got really sick on a little hundred mile trip, obviously not hitting on all cylinders, but it got me back home. I first checked simply to see if I had continuity through all the plug wires; i.e., pulled one at a time to see if I observed a spark and I did have fire on each one. But then when I got my old engine analyzer out, I found the resistance on 2 wires was not within specs, and those two plugs were only getting fired about every 2nd or 3rd time around. I bought a complete new set of wires which fixed the problem. That set also included one extra wire which I hung on the garage wall. Sure enough, a few years later, after I had traded for a 1975 Town & Country wagon, it started missing just a little bit, and that one new wire hanging on the garage wall fixed it.
 
   / Repair/mechanic tricks and or tips? #437  
RedDirt said:
Pat, Here is a photo to show the set up. The second photo is a close up of the leg detail of the horse.

The picture shows just a 16" wide x 8ft piece of ply on the saw table but you get the idea. (No, the lights on the tractor are not "on"; it's the flash of the camera.)

Ray

Ray, Thank you for your informative post with pix. I will study on what you have done and will try to either copy or synthesize your setup into mine. I really do need an infeed and outfeed table whether solid top or with rollers or a combination but am sort of too crowded right now until I segregate my metal working from my wood working. I need to enclose my 21x48 (open on one long side) shed on the side of my shop and make it THE METAL SHOP. Then I will heave room to handle 4x8 sheets way better, especially incorporating sopmething likek you have.

Thanks again, Ray, I really appreciate the pix and info.

Pat
 
   / Repair/mechanic tricks and or tips? #438  
To straighten a length of wire cut it to length and clamp one end in a vise. With pliers or vise-grips grab the free end and "twang" it (wire a bit slack then jerk to tension it). Do this a couple of times and the wire will be almost perfectly straight. Works great for straightening wire off a coil or a length that has kinks.


Once upon a time an old timer showed me this slick way to straighten wire. Hold one end in a vice or wrap around a hook but use a drill and chuck one end and twist. Works great!
 
   / Repair/mechanic tricks and or tips? #439  
JimWalch said:
Once upon a time an old timer showed me this slick way to straighten wire. Hold one end in a vice or wrap around a hook but use a drill and chuck one end and twist. Works great!

A few times I haven't had a piece of wire heavy enough for the job. I took rebar tie wire and doubled it. I placed the two cut ends in a vise, made a hook out of a cut nail and chucked the hook in a hand drill. Pull the loop of wire with the hook in the drill and spin. For heavier wire you can take that twisted pair and twist together another twisted pair on to it and so on.
 
   / Repair/mechanic tricks and or tips? #440  
Carry a can of that "canned air" with your chainsaw tools to blow the sawdust off around the gas and oil filler caps. Works WAY better than blowing on them.
 
 
Top