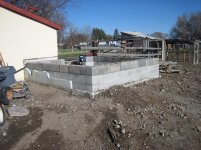
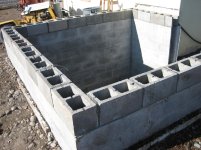
I hereby declare phase 1 complete. I excavated the last bits of the root cellar floor in preparation for pouring concrete tomorrow.
Tomorrow begins phase 2: Concrete and masonry. I have reserved a 1 yard cement trailer, and I have a good friend who has a lot of concrete experience. I'm looking forward to having him there to help me.
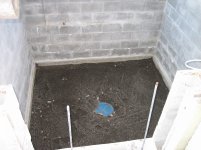
There is a change to the plan. My wife asked if I had any kind of drain in the floor. I hadn't thought of that before because I was just going to have a cement perimeter with a dirt floor in the middle. Now that I'm putting concrete accross the whole floor (thanks M7) I probably should have a drain. I dug down 4 feet in the center of the floor so that I could sink a 15 gallon plastic barrel. That was a chore... digging down 4 feet into a floor that is already 6 feet below the walls. Each shovel full of gravel had to move 10 feet up.
The plastic barrel has 3/4" holes drilled in it about every 6 inches or so all the way around. I need to buy the floor drain tomorrow before I pick up the cement trailer. Once I have the drain, I'll cut the hole in the barrel to fit it. After we have the cement all cured I'll go back and throw as many big rocks down the drain as I can fit. This is the same process that we did when we poured new stairs for our basement remodel, and that drain has worked very well.
Hopefully I can free up a minute or two in the morning to snap a few pictures in the daylight.
/ Root Cellar Remodel, Split Level Storage, Shop, Shed Pole Building on a Foundation
Yesterday was concrete. I am SOOO glad to have friends who are so willing to share their time and talents. This friend of mine brought his two sons who have been helping him do concrete since they could hold a shovel. It was like watching a professional dance team watching that crew work together. I was in the hole with them moving mud around, but I don't think I really made the job go any faster or any better. I sure learned a lot, though.
I gave the camera to my 10-year-old to document the day. Here are a few pictures that help show the process.
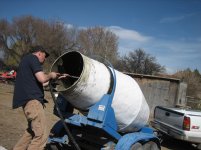
Pic 1 - This is a shot of the trialer that I rented to do the concrete with. I bought 1 yard and it was the perfect amount. We didn't have any left over, and we covered the floor perfectly.
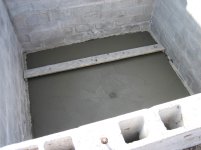
Pic 2 - One of the biggest challenges to this job was working in a hole with nowhere to stand. I rigged this bridge out of a board with a standoff on each end. This gave the guys a place to kneel while they were floating the surface.
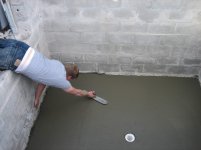
Pic 3 - Once again managing the challenge of dealing with a concrete pad that is 3 feet below the surface with no real exit. In this picture you can also see a good view of the drain.
Attachments
IMG_0263.jpg
438.8 KB
· Views: 427
IMG_0300.jpg
338.1 KB
· Views: 509
IMG_0307.jpg
288.4 KB
· Views: 925
/ Root Cellar Remodel, Split Level Storage, Shop, Shed Pole Building on a Foundation
I'm going to do some accounting here, too, to keep track of my expenses.
I started the project by paying $300 for a pile of surplus lumber. This includes all the 2X4's that I'll need and a lot of the plywood. I also paid $1 each for 30 bricks last fall.
I paid $150 for the concrete yesterday. I also paid $15 for the floor drain and the stem pipe.
Last night I paid $60 for some windows. The plan right now includes 4 windows. I have two large windows that were going to be installed in our house, but we changed our plans there. I may add a few more if I can find some smaller windows for cheap between now and when I start the framing.
Total so far = $555
/ Root Cellar Remodel, Split Level Storage, Shop, Shed Pole Building on a Foundation
Scavenging and scrounging is the only way I'll be able to make this project happen.
I spent $27 today for mortar. I went to two hardware stores looking for a half block, but neither had it. I guess I'll be cutting another block. At least it will match the mess that's already in place.
/ Root Cellar Remodel, Split Level Storage, Shop, Shed Pole Building on a Foundation
I found some time last night to lay the brick. I'm really bad a laying brick. I watched a lot of Youtube videos and read a lot of stuff, but nothing was working like the videos and articles described. In hindsight I think I may have had the mortar too stiff. The other concern I have is that the online calculator said I need 3 bags of mortar for 25 blocks. I didn't even use the mortar from one bag.
I think that if I can do a good job on anchoring the j-bolts so that they borrow strength from the bolts below I'll end up with a good structure.
Attachments
IMG_0316.jpg
616.9 KB
· Views: 662
IMG_0317.jpg
500.1 KB
· Views: 522
/ Root Cellar Remodel, Split Level Storage, Shop, Shed Pole Building on a Foundation
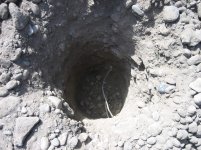
I learned how to do an underground splice today. There is a wire that goes from the old root cellar underground to another outbuilding. I knew it was there, but I got caught up in the process of marking out my support posts and neglected to check if I was going to clear said wire. I didn't. I pulled the auger up after drilling the hole, and there was a section of wire wrapped around the auger.
Lucky for me, I was able to pull enough wire through so that I only had to do one splice. The attached picture is of the wire in the bottom of the hole after I pulled the extra wire.
If anyone was wondering, the hard part of an underground splice is standing on your head to do it.
Attachments
IMG_0321.jpg
683.9 KB
· Views: 457
/ Root Cellar Remodel, Split Level Storage, Shop, Shed Pole Building on a Foundation
")