ROPS: Epoxy light bar with front/rear lights

   / ROPS: Epoxy light bar with front/rear lights
  • Thread Starter
#11  
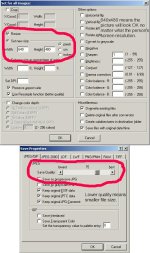
George, the photo files started out a 5+MB files, I opened them in Photoshop and dropped the resolution down to 72 pixels/inch and then had to shrink the size down, the combination of the two was how I got the file sizes down to the 100,000 kb limit. If you want, I can send the files to you via email.

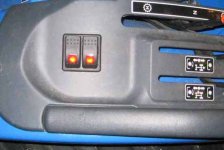
As far as any flicker, there is absolutely none that I have been able to detect.

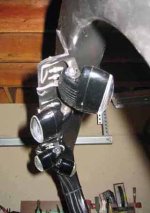
What surprised me was how brite these 35 watt lights are. I was somewhat concerned that I would need larger for the front mounted lights but what I found was the lights do exactly what I had hoped. They fill in the area that the headlights shine on without being so bright that they light the whole field in front of me and without seriously over taxing the electrical system.

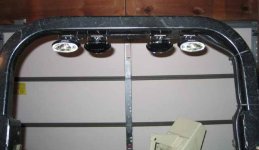
I went back and forth between JB Weld and Marine Grade epoxy. I can't remember why I ended up with the epoxy, probably becasue it was in my hand at the store? Both appeared to be totally capable of doing the job. The epoxy claimed to be waterproof. I can't remember the brand, but I looked up several on several manufacturer's websites before I finally decided. It had a slow set up time so I held the bracket on with clamps to keep it level. What I can tell you is that you can do "chin ups" by hanging on the bracket and it won't budge. That bracket is on there as solid as if it was lag bolted thru the ROPS. Time will tell if it holds up for the duration, but so far I am very impressed.
 
   / ROPS: Epoxy light bar with front/rear lights #12  
<font color="blue"> dropped the resolution down to 72 pixels/inch and then had to shrink the size down, </font>
Have you ever tried changing the picture size to 640 x 480 then increasing the jpeg compression to reduce the file size? This typically results in a picture that's still large enough to see details.

<font color="blue"> the 100,000 kb limit </font>
100 kb limit. /forums/images/graemlins/smile.gif
 
   / ROPS: Epoxy light bar with front/rear lights #13  
Bob that a neat looking project. I might suggest however that you put a safety wire on the angle iron as a precaution to the epoxies failure. That way the wire will hold the angle in the event that the epoxy breaks and keep you from being hit in the head by flying parts. /forums/images/graemlins/shocked.gif
 
   / ROPS: Epoxy light bar with front/rear lights
  • Thread Starter
#14  
It has been years since I used Photoshop on a regular basis, I have the full version, but am not sure what you are referring to when you say to increase the jpeg compression. I played some, maybe I did what you said and didn't realize it.

Here are the switches on the left fender.
 

Attachments

  • 355388-2switches.jpg
    355388-2switches.jpg
    44 KB · Views: 297
   / ROPS: Epoxy light bar with front/rear lights
  • Thread Starter
#15  
PineRidge, I wanted to avoid wrapping anything around the bracket, so if it falls of it will just fall off. Hopefully it will fall behind me? Anyway, give the fact that it has been up there for several months and given the fact that it is still rock solid, I don't think it will fall anytime soon. The epoxy I used was rated for metal to metal adhesion with 5000# loads while being submerged under water. I think I got a good epoxy.

I also think I might have fixed the problem I had with small pictures so here is a front view, you can see the bottom of the bracket is flush with the bottom of the ROPS bar. The front of the front lights are just under and just behind the leading edge of the ROPS bar to give them some protection from the trees that I hit on a regular basis (we have 100's of native hawthorns that grow about 6' to 10' tall and the ROPS hits the branches when I mow.
 

Attachments

  • 355391-2front.jpg
    355391-2front.jpg
    44.6 KB · Views: 314
   / ROPS: Epoxy light bar with front/rear lights
  • Thread Starter
#16  
Here is a LARGER side view of the bracket.

There is a lot of glare from the flash in this picture. The whole thing is actually painted black and the ROPS paint and the bracket paint are the same. For some reason the light housings look black in the picture and the bracket and ROPS look grey, but they all match. The zip ties are also black and the expose wires, except right at the lights themselves are wrapped in black electical tape and encased in black wiring tubes.
 

Attachments

  • 355398-2side.jpg
    355398-2side.jpg
    42 KB · Views: 317
   / ROPS: Epoxy light bar with front/rear lights #17  
</font><font color="blue" class="small">( It has been years since I used Photoshop on a regular basis, I have the full version, but am not sure what you are referring to when you say to increase the jpeg compression. I played some, maybe I did what you said and didn't realize it.
)</font>

In what format are you saving the files? .jpg? .gif? .bmp? Regardless of the format used by the source (the camera, scanner, etc), the first thing I do is convert the pictures to .jpg by using the "Save As" feature and specifying jpeg compression. At this point, good photo software like Photoshop (I use the full version of Paint Shop Pro) will allow you to specify the amount of compression. The default is usually around 30%. You can increase the compression and reduce the size of the file. Increasing the compression may recude the sharpness of the picture or blend some colors, but I've gone to 60% without noticing it.

This is the reason why I love my old Sony Mavica FD71. The resolution is only 640x480, or less than 1/3 megapixel, but the raw .jpg files average only about 35K bytes, and the resolution is fine for web publishing. I do size reduction, color reduction and increase the compression, and can get them down to less than 8K bytes for faster loading.
 
   / ROPS: Epoxy light bar with front/rear lights #18  
<font color="blue"> but am not sure what you are referring to when you say to increase the jpeg compression. </font>
A free picture viewer/editer, IrfanView, has the ability to both resize and 'shrink' files. My standard procedure with digital pictures is to copy the original files from the camera into my Photographs folder with a sub-folder name that describes the subject matter, e.g., Christmas-2003. Within this folder, I always create 2 more folders, one called Original and one called Web. I use IrfanView's batch processing capability to resize (640 x 480) and shrink the original files for use on the web or for emailing. I never modify the originals.

Attached is a picture of the 2 IrfanView option screens.
 

Attachments

  • 355425-irfanview.jpg
    355425-irfanview.jpg
    92 KB · Views: 200
   / ROPS: Epoxy light bar with front/rear lights
  • Thread Starter
#19  
Mike & Don

I am an Apple Mac guy, so Infraview probably won't work. However, all the files are JPG files and I did figure out how to compress inside Photoshop. I think the thing that was throwing me off is that it is not called compression. But it seems to have worked.
 
   / ROPS: Epoxy light bar with front/rear lights #20  
Bob, now I can get a better look at an idea I want to steal. But a resolution 800X600 is best for laptops and CRT monitors.

George
 
 
Top