The gully to pond project

   / The gully to pond project #41  
With that terrain you need to ..... get a dirt bike! You have great land for a natural terrain track! :drool:
 
   / The gully to pond project #42  
So now you have a bigger machine how often are you using the NH? As much as I like my Kubota there's nothing like the feeling of a bigger machine.
 
   / The gully to pond project
  • Thread Starter
#43  
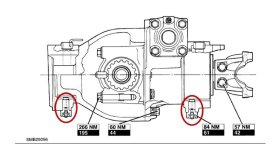
My front axle at the pivot takes grease real easy. Both the front and back fittings. The place that I struggle with grease is where the wheels turn on the axle. There are two fittings, one is easy, the other is always a battle. Of course, I'm 2wd, so it's probably totally different then what you have.

Eddie

Eddie, I'm sure there are differences because my rear axle pivot has a carrier bearing for the driveshaft and a differential in there of course. I've posted an illustration from my maintenance manual and it shows the zerk fittings. I circled them in red. They are screwed into a drilled bolt about 1-1/2" long. The head of the bolt is recessed to protect the zerk. After taking out the zerks and seeing they were okay, I removed the bolts. Their grease passage is about 1/8" in diameter and was completely gummed up with rock-hard grease. I cleared the holes, reinstalled, and grease now goes in effortlessly.:thumbsup:

Like you, I had a heck of a time on my wheel pivots (ball joints?) both top and bottom. My problem was that my Lincoln electric grease gun nozzle fit loose on the fittings because they are smaller. All the grease would just come out of the nozzle in a glob. I went to Autozone and they had a cheap grease nozzle for $2.59. The jaws in this nozzle are plastic, but there are 4 of them instead of the standard 3. Since it was new, it fit snugly around the zerk tips and greasing both top and bottom worked well. The tips were also smaller on the driveline u-joints and expansion joints, but the new nozzle made greasing easy. It's definitely worth the money even if it doesn't last long. I put it on a manual grease gun and left the 3-jaw nozzle on my Lincoln.

So now I can lube every zerk on my tractor and keep it working smoothly. In the process, I learned a lot about the tractor from looking up from the bottom.:D
 

Attachments

  • AxlePivot.jpg
    AxlePivot.jpg
    95.4 KB · Views: 187
   / The gully to pond project
  • Thread Starter
#44  
Charlz: I have nothing against dirt bikes as long as they are on somebody else's property.;) I honestly just grate my teeth from the sound of them. ATVs and UTVs are okay, but I realized long ago that if I open my property to dirt bikes, it will become all people want to do on it. The bikes will make gullies that erode and I'll have to listen to their irritating noise. For my peace and the peace for my wildlife, I've pretty much banned dirtbikes. There's a big track where they hold sanctioned races up the road about 5 miles and that's where I send folks with dirtbikes. They like them and I have no problem with them as long as I don't have to listen to them. I know that may be weird, but it's just the way I feel. I actually don't let anyone but close friends and family ride ATVs on my trails either. I guess it's the ogre coming out in me.:laughing:

Crazyal: There are still plenty of jobs for my TC. The big tractor gets big jobs done quickly, but small jobs and finish work are where the TC shines. I won't be giving it up anytime soon. It will just not be asked to do some jobs that it used to do before. When there's a tree to dig out or a trench to dig, the big tractor will win. Truthfully, I'd love to have a skidsteer too. Heck, if Ken Sweet was closer to Texas, I might be looking at his Cat D3B dozer too. I'm pretty much an equipment junkie.:D
 
   / The gully to pond project #45  
Very impressive work. Good luck.
 
   / The gully to pond project
  • Thread Starter
#46  
With Halloween recently in the past, I'm reminded of the movie, Beetlejuice where saying "Beetlejuice" three times brings up the tormenter. Only in my case, I think the idea is that you say "caliche, caliche, caliche." Wow! Is this stuff tough!!! Thank goodness my backhoe has good teeth.:thumbsup:

I tried working back and forth across the face of the caliche, and it was very time consuming because all I could do is scratch off small chunks and pulverized sand. Then, I had the idea of starting at the top and see if I could chip chunks off rather than work on the vertical face. I started chipping and working my way down and soon ended up with a vertical trench about 4' deep (first two pictures). Then, I started working about 1/2 the width of my bucket to the side of the trench and big chunks of caliche dropped off (next photos). Finally, I worked my way across the face, repeating this process and quickly was able to move 8 to 10 yards of material. The face is shown completed, ready for the next pass in the final photo.

This caliche is tough, but I'll keep scratchin' until I get it. Where I'm working now will be the bottom of my pond basin and it will be solid caliche. I poured some water into a caliche hole yesterday and it just sat there like a pan, holding the water. This could work out really well.:)
 

Attachments

  • CalicheScratch-00.jpg
    CalicheScratch-00.jpg
    112.3 KB · Views: 396
  • CalicheScratch-01.jpg
    CalicheScratch-01.jpg
    99.6 KB · Views: 346
  • CalicheScratch-02.jpg
    CalicheScratch-02.jpg
    105 KB · Views: 336
  • CalicheScratch-04.jpg
    CalicheScratch-04.jpg
    114.8 KB · Views: 258
  • CalicheScratch-06.jpg
    CalicheScratch-06.jpg
    102.2 KB · Views: 335
   / The gully to pond project
  • Thread Starter
#47  
Progress is being made. Here is a photo of the area I am filling in. I have to get this pit filled and then raise the whole area another 3' before building terraces, planting grass, and controlling the runoff so erosion just doesn't occur again. It is hard to see in this photo, but there is about 40' elevation change from this spot to the bottom were I am excavating the fill. I thought about using my dump trailer, but by the time I fill it, drive it to the fill area, dump it, and return, I can just carry the dirt in my tractor's bucket and dump it just as quickly. I could only carry about 4 yards in my dump trailer and be able to pull it with my TC45D. When I heap up my bucket on the LB75B, I can carry at least 1-1/2 yards per trip.
 

Attachments

  • Progress-11-07-2010-475.jpg
    Progress-11-07-2010-475.jpg
    140 KB · Views: 350
   / The gully to pond project
  • Thread Starter
#48  
Here is the basin for the 2nd pond. I'm currently working on the mound in the back. Progress is slow because this mound is solid caliche. The reason it is here is probably because it is caliche and has not eroded away. Also in the background of the photo, you can see a trail. This trail will become the overflow for this pond. The dam will be in the gully to the right after I remove the trees.

The 2nd photo shows the path through what will be the first (high) pond where I drive up to fill in the top gully. There is a trench that brings drainage off the county road and I will terrace surrounding areas to bring as much water into this pool as possible. To the right in this photo, you can see where I started the key trench for the first dam. This key trench will extend across to where I'm standing while taking the photo and eventually this dam will be built up with a road across the top. Behind the mound with the key trench is a low spot where I will install culverts under the road to allow runoff down into the 2nd pond level.
 

Attachments

  • Progress-11-07-2010-477.jpg
    Progress-11-07-2010-477.jpg
    141.1 KB · Views: 268
  • Progress-11-07-2010-479.jpg
    Progress-11-07-2010-479.jpg
    160.4 KB · Views: 250
   / The gully to pond project
  • Thread Starter
#49  
One final photo. This photo shows the type of materials I'm excavating. The top layer is red clay that instantly turns to about 2' of sand and then caliche. The red clay in the key trench I started is where I piled a bunch of clay and didnt' get it all removed to my stockpile. Behind that clay is solid caliche.
 

Attachments

  • Progress-11-07-2010-480.jpg
    Progress-11-07-2010-480.jpg
    151.3 KB · Views: 268
   / The gully to pond project
  • Thread Starter
#50  
More caliche boulders. BTW: My house foundation is sitting on a shelf of caliche. I don't think it is going anywhere.
 

Attachments

  • CalicheChunks-00.jpg
    CalicheChunks-00.jpg
    120.3 KB · Views: 195
  • CalicheChunks-01.jpg
    CalicheChunks-01.jpg
    86.7 KB · Views: 201
 
Top