You are using an out of date browser. It may not display this or other websites correctly.
You should upgrade or use an alternative browser.
You should upgrade or use an alternative browser.
what are the four holes for in the bottom of the TO-30 differential case?
- Thread starter dbotos
- Start date
/ what are the four holes for in the bottom of the TO-30 differential case?
#121
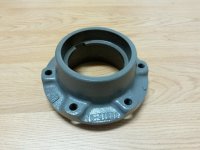
Getting there. Slowly. Got the axle bearing housing done today at lunch. Plugged the bore with two 4" tapered foam plugs (removed before cure) and also masked the OD of the projection on the opposite sides. Oiled up the bare metal this evening so it wouldn't rust.
Daydreaming of nice Fall weather riding on the Ferguson...

Daydreaming of nice Fall weather riding on the Ferguson...
Coyote machine
Super Member
- Joined
- May 4, 2009
- Messages
- 7,660
- Location
- Southern VT
- Tractor
- 22 SANY SY 50U, '10 Kioti DK 40se/hst KL-401 FEL, loaded tires, KB-2485 bhoe, Tuffline TB160 BB, Woods QA forks, MIE Hydraulic bhoe thumb & ripper tooth, Igland 4001 winch, & GR-20 Log Grapple. Woods BBX72" Brush Mower. Diamondplate aluminum canopy
Nice work, as usual. Now, stop dreaming and get her back together!:laughing:
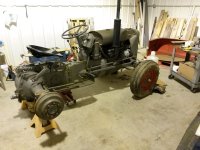
Sometimes life gets in the way of hobbies. Still trying to get old Fergie back together. I got her moved indoors recently, which should greatly help that effort:
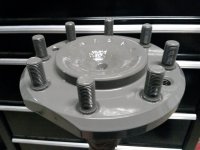
I got the axle flange blasted and painted. Here's a shot of it just prior to paint:
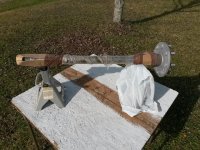
Jackstands make a nice set of tall vee blocks (bagged the one closest to the flange to avoid getting acetone and paint on it). Masking for blast and paint consisted of plastic wrap, cardboard (to protect splines + seal and bearing interface surfaces), and duct tape. Did standard air blow off and acetone rinse before priming. Brake drum is last big item to paint. Got some Loctite 660 retaining compound and Permatex 81182 gear oil safe RTV on the way for reassembly. Going to do the right side too while I've got her down - hopefully that'll go faster than the left.

I got the axle flange blasted and painted. Here's a shot of it just prior to paint:

Jackstands make a nice set of tall vee blocks (bagged the one closest to the flange to avoid getting acetone and paint on it). Masking for blast and paint consisted of plastic wrap, cardboard (to protect splines + seal and bearing interface surfaces), and duct tape. Did standard air blow off and acetone rinse before priming. Brake drum is last big item to paint. Got some Loctite 660 retaining compound and Permatex 81182 gear oil safe RTV on the way for reassembly. Going to do the right side too while I've got her down - hopefully that'll go faster than the left.
Coyote machine
Super Member
- Joined
- May 4, 2009
- Messages
- 7,660
- Location
- Southern VT
- Tractor
- 22 SANY SY 50U, '10 Kioti DK 40se/hst KL-401 FEL, loaded tires, KB-2485 bhoe, Tuffline TB160 BB, Woods QA forks, MIE Hydraulic bhoe thumb & ripper tooth, Igland 4001 winch, & GR-20 Log Grapple. Woods BBX72" Brush Mower. Diamondplate aluminum canopy
Again, nice work. Good thing you are inside now. Progress is a good thing! Show us some finish detail from the painting when you have the pieces done.
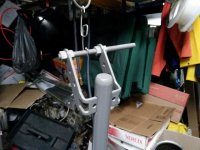
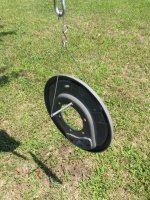
Thanks. I powdercoated the brake backing plate in August. Made a special hanger for it that looks like a waterski handle with a slight bow in the bar:
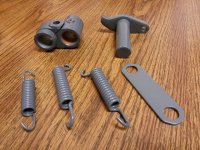
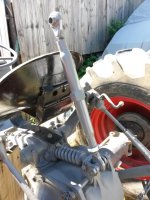
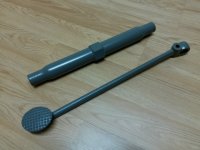
Here are the top link tube (bored a big hex nut and TIG'ed it on so I could use a wrench on it) and the left side brake pedal (both powdercoated):
And the axle shaft flange painted on Sunday:

Here are the top link tube (bored a big hex nut and TIG'ed it on so I could use a wrench on it) and the left side brake pedal (both powdercoated):

And the axle shaft flange painted on Sunday:

Coyote machine
Super Member
- Joined
- May 4, 2009
- Messages
- 7,660
- Location
- Southern VT
- Tractor
- 22 SANY SY 50U, '10 Kioti DK 40se/hst KL-401 FEL, loaded tires, KB-2485 bhoe, Tuffline TB160 BB, Woods QA forks, MIE Hydraulic bhoe thumb & ripper tooth, Igland 4001 winch, & GR-20 Log Grapple. Woods BBX72" Brush Mower. Diamondplate aluminum canopy
Impressive detailed work!:thumbsup:
How does one do power coating? Doesn't it take an oven or some sort of heating process to get it right?
How does one do power coating? Doesn't it take an oven or some sort of heating process to get it right?
Thanks. It's the OCD at work. 
Starting with a clean part (media blasted, air blown, and solvent rinsed), the part needs to be grounded. I usually hang mine from a hook fashioned from galvanized wire, an old bicycle spoke, or some other fabricated contraption. Clip the ground lead from your gun's power supply to your part hanger. Coat with desired powder, starting in the hard-to-reach nooks and crannies (just like liquid painting). After a thorough inspection with a good light, hang the part in a pre-heated curing oven. Most powders cure somewhere in the neighborhood of 400°F for around 10 minutes. Cure time starts when the surface reaches cure temperature (most folks use an IR thermometer to check). After cure time has elapsed, the parts can be removed from the oven or just left in there to cool with the oven off and the door cracked a bit. Once cool, parts are ready to use/reinstall.
That's it in a nutshell (I can provide a much more detailed procedure and lots of tips/tricks if you're interested). I'd recommend one of the Eastwood guns for starting out (I tried one of the Harbor Freight guns once and wasn't impressed). A old kitchen oven turned on its side makes a decent curing oven. Shielding the element with a piece of galvanized steel helps keep from getting too much radiant heat on that side of the part.
