Added a Thumb

   / Added a Thumb #1  

George2615

Super Member
Joined
Feb 28, 2005
Messages
9,278
Location
Central Square, NY
Tractor
LS XR3037HC
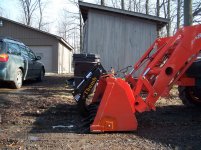
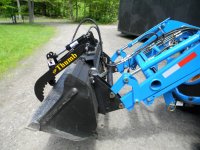
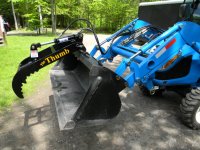
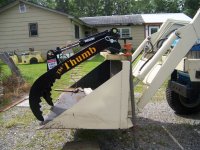
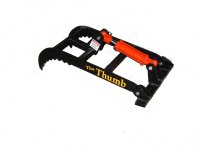
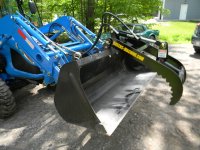
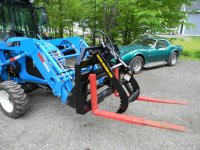
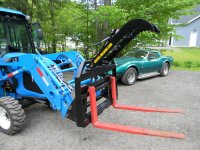
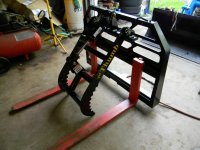
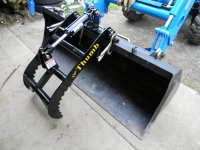
I finally ordered and received a Thumb for using on my bucket and forks. I bought it from Greensmachine. I got the 36" model but they have shorter ones. I also bought 2 thumb base plates. One for the forks and one for the bucket.
So, here's the pics over the past couple days.
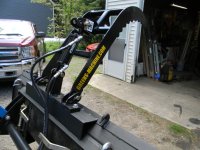
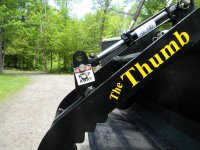
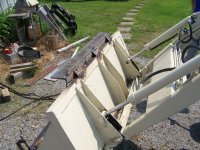
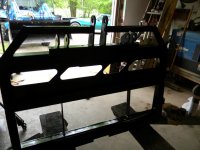
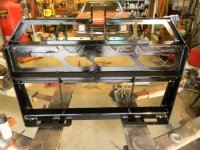
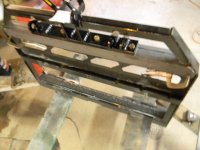
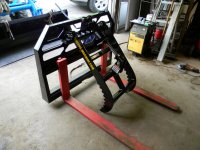
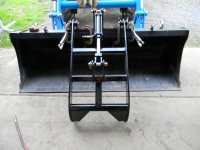
1-9 Test fitting for best location.
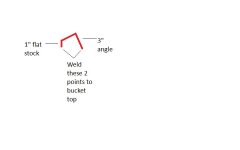
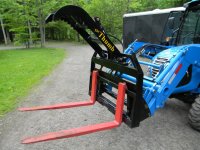
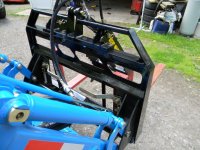
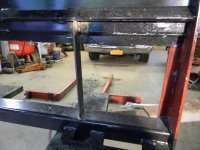
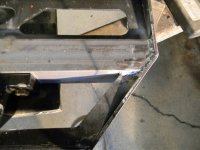
10 - I had to cut out the fork back plate for thumb base plate location. Bought a piece of 3"x3" angle 3/8" thick to mount the base on. Cut it to length and fit it in place.
11 - Drilled 5/8" mount holes in the angle.
12 - Test fit thumb plate.
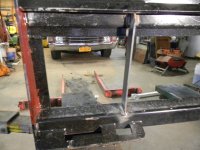
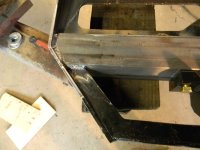
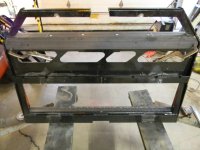
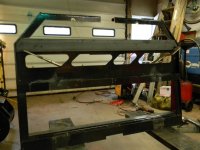
13-14 Welded in the angle to strengthen the upper section of the back plate back up.
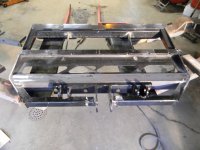
14-18 Also added two vertical uprights where the Q.A. goes.
15-16 Welded using 1/8" 7018
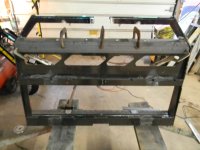
19-21 Primed and painted.
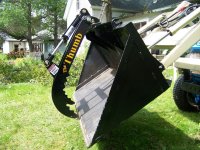
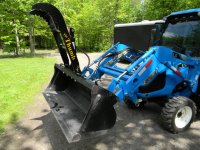
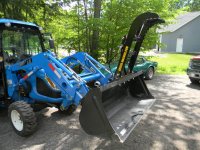
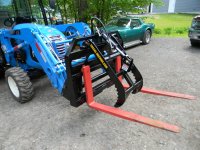
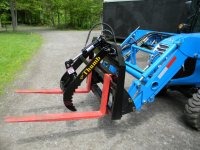
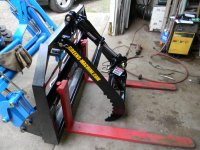
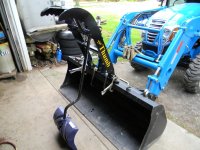
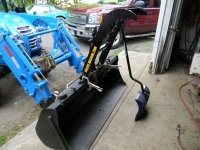
22-26 Installed.
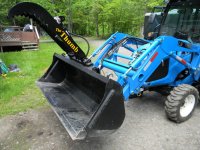
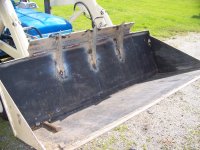
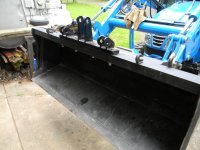
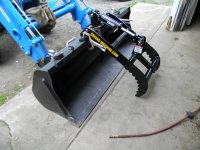
28 - Bolted the base plate on bucket after drilling the 5/8" holes. Thumb base plate bolts are 5/8" Grade 8 with nylon lock nuts.
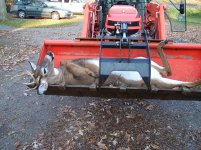
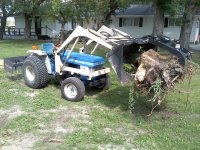
29-32 Installed and tested.
Easy pin on set up. Just pull 3 pins, change from forks to bucket and pin back on.

Sorry but the pics are out of order. I uploaded them in order but they didn't post properly. Hovering your mouse pointer over the pic should show the pic number.
 

Attachments

  • $_57.JPG
    $_57.JPG
    106.7 KB · Views: 240
  • 32.JPG
    32.JPG
    285.4 KB · Views: 292
  • 31.JPG
    31.JPG
    293.6 KB · Views: 271
  • 30.JPG
    30.JPG
    246 KB · Views: 357
  • 29.JPG
    29.JPG
    273 KB · Views: 290
  • 28.JPG
    28.JPG
    202.7 KB · Views: 284
  • 27.JPG
    27.JPG
    281.8 KB · Views: 266
  • 26.JPG
    26.JPG
    269.2 KB · Views: 274
  • 25.JPG
    25.JPG
    295.6 KB · Views: 493
  • 24.JPG
    24.JPG
    251.4 KB · Views: 304
  • 23.JPG
    23.JPG
    285.8 KB · Views: 341
  • 22.JPG
    22.JPG
    254.8 KB · Views: 333
  • 21.JPG
    21.JPG
    173.7 KB · Views: 269
  • 20.JPG
    20.JPG
    169.2 KB · Views: 235
  • 19.JPG
    19.JPG
    223 KB · Views: 242
  • 18.JPG
    18.JPG
    180.7 KB · Views: 233
  • 17.JPG
    17.JPG
    182.3 KB · Views: 253
  • 16.JPG
    16.JPG
    163.7 KB · Views: 253
  • 15.JPG
    15.JPG
    157.4 KB · Views: 217
  • 14.JPG
    14.JPG
    177.5 KB · Views: 252
  • 13.JPG
    13.JPG
    149.3 KB · Views: 224
  • 12.JPG
    12.JPG
    149.6 KB · Views: 246
  • 11.JPG
    11.JPG
    166.7 KB · Views: 230
  • 10.JPG
    10.JPG
    166.6 KB · Views: 229
  • 9.JPG
    9.JPG
    218 KB · Views: 242
  • 8.JPG
    8.JPG
    224.1 KB · Views: 234
  • 7.JPG
    7.JPG
    195.8 KB · Views: 238
  • 6.JPG
    6.JPG
    213.5 KB · Views: 225
  • 5.JPG
    5.JPG
    235.6 KB · Views: 289
  • 4.JPG
    4.JPG
    232.1 KB · Views: 259
  • 3.JPG
    3.JPG
    195.6 KB · Views: 278
  • 2.JPG
    2.JPG
    191.6 KB · Views: 256
  • 1.JPG
    1.JPG
    214 KB · Views: 279
   / Added a Thumb #2  
Nice job;I like mine.I welded a piece of angle on the top of the bucket so I could fully close.I use mine for brush mostly.
I also tacked the nuts on the bottom of the angle for easy removal/installation.
I also replaced the front "pin" with a bolt,I was forever loosing them.Good tool and cheaper/less weight than a full grapple.
 

Attachments

  • with grapple.jpg
    with grapple.jpg
    522.2 KB · Views: 360
  • 100_0827 (Small).jpg
    100_0827 (Small).jpg
    56.7 KB · Views: 353
  • kubota deer.jpg
    kubota deer.jpg
    602.7 KB · Views: 350
   / Added a Thumb
  • Thread Starter
#3  
I like the way it came out on my forks. But I think I will add a piece of 3" angle and some flat stock (Like pic attached) to the top of my bucket to change the thumb base plate mounting angle so the thumb will close more. I'll pick some up next week and make that change.
 

Attachments

  • Thumb base.jpg
    Thumb base.jpg
    11.9 KB · Views: 309
   / Added a Thumb #4  
Yes ,being able to clamp tight is handy for logs,brush ,rocks ect.I angled mine pretty much the way you drew it.I have gotten pretty good with mine ,can pick up small rocks or big.Grabbed a big flat one that probably weighed 1000lbs and filled the bucket side to side.
 
   / Added a Thumb #5  
I was thinking about mounting it on my forks with an angle so that I could get the arm up verticle so It would be out of the way when lifting a pallet, and the mounting plate on my forks would be lower (about 2" above the top of fork latches). What do you guys think? Will it work that way? It looks like I would have to angle it back a little farther than it is on the your bucket. Thanks, very nice work guys!:thumbsup:
 
   / Added a Thumb
  • Thread Starter
#6  
I was thinking about mounting it on my forks with an angle so that I could get the arm up verticle so It would be out of the way when lifting a pallet, and the mounting plate on my forks would be lower (about 2" above the top of fork latches). What do you guys think? Will it work that way? It looks like I would have to angle it back a little farther than it is on the your bucket. Thanks, very nice work guys!:thumbsup:

How high is the material stacked on pallets you lift. The thumb will clear any pallet I lift with my fork. If not, I can unpin it and remove the thumb.
 
   / Added a Thumb
  • Thread Starter
#7  
I changed the base plate mount for the bucket thumb.
I welded on a piece of angle to change the pitch angle of the thumb base plate. Drilled out the 5/8" holes and welded nuts underneath. Mounted the thumb and tested. Now it closes almost touching the bucket. Attached are before and after pics. I also drilled a couple more 1" adjustment holes in the thumb where the cylinder top attaches. Works much better now.
 

Attachments

  • 33.JPG
    33.JPG
    280.4 KB · Views: 278
  • 32.JPG
    32.JPG
    285.4 KB · Views: 255
  • 35.JPG
    35.JPG
    249.4 KB · Views: 344
  • 29.JPG
    29.JPG
    273 KB · Views: 293
  • 34.JPG
    34.JPG
    223.7 KB · Views: 312
  • 36.JPG
    36.JPG
    258.4 KB · Views: 252
   / Added a Thumb #8  
You will find that works well.I added a tooth-bar at the same time,great addition also.
 
   / Added a Thumb #9  
I like the way it came out on my forks. But I think I will add a piece of 3" angle and some flat stock (Like pic attached) to the top of my bucket to change the thumb base plate mounting angle so the thumb will close more. I'll pick some up next week and make that change.

I had to make an elevated mounting bracket to get everything matched up the way I wanted. We stacked wood blocks to get everything lined up and matched up where we wanted. We then measured the height of our block stack, along with the angle, then started cutting and welding steel. I ended up with a perfect match at the tip of the grapple with the cutting edge, and a huge bite for picking up really big loads.

Joe
 

Attachments

  • 102_3510.jpg
    102_3510.jpg
    209.5 KB · Views: 272
  • 102_3529.jpg
    102_3529.jpg
    197 KB · Views: 261
  • 102_3619.jpg
    102_3619.jpg
    821.4 KB · Views: 306
  • 252083_1948189346054_1282194262_31881586_4234086_n.jpg
    252083_1948189346054_1282194262_31881586_4234086_n.jpg
    153.9 KB · Views: 291
  • 102_3526.jpg
    102_3526.jpg
    241.3 KB · Views: 252
   / Added a Thumb
  • Thread Starter
#10  
Nice job Joe. Looks like you got the 36" too. My main use of the thumb will be with my forks. Just thought why not buy a second base for the bucket. That gives me a dual purpose thumb.
 
   / Added a Thumb #11  
Nice job Joe. Looks like you got the 36" too. My main use of the thumb will be with my forks. Just thought why not buy a second base for the bucket. That gives me a dual purpose thumb.

Thanks! Yup, 36" of grabbing goodness. I like your thumb/forks mash-up. I can see where that can be a very handy combination. And the extra mounting base gives you tons more usefulness with the second bucket for a fraction of the cost of another thumb. You know you'd be kicking yourself if you didn't do it.

Joe
 
   / Added a Thumb #12  
George
Did you add a smaller piece of angle on the very front edge of your bucket, where your chain hook is welded? It looks like in your pictures that it has more metal on the front edge compared to my R4041 bucket. I know that I will have to add the 3" angle to mount, like what you had done.
 
   / Added a Thumb
  • Thread Starter
#13  
George
Did you add a smaller piece of angle on the very front edge of your bucket, where your chain hook is welded? It looks like in your pictures that it has more metal on the front edge compared to my R4041 bucket. I know that I will have to add the 3" angle to mount, like what you had done.

Yes I did add a piece of 2" angle to the top of my bucket and welded my hooks to that. The top of the bucket is boxed but I didn't know how thick it was.
 
   / Added a Thumb #14  
Ok, thank you. I was looking into beefing up my bucket before adding a thumb also.
 
   / Added a Thumb #15  
George2615, I followed what you did with mounting and all; but I have a couple of questions per your thumb. I got mine and while to the naked eye it appears flat and straight, once placed on the level metal of bucket the brace bracket (both that I received) seems slightly warped. Was yours just slightly off also? I believe that when I bolt it down - if I start in the middle and work towards the outside - it "might" squeeze down flat?

Also, the pins (with holes for slip in lock pin) provided for the out most holes of the brace need to be "forced" in and out? They are "way" to tight to be just simply pull three pins and switch from forks to bucket!! Did you do any modifications to the hole to enlarge them slightly? Or is it just my luck to get the one that is poorly made? I am looking for some 3"x1" top link pins to replace those provided but am not having any luck finding any. My local TSC has a slot on their wall for some 1"x3 & 13/16" pins but of course they are out and don't know when they may be restocked! n They have 6" lengths and I may need to buy those and just cut them down to fit. But that's at the end of my mounting process to worry about.

I also saw the extra holes for the hydraulic ram that you added to yours. Any problems with the lower set as for contacting the thumb cross-bar? Do you ever even use the others? Your pictures don't show it mounted in other than the original holes, so I wonder if it is worth it to have him drill some in mine or not? I would "probably" only use it for when the thumb is on the bucket as it seems that my bucket is "way" smaller than yours. Mine is approx 55" wide but narrow to the top and that 36" thumb has a "very" long reach!

For now I'm just trying to find out about the quality levels that others have received with their Greens Thumb. I'm currently questioning mine as is my welder/fabricator whom has pointed out these deficiencies to me -- repeatedly! Any further guidance you could offer as per your mounting experience would be greatly appreciated. Thanks, Greg
 
   / Added a Thumb #16  
I am looking for some 3"x1" top link pins to replace those provided but am not having any luck finding any. My local TSC has a slot on their wall for some 1"x3 & 13/16" pins but of course they are out and don't know when they may be restocked! n They have 6" lengths and I may need to buy those and just cut them down to fit.

A local steel shop in San Diego will have 1.00" round steel rod for reasonable prices. If you need 25mm, it is harder to find locally. Don't go smaller than that, or you risk bent pivot pins.
 
   / Added a Thumb
  • Thread Starter
#17  
George2615, I followed what you did with mounting and all; but I have a couple of questions per your thumb. I got mine and while to the naked eye it appears flat and straight, once placed on the level metal of bucket the brace bracket (both that I received) seems slightly warped. Was yours just slightly off also? I believe that when I bolt it down - if I start in the middle and work towards the outside - it "might" squeeze down flat?

Also, the pins (with holes for slip in lock pin) provided for the out most holes of the brace need to be "forced" in and out? They are "way" to tight to be just simply pull three pins and switch from forks to bucket!! Did you do any modifications to the hole to enlarge them slightly? Or is it just my luck to get the one that is poorly made? I am looking for some 3"x1" top link pins to replace those provided but am not having any luck finding any. My local TSC has a slot on their wall for some 1"x3 & 13/16" pins but of course they are out and don't know when they may be restocked! n They have 6" lengths and I may need to buy those and just cut them down to fit. But that's at the end of my mounting process to worry about.

I also saw the extra holes for the hydraulic ram that you added to yours. Any problems with the lower set as for contacting the thumb cross-bar? Do you ever even use the others? Your pictures don't show it mounted in other than the original holes, so I wonder if it is worth it to have him drill some in mine or not? I would "probably" only use it for when the thumb is on the bucket as it seems that my bucket is "way" smaller than yours. Mine is approx 55" wide but narrow to the top and that 36" thumb has a "very" long reach!

For now I'm just trying to find out about the quality levels that others have received with their Greens Thumb. I'm currently questioning mine as is my welder/fabricator whom has pointed out these deficiencies to me -- repeatedly! Any further guidance you could offer as per your mounting experience would be greatly appreciated. Thanks, Greg

Questions answered by paragraph. Perhaps since I posted this 5 years ago quality control may have suffered in production of the mount.
1) Both my mounting plates where flat, not warped. Depending on how warped yours are the bolts might squeeze it down. It's a pretty thick mount plate though.
2) My three pins slide in / out easily. Remove your pins and take a file or die grinder to ream the holes slightly or you can replace them with cut down pull pins from TSC or pull your pins and clamp in a vise and sand them down with some emory or sandcloth so they fit easier.
3) No, I don't use the other holes. I drilled the extra holes to be able to change the full open / full close position of the thumb. You may not need to drill additional holes.
4) Just an FYI, so far I have found my thumb most useful with my forks and have used it very little on the bucket.
 
Last edited:
   / Added a Thumb #18  
Thanks for the reply George,
#1 - Neither of my base plates are warped "all that bad" and I do think I can squish it flat working from the middle out, and using an impact to bolt it down. I was just curious, since they both are identical including the minor warp.
#2 - Yes, I am going to have to grind down the insides some because it takes a punch and hammer to remove the pins now. But, I will also try your other ideas like using emory on the pins some too.
#3 - That's what I wanted to hear about your added holes and I don't think I'll need them; but while the thumb is at the fabricators I'll probably have them added anyway, just for an in case situation.
And for #4, that was my original main intention for the thumb. To use with my forks for my annual limb cleaning around my small property. Making 1 or 2 trips hauling brush vice my current many, many trips. I just thought why not get another base plate and be able to use it on either. But, after seeing just how heavy it actually is - I'll probably end up leaving it on the forks for the most part.
George, have you experienced any problems with the thumb pins getting rusted at all? That's another item my fabricator brought to my attention -- there are "no" grease fittings at the pin holes [like on every other backhoe or grapple I've looked at] and they are a swivel item? I'm debating whether it would be wise to drill, tap, and install grease fitting also?

dfkrug, Thank you for the useful suggestion and that will be a viable resort if needed. But, since I'd have to cut and grind anyway with steel rod I might as well just get the longer pins from TSC (local shop, about 2 miles away) and cut them short enough to fit and drill a keeper hole in.
 
   / Added a Thumb
  • Thread Starter
#19  
Greg,
I just went outside and looked at my pins. (Brrrrrrrr 21 degrees out there) 5 years old and only have a couple spots of minor surface rust. They still spin freely without grease fittings. Plus they are stored outside all year. I think if you ream / file the holes slightly and grease the pins before installing them you'll be fine.
 
   / Added a Thumb #20  
Okay, thanks for that additional info -- even tho it sounds "very cold" to me!! I appreciate you confirming about the rust and need for grease fittings. Get u back inside with a cup of hot cocoa or cider! Thanks.


Tractor & Equipment Auctions

HYDRAULIC THUMB FOR MINI EXCAVATOR (A58214)
HYDRAULIC THUMB...
2020 KENWORTH T680 TANDEM AXLE SLEEPER (A59905)
2020 KENWORTH T680...
2016 CHEVROLET SILVERADO CREW CAB TRUCK (A59823)
2016 CHEVROLET...
2018 ALLMAND MAXI-POWER 45 GENERATOR (A58214)
2018 ALLMAND...
2022 Greenworks CU400W Commercial Work Utility Vehicle DEMO UNIT (A56438)
2022 Greenworks...
2019 CATERPILLAR 259D3 SKID STEER (A60429)
2019 CATERPILLAR...
 
Top