Spike's Truck Drum Waste Oil Heater

   / Spike's Truck Drum Waste Oil Heater
  • Thread Starter
#11  
LetsRoll,
I am not heating a 1200 square foot shop. All I need is something that will get as hot as a pot belly stove. I believe this should work.
 
   / Spike's Truck Drum Waste Oil Heater #12  
Good luck and keep us updated with your progress.
 
   / Spike's Truck Drum Waste Oil Heater #13  
I did a test run with about a quart of oil in the pot. The heater smoked out of the pot lid 1/4 inch holes and when the oil came to temp flames came from the cylinder holes. There are about three things that I can change to fix the problem. The first would be a problem with the baffle. It was a design that I thought up not one that Spike uses. The second would be, my chimney reduces to 5 inches. I may have to put in 6 inch pipe. The third would only affect the smoke, I have too much vent in the pot lid, air could be coming in from between the lid and pot. I could install temporary bolts in the vent holes and see if the lower pot continues to get enough air but does not smoke.

DSCF0021-5.jpg

Just an idea, what would you think about installing a flue pipe fan like a squirrel cage blower motor? That will pull on the flame in your pot until the pot temperature come up. And I also agree that you might have to much air around your pot hence the reason the flame is coming out of the holes .
 
   / Spike's Truck Drum Waste Oil Heater
  • Thread Starter
#14  
Yesterday I installed a 6 inch chimney. The thing continues to flame through the holes at high burn. I did open the pot during a low burn and noticed the flame would increase when this was done. This leads me to believe there is not enough air making it to the flame. One thing I will note, the chimney did give it a wider burning area before the flames come out of the holes in the cylinder. My next move is to drill more holes in the cylinder.
I also built a shelf for the bucket and plumbed in the oil line.

DSCF0022-3.jpg
 
   / Spike's Truck Drum Waste Oil Heater #15  
It sounds like your input/output drafts are not balanced. I don't remember reading anything in your posts about the height of your chimney. If you read Spikes narration carefully about the experimentation he did with the amount and size of the holes in order to balance the draw of the chimney with the incoming air you will remember that he had to weld some holes shut and tinker with the size of the holes until he got the right balance for a clean burn. This design relies on atmospheric draft and this means that once the unit is up to heat there is only a narrow range of fuel delivery that will burn cleanly without additional air adjustment. Look at the You Tube clip of Ozzirt's first burn with his setup outdoors on a trailer or truck with a short chimney pipe and how he had to close off at least half of the draft holes with a sheet metal sleeve to balance the incoming air in relation to the reduced draft of the short chimney to get a clean burn. Once you find the "sweet spot" ratio of chimney 'suction to draft holes to fuel rate you will have an efficient clean burning unit but with a limited heat output range. Good luck with your tinkering!
 
Last edited:
   / Spike's Truck Drum Waste Oil Heater #16  
I can tell you from my experience, the draft has to be really close to the flame on a small flame and you have to be able to adjust the amount of draft. If you can not adjust the amount of draft, your not going to be able to control the flame temperature during preheat.

I think using a adjustable sleeve around the pipe that he has the holes drilled into. He can control the amount of draft on the flame in the pot and that sleeve will also allow him to control the flame temperature. In theory, pulling the sleeve up, will expose more holes. Which will allow more draft air to the flame, which should increase his flame temperature. Push the sleeve down, will cover more holes, resulting in less air draft on the flame. Which will lower the flame temperature. This is just an idea for him to maybe try out.
 
   / Spike's Truck Drum Waste Oil Heater #17  
Hi everyone, please forgive me as this is only a flying visit for the moment. I explained to David in an earlier email today that I have just returned home after several weeks away and I still have a pile of email to answer as well as all those jobs that mount up while you are away.

There are some very interesting and informed comments here, and hopefully I will be able to give answers to a few questions.

I notice that David says his heater is flaming through the holes at high forcing rates. What I would like to know is, is this flame popping and blowing puffs of foul smelling fuel vapour?

As Don pointed out, this heater is highly dependant on having a good natural draft and to this end, the size and number of the secondary air holes have some effect on the mixing of the fuel and air, with the general rule being that, the larger the holes, the more violent the mixing and this is one of the main things that keeps it burning cleanly. Also larger holes burn clean over a much wider range of temperatures.

I have thirty two 3/8" holes and also a similar number of 3/16" holes just above the lid of the pan, these are not visible because they are obscured by the locating ring for the lid. I can get this to burn cleanly from about 350degC to 1100degC.

I do not recomend trying to burn at this temperature as the radiant heat from the secondary burner tube and the firebox melted the TV aerial cable and d*mn near set fire to my favourite armchair. about six feet away
IMG_2326m.jpg
IMG_2325m.jpg

This is what can happen if you get distracted when lighting up. I had just lit the heater and I had opened the metering valve almost full to cover the bottom of the pan in oil when the door bell rang. A neighbour needed a hand, and by I got back 40 minutes later this is what it looked like. You can see that I had pulled the pyrometer out as it was hard over on the stop at 1250deg and I was worrid that I had ruined it, fortunately it survived although I blistered my knuckles getting it out.

while i was away I received an email from a bloke in Scotland where they are having some of the coldest weather in living memory. He has just built a heater and plumbed it into his hot water heating system. Here is the body of the email. I will post a link to his video taken while he was building it, as soon as I can find it.

Gordon said:
Hi Spike,
I have been using my copy of your heater to heat my house for 7 weeks now ( heating water to heat my water tank and radiaters) here in Scotland. It have been the worst winter for 20 years,temperatures below zero for 4 weeks now. I made the heater at the right time as heating oil supply is getting tight due to demand and the refineries cannot get it out due to the snow conditions. Customers are being told of a 4 week wait and rationing. My friend told me today he has heard prices of 72 pence a litre due to what he says is profiteering.
I run my boiler for 18 hours a day and burn 25 litres,it would cost me a fortune on heating oil.
I would just like to thank you for sharing your plans and have a good Christmas.
Regards Gordon.
 
   / Spike's Truck Drum Waste Oil Heater #18  
Following is my attempt using this concept. My biggest problem is not having enough time to work on it. This was last years project; havn't had time to play with it this heating season.

HOW TO BURN WASTE MOTOR OIL IN A GAS FURNACE

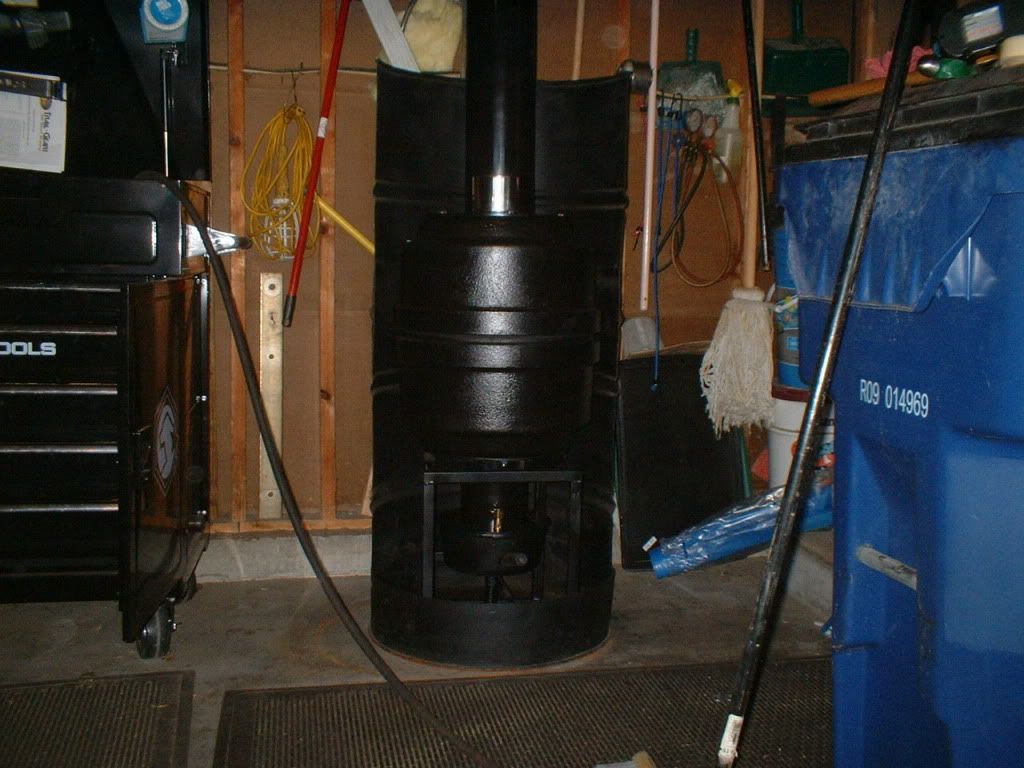
F U R N A C E S H E L L
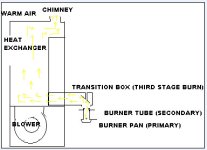
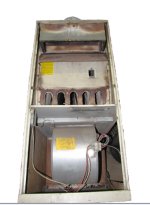
I used a salvaged gas furnace for the shell and the heat exchanger but removed the electronic controls, gas valve and burners and left the blower fan remaining. A couple of changes must be made to the heat exchanger system in order for the burner system to work. First the draft hood must be made air tight in order to maintain chimney draft suction all the way down to the burner. Next I fabricated a steel box to connect three of five heat exchanger tubes to the oil burner assembly which will stand in front of the furnace shell. After testing the burner, I determined that it will burn about one half gallon of waste oil per hour at the high burn setting which at 150,000 BTU per gallon calculates to about 75,000 BTU input. The gas furnace was a 125,000 BTU input and used a five tube heat exchanger so I figured that three tubes should be used for my heat exchanger.
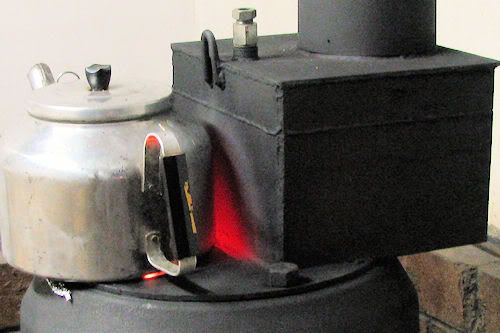
B U R N E R
The burner design concept was borrowed from the You Tube poster name 徹zzirt at this link address: YouTube - Drip Feed Waste Oil Heater
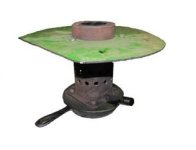
I used a burner tube from an old fuel oil furnace for the secondary burn tube and drilled 26 - 7/16 holes for draft air inlet.

The top of the tube has cast iron fins to swirl the flame. I think a ten inch length of four inch black pipe would work just as well if you do not have access to a burner tube like this.
This burner is mounted to a steel plate and beneath is a removable 6 inch cast iron fry pan for the primary burner fire pot. A ス X 6 inch pipe nipple is the oil inlet from the fuel pump.

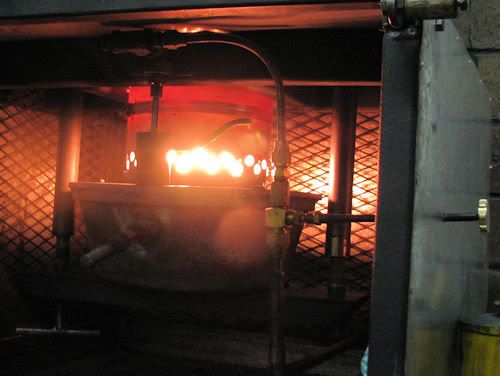
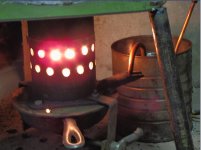
Below is a picture of a test burn that I set up with a two pound coffee can as fuel storage and the air bubbler pump submerged. I fitted a 6 inch furnace pipe above the burner assembly that went directly into a masonry chimney for the test. This type of burner is not at all finicky to start and burn and takes only about 5 to 10 minutes to get it up to running temperature. I use about four or five squirts of kerosene from my pump type oil can and then point a propane torch flame for about 3 seconds down the primary air hole and it starts right up. A low to medium oil volume is best for the first five minutes of burn time until the unit gets hot enough to accept the high volume setting. Primary combustion air comes in at three locations. Two 7/16 inch holes are in the steel plate over the fire pan and the third inlet is the half inch pipe for the oil inlet. This pipe terminates at the center of the burner and has the top of the pipe cut away to form an open trough. This is just enough air to combust the oil into a very rich flame mixture which then rises into the secondary combustion burner tube where the air rushes in to burn the mixture with a bright white flame and a muffled roaring sound. Above the burner, the third combustion stage happens in the steel transition box that carries the hot gasses to the heat exchanger. The six inch round cut-out that came from the bottom of the transition box is mounted on a forty five degree angle just above the opening and serves two purposes. First it helps divert the hot combustion gasses from its vertical path to a horizontal path on its way to the heat exchanger, and second, since it is mounted above the hot combustion gasses by an open one half inch pipe mounting that allows additional air into the flame path while it glows a bright red color from the heat, it allows any unburned fuel one more chance to burn. The open pipe also provides a peek hole directly down into the burner to monitor it. My non-contact laser thermometer showed963 degrees F on the burner tube on one of the tests.
I am very pleased with the low amount of smoke that this burner generates. It is not completely smokeless, but you really have to look for it. I read stories of how users had to chisel residue deposits out of pot type burners but after about seven to eight hours of tests I just turned the pan up side down and tapped it once and only fine ash dropped out.


F U E L P U M P
Fuel (Waste motor oil) is fed into the furnace burner by an air bubbler pump which is a very simple pump made out of a one/ eighth inch brass flare tee. Oil comes in the bottom of the tee, air comes in the side and oil and air go out the top. The air is supplied by a tiny vibrating aquarium air pump. The volume of oil that is pumped per minute is affected by the static level of the oil in the pump tube and also by the temperature of the oil.
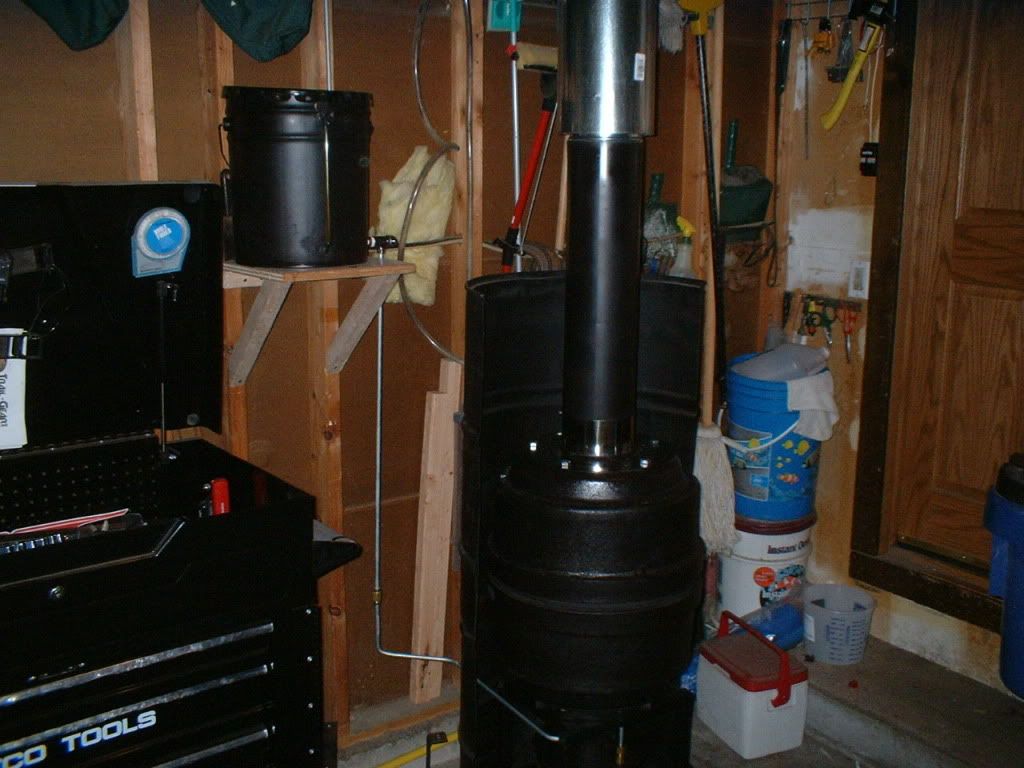
T A N K
I use a salvaged 10 gallon tank from a kerosene torpedo heater for fuel storage and it is adjustable in height with a crank system which regulates the static oil height in the pump tube and consequently the amount of oil pumped to the burner. The drain plug is replaced with a brass flare elbow fitting and connected to the bubbler pump with a clear flexible vinyl tube. This allows the tank to move up and down apart from the stationary bubbler pump. The tank is intentionally off level away from the oil exit fitting to allow water and other impurities to accumulate at the low end for later cleaning with the use of a small lever action suction device thru the fill opening. A 15 watt incandescent bulb with magnetic attachment heats the tank near the oil outlet for better oil flow in cold weather.
F U E L G A U G E A N D P U M P V O L U M E I N D I C A T O R
The tank had an opening top center for the fuel line of the torpedo heater which is now used for a fuel gauge, but more importantly it shows the range of bubbler pump oil volume to the burner. A vertical wire supported by a float protrudes thru the center hole and rises and lowers in keeping with the oil level and slides thru an indicator supported independently that shows high and low burn rates. Every inch of oil in the tank is about 1.74 gallons which is equal to about three and a half hours of burn time at one half gallon per hour burn rate. The working range of oil in the bubbler pump is about an inch and a half from high burn to low burn, so no adjustment is needed for about four hours unless you want to fine tune the heat output. This really works good because start-up is at high heat when it is needed most to warm up the shop, then it automatically gradually reduces the heat output over the next 4 hours when I don稚 need as much heat anyway. If I need more heat than the low setting after or near the end of the first 4 hours, I just crank up the tank to a higher level within the range of the indicator wire for another four hours or so of heat.
 

Attachments

  • Snap_2011.01.02_13h28m58s_001.jpg
    Snap_2011.01.02_13h28m58s_001.jpg
    23.7 KB · Views: 1,033
  • Snap_2011.01.02_13h37m43s_005.jpg
    Snap_2011.01.02_13h37m43s_005.jpg
    41.6 KB · Views: 533
  • Snap_2011.01.02_13h34m04s_003.jpg
    Snap_2011.01.02_13h34m04s_003.jpg
    10.7 KB · Views: 810
  • Snap_2011.01.02_13h35m34s_004.jpg
    Snap_2011.01.02_13h35m34s_004.jpg
    81.8 KB · Views: 2,775
   / Spike's Truck Drum Waste Oil Heater #19  
Hey fellas, check this sight out. Although there is a lot of info on burning waste oil here on TBN, this will help out more. Nice build on the stove dngspot:D I have had good look with my Sanders stove, with bigger steel conical burners only. I can bring the garadge from 25f degrees to 90f degrees in a little over an hour, Only the ceiling is insulated. Only thing that is a drawback I have found on the sanders stove is it makes rain "soot flakes" outside. Been look'n at other stove designs to equal to the simplicity and heat output but cleaner burn to eliminate the black snow of soot flakes. The "spike break drum burner" seems to be along them lines with a better, cleaner combustion burn.

http://wasteoilheaterforum.com/
 
   / Spike's Truck Drum Waste Oil Heater
  • Thread Starter
#20  
just a bit more info. The flame is pretty steady but does vibrate the heater slightly. And yes it will fill the garage with smoke. It does not smell like oil cooking on an engine exhaust manifold but, does have an odor. Enough that I could not wait to shower after it finished.
My flue is 6 inch inner diameter and is 15 feet long. It is about 1 foot above the ridge of the house.
I pulled the secondary burner out of the heater and sandblasted it. I had to remove the paint so I could mark it for drilling. My plan is to add 18 additional 1/15 holes above the existing 39- 5/16 holes. The reason I am using a 5/16 drill bit is because the cylinder is so hard and the only carbide drill bit I have access to is a 5/16 bit.
I also plan on reinstalling the baffle that I removed Friday.
 
Last edited:

Tractor & Equipment Auctions

2024 JOHN DEERE FC20M LOT IDENTIFIER 71 (A53084)
2024 JOHN DEERE...
40' CONTAINER (A51244)
(APPROX 100) UNUSED FUTURE 10' GALVALUME STEEL (A51248)
(APPROX 100)...
2010 Chevrolet Tahoe SUV (A50324)
2010 Chevrolet...
2024 REMLINGER 2300 LOT IDENTIFIER 56 (A53084)
2024 REMLINGER...
PAIR OF DIAMOND PLATE DOUBLE AXLE FENDERS (A51247)
PAIR OF DIAMOND...
 
Top