Learning to Farm
Silver Member
- Joined
- May 24, 2011
- Messages
- 209
- Tractor
- Kubota L3750
Hi Everybody!
As some of you may know, I am new to this. I thought you all would get a kick out of my newbie perspective.
I got my help out with my first fix up. While I was weed-eating a little while ago I found a finish mower in the weeds (the prior field person was a lazy drunk and that is being nice). Mowing the fields with the brush hog is a bit of over kill, so I asked the owner if it could be fixed it up and used. He said he would have the part-time farm mechanic work on it and I volunteered a second set of hands (because I want to learn about it).
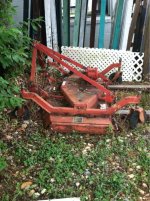
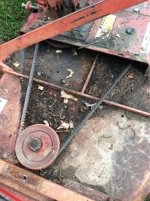
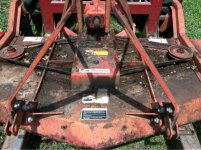
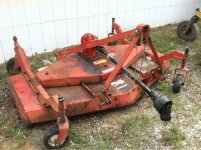
So, the mower deck was covered in tree litter and there was a wheel part that looked like it lost a lynch pin. We picked it up with the fork and placed it where we could clean it. It was power-washed to remove the leaf litter and in places 1 inch of caked grass. The belt covers were removed and although the belt are stretched they still have some life left in them (whew not rotted). One of the belt covers had a dent that was beat flat. When spun by hand everything was free and clear.
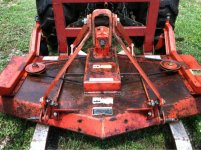
We had to find a "PTO linkage" (not sure what real name is, the part that drives the attachment from the tractor). The one that was found the female part of the shaft was warped. The mechanic heated it up and straightened it, I was amazed (I am easily awed). Once it moved smoothly he realized that the end that attaches to the mower was the wrong one, we needed one with notches, this one was smooth and had a place for a pin. Well, I know when to let a professional sweat and swear on their own so I put the wheel on, with a new lynch pin and hooked up the now cleaned mower to the tractor (greased all the zerks that would take grease, checked the gear oil level) and went for pizza while he removed the round end for a grooved one.
When I got back the ends were exchanged, we attached it to the mower and tractor and started it slowly. After a few minutes I tried to grease the zerks that didn't take grease and they all did. We removed the blades and he sharpened and balanced them(I am going to learn next time), by that time we put the belt covers and blades back on.
It took 4 hours and no new part") ! I have added to my wish list an impact wrench. I won't get to try it out until this evening, but I am not sure as we had rain all morning.
! I have added to my wish list an impact wrench. I won't get to try it out until this evening, but I am not sure as we had rain all morning.
The farm owner said I was like a kid at Christmas, all over a rusty mower... I had my head and hands in everything. :laughing: I can't understand why someone was allowed to trash a perfectly good mower?
Any tips on using the mower is appreciated, pictures will be posted in a few.
As some of you may know, I am new to this. I thought you all would get a kick out of my newbie perspective.
I got my help out with my first fix up. While I was weed-eating a little while ago I found a finish mower in the weeds (the prior field person was a lazy drunk and that is being nice). Mowing the fields with the brush hog is a bit of over kill, so I asked the owner if it could be fixed it up and used. He said he would have the part-time farm mechanic work on it and I volunteered a second set of hands (because I want to learn about it).
So, the mower deck was covered in tree litter and there was a wheel part that looked like it lost a lynch pin. We picked it up with the fork and placed it where we could clean it. It was power-washed to remove the leaf litter and in places 1 inch of caked grass. The belt covers were removed and although the belt are stretched they still have some life left in them (whew not rotted). One of the belt covers had a dent that was beat flat. When spun by hand everything was free and clear.
We had to find a "PTO linkage" (not sure what real name is, the part that drives the attachment from the tractor). The one that was found the female part of the shaft was warped. The mechanic heated it up and straightened it, I was amazed (I am easily awed). Once it moved smoothly he realized that the end that attaches to the mower was the wrong one, we needed one with notches, this one was smooth and had a place for a pin. Well, I know when to let a professional sweat and swear on their own so I put the wheel on, with a new lynch pin and hooked up the now cleaned mower to the tractor (greased all the zerks that would take grease, checked the gear oil level) and went for pizza while he removed the round end for a grooved one.
When I got back the ends were exchanged, we attached it to the mower and tractor and started it slowly. After a few minutes I tried to grease the zerks that didn't take grease and they all did. We removed the blades and he sharpened and balanced them(I am going to learn next time), by that time we put the belt covers and blades back on.
It took 4 hours and no new part
! I have added to my wish list an impact wrench. I won't get to try it out until this evening, but I am not sure as we had rain all morning. The farm owner said I was like a kid at Christmas, all over a rusty mower... I had my head and hands in everything. :laughing: I can't understand why someone was allowed to trash a perfectly good mower?
Any tips on using the mower is appreciated, pictures will be posted in a few.