ice12585
New member
Any info or ideas out there about lights defiantly about the wiring would be nice, and appreciated!!! I understand that people
will disagree with holes in ROPS, dont really need advice on that!!!


If anyone has any pictures of there wiring that would be a great help, how they ran the wiring, the places that the lights, wiring, relays, switches where mounted would be greatly appreciated.
So its getting later in the year and with the day light getting less and less, I decided to put some work lights on the tractor.
So I looked at and have read a few thing so far on the forms about lights, but there seems to be a lot of deferring opinions of
what kind of lights, how to to mount them, and the really big one is all about DRILLING HOLES in the ROP BAR.
After looking up the spec on ROP bars and talking to a structural engineer that I work with, I decided to take the plunge, head first
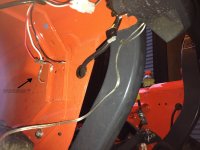
in to the installing of the lights. I don't really know anything about wiring on a tractor :-(

One of my big concurs is the final look and function of the light. I realize that there will be a lot of people out there that would not
have drilled holes in the ROP bar I decided too. For one to keep it nice and clean, I wanted the wiring run inside of the ROP, and also
I do not want any big bulky mounting bracket attached with a U-bolt.


I ordered the LED light bar for the middle, and two LED 4"x4" lights for each side should be plenty. All of this was ordered from
Amazon.com It's all water proof, and shock rated. I started the install and wiring and then realized that I needed to install a relay,
for the light!! A little rework but it will get there.
will disagree with holes in ROPS, dont really need advice on that!!!
If anyone has any pictures of there wiring that would be a great help, how they ran the wiring, the places that the lights, wiring, relays, switches where mounted would be greatly appreciated.
So its getting later in the year and with the day light getting less and less, I decided to put some work lights on the tractor.
So I looked at and have read a few thing so far on the forms about lights, but there seems to be a lot of deferring opinions of
what kind of lights, how to to mount them, and the really big one is all about DRILLING HOLES in the ROP BAR.
After looking up the spec on ROP bars and talking to a structural engineer that I work with, I decided to take the plunge, head first
in to the installing of the lights. I don't really know anything about wiring on a tractor :-(
One of my big concurs is the final look and function of the light. I realize that there will be a lot of people out there that would not
have drilled holes in the ROP bar I decided too. For one to keep it nice and clean, I wanted the wiring run inside of the ROP, and also
I do not want any big bulky mounting bracket attached with a U-bolt.
I ordered the LED light bar for the middle, and two LED 4"x4" lights for each side should be plenty. All of this was ordered from
Amazon.com It's all water proof, and shock rated. I started the install and wiring and then realized that I needed to install a relay,
for the light!! A little rework but it will get there.
Attachments
Last edited:


