Teikas Dad
Gold Member
I finally finished my fueling station. The end product is based on what I've learned here on TBN from all of your experience and suggestions.
Early on I decided to go with a 30 gallon tank. I figured that it's small enough to move easily but large enough that I won't be refilling it ever other week.
#1 thing I learned on TBN was to go with a plastic drum, not a steel drum (as I was originally going to do) to cut down/avoid condensation issues. I found a free 30 gallon closed top drum at a local car wash that was in really good shape. I took it home, rinsed it out the best I could then filled it completely with water and let it sit a couple days. I figured doing that would break loose anything dried inside the drum. After I drained it all out I pressure washed the interior interior of the drum to make sure it was completely cleaned out.
I looked around for pump ideas and my choices came down to the $100 pump from Harbor Freight or a $300+ pump from Northern Tool or Tractor Supply. Northern Tool did have one for around $160 but it was a made in China deal. I kept checking Ebay and I got my hands on a brand new GPI 150S-EM 12v pump for $182. While more expensive than the HF model, it's made in America and if something goes wrong with it I can buy repair parts rather than just throwing it away.
A trip to TSC for a water absorbing fuel filter and decals, a stop at Home Depot for some 3/4" galvanized pipe parts and PVC fittings and this is the end result finished today.
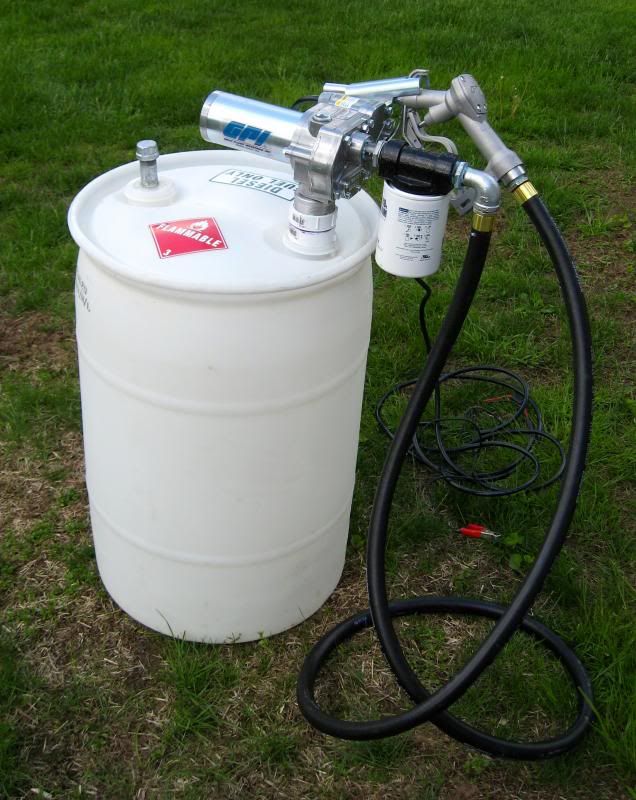
The pump mounts directly to the barrel in the fine thread (NPT) bung. I tried to thread the entire pump into the bung and it didn't want to go because of the weight of the pump made it difficult to get the threads started. Rather than booger up the threads I got a 2" male and 2" female PVC pipe fittings. I threaded the male fitting into the bung then threaded the female fitting on to the mount on the pump. After measuring, cutting and installing the pickup tube I dry fit it to make sure the pickup tube was a couple inches above bottom of the drum to avoid sucking up any crap that might end up on the bottom. It fit good so I glued the two PVC fittings together. It was a lot easier mounting the pump that way saving the threads in the drum. If I want to remove the pump I still can. Reinstallation shouldn't be a problem as the PVC pipe fitting threads are a lot beefier than the bung threads. I installed a spin off filter unit that has a water absorbing filter.
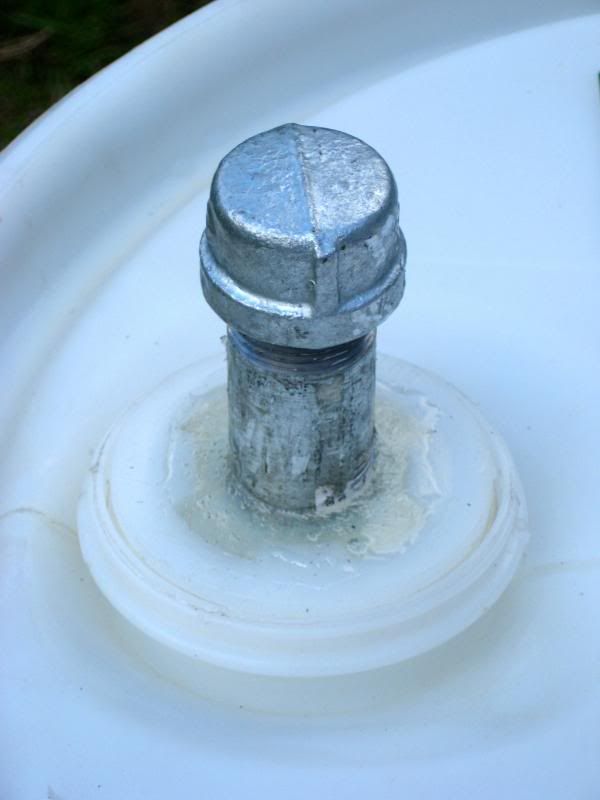
I wanted a method of venting the tank easily while still being able to add fuel without too much trouble. To handle that I got a 3/4" by 3" galvanized nipple and cap. I knocked out the center portion of the bung cap with the buttress threads (the course threads) and screwed the nipple in. I figured installing and removing the cap with the buttress threads would be easier and stand up better than the fine thread cap for taking the cap off and reinstalling multiple times. Before I put the nipple in I threaded the cap on as far as I could turn it by hand and marked it. Then I drilled 6 holes into the threaded part of the nipple just above the point where the cap screws all the way down to. That way to vent the tank I just unscrew the galvanized cap a couple turns to expose the holes and allow air in. After the nipple was threaded in place I mixed up some clear epoxy and filled the top of the bung cap locking the nipple in place. That way I can use the nipple as a handle that makes it easy to open and close the bung cap for adding more fuel. Here's a close up:
Made the electrical connections complete with alligator clips, put shrink tubing on all the connections, put on my decals and it was done.


I've got an extra hand truck that I'm going to strap the barrel to in order to make it easier to move around.
Early on I decided to go with a 30 gallon tank. I figured that it's small enough to move easily but large enough that I won't be refilling it ever other week.
#1 thing I learned on TBN was to go with a plastic drum, not a steel drum (as I was originally going to do) to cut down/avoid condensation issues. I found a free 30 gallon closed top drum at a local car wash that was in really good shape. I took it home, rinsed it out the best I could then filled it completely with water and let it sit a couple days. I figured doing that would break loose anything dried inside the drum. After I drained it all out I pressure washed the interior interior of the drum to make sure it was completely cleaned out.
I looked around for pump ideas and my choices came down to the $100 pump from Harbor Freight or a $300+ pump from Northern Tool or Tractor Supply. Northern Tool did have one for around $160 but it was a made in China deal. I kept checking Ebay and I got my hands on a brand new GPI 150S-EM 12v pump for $182. While more expensive than the HF model, it's made in America and if something goes wrong with it I can buy repair parts rather than just throwing it away.
A trip to TSC for a water absorbing fuel filter and decals, a stop at Home Depot for some 3/4" galvanized pipe parts and PVC fittings and this is the end result finished today.
The pump mounts directly to the barrel in the fine thread (NPT) bung. I tried to thread the entire pump into the bung and it didn't want to go because of the weight of the pump made it difficult to get the threads started. Rather than booger up the threads I got a 2" male and 2" female PVC pipe fittings. I threaded the male fitting into the bung then threaded the female fitting on to the mount on the pump. After measuring, cutting and installing the pickup tube I dry fit it to make sure the pickup tube was a couple inches above bottom of the drum to avoid sucking up any crap that might end up on the bottom. It fit good so I glued the two PVC fittings together. It was a lot easier mounting the pump that way saving the threads in the drum. If I want to remove the pump I still can. Reinstallation shouldn't be a problem as the PVC pipe fitting threads are a lot beefier than the bung threads. I installed a spin off filter unit that has a water absorbing filter.
I wanted a method of venting the tank easily while still being able to add fuel without too much trouble. To handle that I got a 3/4" by 3" galvanized nipple and cap. I knocked out the center portion of the bung cap with the buttress threads (the course threads) and screwed the nipple in. I figured installing and removing the cap with the buttress threads would be easier and stand up better than the fine thread cap for taking the cap off and reinstalling multiple times. Before I put the nipple in I threaded the cap on as far as I could turn it by hand and marked it. Then I drilled 6 holes into the threaded part of the nipple just above the point where the cap screws all the way down to. That way to vent the tank I just unscrew the galvanized cap a couple turns to expose the holes and allow air in. After the nipple was threaded in place I mixed up some clear epoxy and filled the top of the bung cap locking the nipple in place. That way I can use the nipple as a handle that makes it easy to open and close the bung cap for adding more fuel. Here's a close up:
Made the electrical connections complete with alligator clips, put shrink tubing on all the connections, put on my decals and it was done.
I've got an extra hand truck that I'm going to strap the barrel to in order to make it easier to move around.
Last edited: