3616 - How to remove/check glo plugs

   / 3616 - How to remove/check glo plugs #1  

JimnAZ

Bronze Member
Joined
Aug 22, 2014
Messages
54
Location
Seligman, AZ
Tractor
None
Hello,
I know where they are but I've never worked with GP's before and am concerned I'll mess up something. My tractor has trouble starting when cold. Starts right up when warm. Before I start worrying about adding diodes or replacing something I'd like to check the plugs for voltage/resistance. Every video I pulled up had the plugs out already or it looked like a different setup. I know, it's probably easy but when you are over 2hrs away from a parts store I'd rather be safe than sorry.
Anyone have videos or photos? Maybe good at explaining the steps? :)
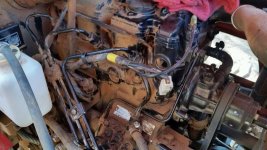
IMG_1538.JPG

The oil and fuel filter has just been changed, battery charged, I even tried to tip about turning key for plug then turning on again to heat twice. Still trouble starting.

Thx
 
   / 3616 - How to remove/check glo plugs
  • Thread Starter
#3  
   / 3616 - How to remove/check glo plugs #4  
Check the voltage first on the feeder wire. I see you removed the air inlet hose, I left mine on. I did have to have fuel tank less than half and then remove the fuel tank fill line to get to the plug closest to the firewall. Loosen the nuts on top of the glow plugs and slide the bar out and then you can check resistance on each plug. I cleaned the engine pretty good, sprayed lubricant on the plugs and then ran it a couple times and then removed the glow plug while the engine was warm. They came out pretty easily, but you will need deep well sockets. I ordered new plugs from bestfarmparts, but don't have them yet. After looking a several diesel forums, I plan on putting my plugs back in with anti-seize in case I have to take them out again. Several posts recommended either a copper, nickel, or ceramic based anti-seize, but not moly based. You may want to do a little more research, several dissenting opinions on the thread lubricant.
 
   / 3616 - How to remove/check glo plugs
  • Thread Starter
#5  
Check the voltage first on the feeder wire. I see you removed the air inlet hose, I left mine on. I did have to have fuel tank less than half and then remove the fuel tank fill line to get to the plug closest to the firewall. Loosen the nuts on top of the glow plugs and slide the bar out and then you can check resistance on each plug. I cleaned the engine pretty good, sprayed lubricant on the plugs and then ran it a couple times and then removed the glow plug while the engine was warm. They came out pretty easily, but you will need deep well sockets. I ordered new plugs from bestfarmparts, but don't have them yet. After looking a several diesel forums, I plan on putting my plugs back in with anti-seize in case I have to take them out again. Several posts recommended either a copper, nickel, or ceramic based anti-seize, but not moly based. You may want to do a little more research, several dissenting opinions on the thread lubricant.
Thank you for this detailed direction(s). I'm sorry but need to ask some dumb questions. Where is the feeder wire? I removed the hose just so I could see better and take the pic. I saw already the one in the back will be a bear. Thanks for the tip of removing the fuel fill line.
Loosening the top nut where the fuel comes in or the next one down? "The bar" is this the piece of metal that connects all 3 plugs? When checking resistance, where exactly do I place the probes?
Sorry, for the stupid questions

Thanks
 
   / 3616 - How to remove/check glo plugs #6  
I had to move that elbow piece of the fuel fill. I removed the two bolts on the side and loosened the large hose clamp and simply moved it away enough to get to the glow plug-I left the smaller hose at the top of the fill neck attached. The feeder wire is the wire that is connected to the bus bar that delivers voltage to the plugs. It is attached at the top of the forward plug. It has a white disconnect plug that you can unhook to check that you are getting voltage when you turn the key switch to the glow plug position. To test the plugs, put your leads on the top of the plug and the flats of the plug nut. Mine all read greater than 300 ohms. I don't have a service manual, so i don't have a specific value, but my understanding is if it over a couple of ohms then to replace them.
 
   / 3616 - How to remove/check glo plugs
  • Thread Starter
#7  
I had to move that elbow piece of the fuel fill. I removed the two bolts on the side and loosened the large hose clamp and simply moved it away enough to get to the glow plug-I left the smaller hose at the top of the fill neck attached. The feeder wire is the wire that is connected to the bus bar that delivers voltage to the plugs. It is attached at the top of the forward plug. It has a white disconnect plug that you can unhook to check that you are getting voltage when you turn the key switch to the glow plug position. To test the plugs, put your leads on the top of the plug and the flats of the plug nut. Mine all read greater than 300 ohms. I don't have a service manual, so i don't have a specific value, but my understanding is if it over a couple of ohms then to replace them.
Thank you very much!
 
   / 3616 - How to remove/check glo plugs
  • Thread Starter
#8  
Well I checked the feeder wire and am getting 12+ volts. I didn't want to take out the plugs so I couldn't check resistance.
When I turn the key to get the plugs going there is a clicking sound. The sound is still there after the glo light tuns off. Is this normal?
 
   / 3616 - How to remove/check glo plugs #9  
You definitely want to clean the immediate area around the plugs before you take them out - you don't want anything whatsoever getting down the holes into the cylinders. Looks like quite a bit of dirt build-up on your engine. A little spray of carb cleaner or brakleen with an old toothbrush and then some compressed air will help. Also want a clean spot to touch your meter leads to so you get a good connection for testing. The majority of glowplugs run in the 1 - 2 ohm range if good. Most systems use a timer to energize the glowplug relay to provide power - both can/will make clicking noises. You don't have to remove the plugs to check resistance, but you do need to remove the bar that connects them so you can check them individually.
 
   / 3616 - How to remove/check glo plugs #10  
If you are lucky, the one that's hard to remove will be good. If not, you might try doing what I did on my truck - Test all of them, replace the EASY ones then see how your tractor starts. I think my truck had five of eight that needed to be replaced. One was way back at the firewall and a bleep to get to. I just replaced the easy ones and the truck started just fine. Of course, when you have fewer cylinders, that might not work as well. In any case, it was a relief to see that some were bad (open) and replacing most of them did the trick.
 

Tractor & Equipment Auctions

(2) METAL SPOOLS W/ SOME DURALINE 4" PVC PIPE (A51244)
(2) METAL SPOOLS...
LANCER MODEL HL125 - 4' TILLER (A51243)
LANCER MODEL HL125...
2020 INTERNATIONAL MV607 26FT NON CDL BOX TRUCK (A52141)
2020 INTERNATIONAL...
5' X 20' 3/8" THICK STEEL PLATE (2) PIECES (A51244)
5' X 20' 3/8"...
DeeZee Crossover Aluminum Truck Tool Box - Secure Weather-Resistant Storage for Pickup Beds (A52128)
DeeZee Crossover...
MISC, 3 MAN HUNTING BLIND, FISHING POLES (A51244)
MISC, 3 MAN...
 
Top