Todd727
Gold Member
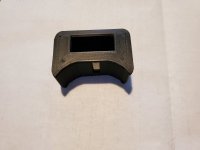
I ran into a situation on my excavator where I needed to add an additional switch to control the door on my forestry mulcher. I tried to find a ready made solution and decided that I was going to have to make it myself. I'd recently seen some of the 3D work that was being produced by my company and realized that I needed a 3D printer.
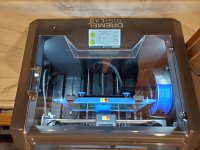
Of course that opened a mess. I'd known about the process for several years but I just didn't want to get into it at the point where you essentially had to assemble a printer from parts. Anyway, after too many late nights, I ended up getting the Dremel 3D45.
This is not an inexpensive printer, but since I planned on putting it in the shop, I wanted a fully enclosed printer. Getting this thing set up was extremely easy. Very happy with the choice. Was able to print within 30 minutes of opening the box. From everything I've read, this is an outstanding printer, pro level, but easy to use. Only negative is it uses smaller spools of plastic. There are solutions for that though.
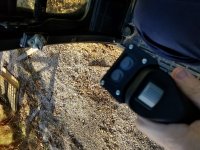
The next problem was figuring out how to design the parts. I ended up going trying Tinkercad from Autocad. It is an online program and I was initially having problems because of the way you have to use shapes instead of lines to design your part. Naturally, the switch housing was complicated. Probably should've started with something easier, but I learned a lot very fast. The nice thing about 3d printing was I could quickly print a part, test fit, modify the design and print again.
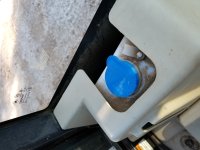
I finally did get it the way I wanted and mounted. Right after I finished that, I realized I could print a cap for the windshield washer reservoir. It is an odd size, auto stores don't have anything close and Yanmar doesn't sell the cap, just the complete reservoir for $350.
I see questions about brackets and holders and think that a lot of us could really get a lot of use out of these things. I've found several projects around the house now, end caps for a steel table I built and welded to hold the printer, chair sliders, and organizers for a lot of parts. I'm having fun with this stuff.
Sorry for the typical phone photo orientation. If you click on them, they should be right side up.
Of course that opened a mess. I'd known about the process for several years but I just didn't want to get into it at the point where you essentially had to assemble a printer from parts. Anyway, after too many late nights, I ended up getting the Dremel 3D45.
This is not an inexpensive printer, but since I planned on putting it in the shop, I wanted a fully enclosed printer. Getting this thing set up was extremely easy. Very happy with the choice. Was able to print within 30 minutes of opening the box. From everything I've read, this is an outstanding printer, pro level, but easy to use. Only negative is it uses smaller spools of plastic. There are solutions for that though.
The next problem was figuring out how to design the parts. I ended up going trying Tinkercad from Autocad. It is an online program and I was initially having problems because of the way you have to use shapes instead of lines to design your part. Naturally, the switch housing was complicated. Probably should've started with something easier, but I learned a lot very fast. The nice thing about 3d printing was I could quickly print a part, test fit, modify the design and print again.
I finally did get it the way I wanted and mounted. Right after I finished that, I realized I could print a cap for the windshield washer reservoir. It is an odd size, auto stores don't have anything close and Yanmar doesn't sell the cap, just the complete reservoir for $350.
I see questions about brackets and holders and think that a lot of us could really get a lot of use out of these things. I've found several projects around the house now, end caps for a steel table I built and welded to hold the printer, chair sliders, and organizers for a lot of parts. I'm having fun with this stuff.
Sorry for the typical phone photo orientation. If you click on them, they should be right side up.