Brush Forks - Second Attempt

   / Brush Forks - Second Attempt
  • Thread Starter
#11  
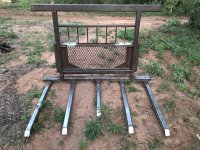
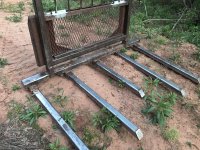
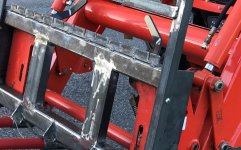
..................I also really like how tall you made your headache rack so the limbs/brush don't end up on top of the tractors hood.

Gene, I'll see if I can get a few pictures of my brush forks tomorrow for you.

KC

Thank you, and I love to see things that others make. There are often things that are very useful.

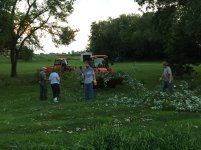
Experience with the set first set on the L3200 was not wasted. The bucket was the only thing preventing stuff from rolling off the back and onto the hood. We had a storm a few years ago that broke off a bunch of tree branches. Friends and family turned out when they saw how much was on the ground. Brother in law brought his L4740 over and it didn't take all that long to get the place in shape. There's a brush pile at the end of a fence row where we dump limbs and trimmings. One of the helpers with less experience took a load and wasn't familiar with the need to dump a little while raising the loader and a limb dented the hood.

Not long after buying the L3200 I had a mishap pulling a sapling that came back and thwocked the hood, so it wasn't a pristine hood. The difference was that the original damage couldn't be seen from the seat:)
 

Attachments

  • IMG_1509 Small.JPG
    IMG_1509 Small.JPG
    435.4 KB · Views: 175
  • IMG_1515 Small.JPG
    IMG_1515 Small.JPG
    537.1 KB · Views: 187
   / Brush Forks - Second Attempt #12  
Not to hijack, but as to hood damage...

Was at work one day a few years ago... had told wife's cousin he could cut firewood from downed trees in my lower field, and use tractor to tram bucket loads of wood back to his trailer at the road. Did what your help did, bucket up, firewood rolled over top of bucket, hood damage as a result. But my hood was perfect before that! Still dented, but I've managed to make the fenders match it now... and it doesn't hurt my conscience to bum beer off him every chance I get!

Back to brush forks... *grin*
 
   / Brush Forks - Second Attempt #13  
Since you said bucket, I guess you mean the forks in the link in my first post. The angle iron grabs the bucket edge and the chains and binder lock it on. After the pictures in the link I did add a couple tabs and two chains on the front side. That made it easier to install. It is just a matter of parking the bucket over the forks, dropping the two chains in the slots, and curling the bucket. The added chains don't perform any duty except helping with the installation. The design was to get something simple to work with the pin on bucket.

The new forks got a good workout yesterday while doing some tree removal. The headache rack was handy.

Chim, I was asking to see MF RED in MT's setup simply coz I think I could fab up something like that with my little 120v welder. BUT...your forks are awesome, man! If I had the skills and a better welder, I'd go your route. Maybe I'll get there down the road.
 
   / Brush Forks - Second Attempt #14  
Chim, that's pretty cool. Also, MF Red, can you post a pic of the forks as they attach to the bucket? I wanna fab me up some debris forks.

I hope you get the idea how I built my brush forks from these pictures, I'm embarrassed to show mine next to what chim built...

I think I used 1" x 3" x 1/8" rectangular tubing, 1.5" x 1.5" x 1/8" angle iron, and 3" x 1/8" flat bar for the brush forks and the tooth bar, and the angle iron connections are about 1/8" smaller then the length of the FEL bucket..

I also built a jib that works with both the tooth bar and the brush forks, and used it to set the wife's greenhouse walls that I framed on the garage floor years ago.

The plywood platform on top of the brush forks hinge up and can be bungee to the vertical headache rack.

I used two 1/4" - 20 welded eye bolts to secure the plywood to the top of the brush forks, and used the same fasteners to secure the headache rack to the upper edge of the FEL bucket in order to slide into the bucket easy.

The plywood hinged platform has sure worked out good for me to use as a work platform, etc... and I just flip it up and out of the way to pick up a pile of tree branches.

All of the fasteners are installed in holes that are tapped.

KC

20200424_153035.jpg 20200424_153048.jpg 20200424_153252.jpg IMAG0008.jpg
 
   / Brush Forks - Second Attempt #15  
I would add some metal to protect your QA levers. If I built another, I would use a solid back plate. This one I built uses removable 2" x 1/4" square tube for the forks, due t me inevitably bending them.
 

Attachments

  • IMG_3351.jpg
    IMG_3351.jpg
    2.8 MB · Views: 167
  • IMG_3352.jpg
    IMG_3352.jpg
    3 MB · Views: 147
   / Brush Forks - Second Attempt
  • Thread Starter
#16  
I would add some metal to protect your QA levers. If I built another, I would use a solid back plate. This one I built uses removable 2" x 1/4" square tube for the forks, due t me inevitably bending them.

The picture was snapped just before removing the forks and putting the bucket back on. It was posted before I noticed the levers were in the up position. When the levers are in the down / locked position they hide behind the top member of the QA frame. The slotted angle adds a bit more protection. Here's a cropped closeup of the levers while up.
 

Attachments

  • IMG_7206 Closeup.JPG
    IMG_7206 Closeup.JPG
    284 KB · Views: 158
   / Brush Forks - Second Attempt #17  
The picture was snapped just before removing the forks and putting the bucket back on. It was posted before I noticed the levers were in the up position. When the levers are in the down / locked position they hide behind the top member of the QA frame. The slotted angle adds a bit more protection. Here's a cropped closeup of the levers while up.

It looks great BTW, I love how you built your own QA plate. I have been very rough on mine to the point of twisting the 2 x 3 x 1/4 bottom tubing near one end.
 
   / Brush Forks - Second Attempt
  • Thread Starter
#18  
It looks great BTW, I love how you built your own QA plate. I have been very rough on mine to the point of twisting the 2 x 3 x 1/4 bottom tubing near one end.

Thanks but I can't take credit for the SSQA frame. Only reinforced it and used it for the starting point of the build. Bought it from a guy near York who has a lot of equipment he uses in his business. He bought a package deal and had one left over when he was done fabbing attachments for his skid steers. The frame was just a rectangular picture frame with the tabs on the tractor side for connecting to it. Not sure what the wall thickness is on the square tube but the frame itself was very heavy. I added the two pieces of 4" channel between the top and bottom members to make sure it was stiff. The frame seemed a lot more robust than the 3/8" solid plate I bought to make my snow plow mount.
 
   / Brush Forks - Second Attempt #19  
I don't wanna hijack Chim's thread. MF Red, I'm gonna send you a pm about your forks.
 
   / Brush Forks - Second Attempt
  • Thread Starter
#20  
I don't wanna hijack Chim's thread. MF Red, I'm gonna send you a pm about your forks.

No worries on my part. It's nice to have more ideas floating around for anyone who happens by while researching for their build.
 

Tractor & Equipment Auctions

2015 Nissan Pathfinder AWD SUV (A48082)
2015 Nissan...
2011 Liebherr L586 (A51039)
2011 Liebherr L586...
2017 Bad Boy Outlaw XP 61in Zero Turn Mower (A48082)
2017 Bad Boy...
2011 Kia Optima Sedan (A50860)
2011 Kia Optima...
2012 Ford E-350 Super Duty Passenger Van (A48081)
2012 Ford E-350...
2020 John Deere 9470R Tractor (A50860)
2020 John Deere...
 
Top