2016 2555CL FEL bracket bolts snapped... What a nightmare...

   / 2016 2555CL FEL bracket bolts snapped... What a nightmare... #1  

erkme73

Silver Member
Joined
Nov 12, 2017
Messages
127
Location
Middle TN
Tractor
Mahindra 2555 HST Cab
Right up front, let me say this is operator error. I did not know checking the loader bracket bolts was something to do - but will from now on. After having been told by several internet folk I should have RTFM, I did just that, but found no specific reference to the loader bracket bolts, or what their torque values should be.

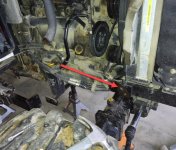
In any case, I had the two front-most bolts (M14 x 2.0, 10.9 grade) bolts shear off on the right side, and one shear off on the left (with the remaining bolt loose and damaged). I had noticed some "slop" in the FEL the last couple of uses, but didn't notice the missing/loose bolts. The last time I used it, I heard a snap and a "ting" as some thing metal shot out across the gravel. I stopped everything and searched until I found the problem.

2020-08-21_14-12-49.jpg

2020-08-21_14-12-33.jpg

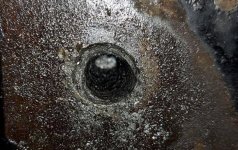
On the first one, I attempted to remove it using a bolt extractor. I worked my way up to the largest (#6) but still was unable to get the bolt to budge. With the hole for the extractor being slightly off center, and getting close to the hole wall, I opted to drill the hole out to the M14 diameter and tap it out for the M14x2.0 bolt. Surprisingly that worked well. Lots of swearing and sweating bullets (I did not want to snap off the tap inside my new hole), but it worked. I ran the tap through the other hole on the same side to clean it up since the original bolt was galled up a bit from being loose.

Today I moved to the other side. After several others (including dealer tech) suggested welding a nut on what was left of the bolt, I did just that. The first (lower) bolt took two tries, but I was able to gently coax the bolt out of the hole:

25898c614d8f68ee523a55b9c20c8bc837d14229-1.jpg

I then attempted the same approach on the top bolt. After 6 attempts, it was clear the weld was not strong enough to overcome the rust/corrosion on the threads. So I opted to drill the bolt out to re-tap as I had done on the other side. This was a mistake. Focused more on applying the correct pressure, I did not notice that the drill bit was walking away from the initial hole. By the time I realized it, I had a hole that was well off target, and oblong. Very frustrated with myself, and I'm now going to sleep on it (while licking my wounds). I have a several professional welder friends that have recommended filling the hole with 6010 electrode and redrilling/tapping. I will probably give that a go - maybe even have them come do it for me.

For now, I've reassembled with 3 fully torqued bolts (albeit they're only grade 8.8 as no one had 10.9 in the correct size over the weekend) as place-holders. Tomorrow, I'll hit a Fastenal to get the correct bolts... And see what they recommend for the fix.

As embarrassing as it is, here's is my wonderful hack-job... go easy on me.

b1808b486d9feed6bcb48e106d7de5ec7206cfc7-1.jpg

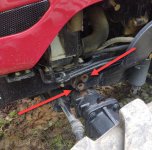
Incidentally, I have looked everywhere to find the torque specs for the loader bracket. There are 4 long main bolts on the right bracket, and 5 on the left. They were all extremely tight, and required the impact wrench to get them all the way out. The threads are all quite rusted/corroded at the point where they were in the frame. Dissimilar metal oxidation perhaps?

In any case, I've maxed them out on torque with my 1/2" drive pneumatic wrench (which is what the dealer tech recommended and said that's all they do), and I've painted lines on all bolts.
 

Attachments

  • 2020-08-21_19-03-19.jpg
    2020-08-21_19-03-19.jpg
    165.7 KB · Views: 152
  • 2020-08-21_19-02-54.jpg
    2020-08-21_19-02-54.jpg
    277.3 KB · Views: 146
  • 2020-08-21_14-12-09.jpg
    2020-08-21_14-12-09.jpg
    105.6 KB · Views: 154
   / 2016 2555CL FEL bracket bolts snapped... What a nightmare... #2  
Feel sorry for you. But FWIW, you've come up with much better attempts than I would have to this point. I'd still be licking my wounds for 3 days before attempting ½ of what you have. Sounds like you're on the right track.

Now, I'll have to check my FEL for the potential problem you have. I thought I just had pins holding the FEL to the frame, but will certainly take a closer look tomorrow.

Any idea how you're going to close the oblong hole, and get it "plumb" with the original? Can you order a new mounting bracket to install once you get everything removed?

Let us know how it progresses.
 
   / 2016 2555CL FEL bracket bolts snapped... What a nightmare... #3  
That's what you're looking for.Screenshot_20200824-202231_Chrome.jpeg
 
   / 2016 2555CL FEL bracket bolts snapped... What a nightmare... #4  
The problem is the installers interpretation of a clean dry bolt and a clean dry hole. Often there is a degree of rust present because this type of equipment sets out for weeks or months. For many cases this is why proper torque is never achieved and the problems later. A non-calibrated air impact often doesn't achieve it. At this age of tractor it should not have happened. Often a HS kid is the one putting the loaders on.

Here is a installation clip for a MF model. It's a mistake not giving torque values for specific anti corrosion compounds.

SmartSelect_20200824-205947_OneDrive.jpg
 
   / 2016 2555CL FEL bracket bolts snapped... What a nightmare... #5  
On the screwed up hole, can you knock out what is left of the broken bolt? If you drill through is there room for a nut on the back side? The hole is unusable as it is now so you have to come up with a repair. Is the threads in cast iron or steel?

edit...being that the drill wandered that much off of the broken bolt, I'm assuming that the frame is soft cast iron. There are many ways that can be repaired in a machine shop, most of them demand the frame to be removed for machining.
 
Last edited:
   / 2016 2555CL FEL bracket bolts snapped... What a nightmare...
  • Thread Starter
#6  
Feel sorry for you. But FWIW, you've come up with much better attempts than I would have to this point. I'd still be licking my wounds for 3 days before attempting ス of what you have. Sounds like you're on the right track.

Now, I'll have to check my FEL for the potential problem you have. I thought I just had pins holding the FEL to the frame, but will certainly take a closer look tomorrow.

Any idea how you're going to close the oblong hole, and get it "plumb" with the original? Can you order a new mounting bracket to install once you get everything removed?

Let us know how it progresses.

Well, the problem is with the frame. The hole I borked is on the frame of the tractor. The threads are in the hole, and the bolt clamps the bracket down. There are two holes on each side. One is a through-hole - where you can access the back of the bolt from the other side of the frame. The top hole, which, of course is the one I butched, goes into a perpendicular cross member of the frame - so it is not exposed. There is simply no way to put a nut on the other end of the frame.

Since the new hole does not align to the holes in the brackets, I have no choice but to fill in, drill, and tap new threads that are more inline with the the hole on the bracket. How I'm going to fill it in? That's the dilemma.

That's what you're looking for.View attachment 667367

Yes, thanks. Is that Mahindra specific, or just a general guide for various size/grade metric bolts? It's frustrating that the only mention in the manual for torque values are for the wheel lugs. For everything else it's this:

2020-08-24_21-48-05.jpg

The problem is the installers interpretation of a clean dry bolt and a clean dry hole. Often there is a degree of rust present because this type of equipment sets out for weeks or months. For many cases this is why proper torque is never achieved and the problems later. A non-calibrated air impact often doesn't achieve it. At this age of tractor it should not have happened. Often a HS kid is the one putting the loaders on.

Here is a installation clip for a MF model. It's a mistake not giving torque values for specific anti corrosion compounds.

View attachment 667369

Yes, and based on the condition of the bolts that actually screw into the frame (vs clamping with a nut), it's pretty clear there is some kind of dissimilar metal oxidation occurring. Only the threads that are inside the frame have rusted/oxidized.

2020-08-24_21-42-16.jpg

On the screwed up hole, can you knock out what is left of the broken bolt? If you drill through is there room for a nut on the back side? The hole is unusable as it is now so you have to come up with a repair. Is the threads in cast iron or steel?

edit...being that the drill wandered that much off of the broken bolt, I'm assuming that the frame is soft cast iron. There are many ways that can be repaired in a machine shop, most of them demand the frame to be removed for machining.

I assume it's cast, but I don't know how to tell. The drilled portions seem smooth and shiny, but the painted parts appear to be lump and cast-like. I know very little about welding, but after reading how difficult it is to get a good strong weld on casted parts, it does worry me a bit.

That said, I have two friends that are professional welders. One is 700 miles away, the other just had shoulder surgery that will take many more weeks to heal - so it is unlikely that they will be able to help me in person for the foreseeable future. But both have said they would be able to get it resolved if/when they are here.

I'm really not that stressed today (vs when it happened). I now have two 10.9 grade bolts on one side, and one on the other. That's better than I've had for quite a while (embarrassingly). I used the FEL to move a brush pile today, and my witness marks didn't budge.

That said, it'll be light duty work with the FEL (if at all) until I can get either of my friends to get me a better feel for what to do next.

Ultimately, the purpose for the post was to let others know to specifically check these bolts. They're easily visible without removing any covers - and if you don't already have witness marks, torque them, and add them. I even put a huge spooge of white marking paint at the step going into the cab from both sides. Sticks out like a sore thumb. I see it every time I get in or out. It's a constant reminder to quickly visually check the bolt witness marks.
 
   / 2016 2555CL FEL bracket bolts snapped... What a nightmare... #7  
Well, I would get the rest of the broken bolt out before going further. Try knocking it towards the hole you drilled to loosen it. Get the wallowed side welded up and mount your bracket. Line up the bracket the best you can to the correct location, use a drill bushing or drill guide block to help hold the drill on location. A 12mm end mill going through a drill bushing to guide it using a mag drill for better control. Or, a patient person with a dremel tool could get it close. Good luck!
 
   / 2016 2555CL FEL bracket bolts snapped... What a nightmare... #8  
Thanks for posting. I'm checking mine soon.
 
   / 2016 2555CL FEL bracket bolts snapped... What a nightmare... #9  
I was going to suggest going to a bigger bolt but the hole may be too big for that. Possibility of a big Helicoil or Tim-Sert maybe?
As for beating the crap out of it with an impact gun, a very poor way to torque a bolt. If the guns big enough all you'll do is stretch the bolt past the yield point and from there no matter how much you tighten it, it won't stay.
Lock washers.....I despise the d^^m things, they'll break, if they don't they'll distort enough to stretch past the head of the bolt or nut. Only time they do any good is when the fastener has already come loose and by then it's too late anyway. Get some GR8 or 10.9 flats and use Loctite on the thread. Not only will the Loctite stop the bolt loosening, it'll prevent corrosion by keeping oxygen away from the threads.
As for welding up the hole...ehhh I'd be a bit leary of two things, getting the hole filled without voids and what is it going to do to the frame as far as adding stress where you don't want it............Mike
 

Tractor & Equipment Auctions

2017 Kubota KX033-4 (A46443)
2017 Kubota...
New Holland 40 Blower (A47809)
New Holland 40...
2014 GOOSENECK DRIVER SIMULATOR TRAILER (A45046)
2014 GOOSENECK...
72in Large Capacity Bucket (A47809)
72in Large...
2003 SHALE PRODUCTIONS SAND SEPARATOR (A47001)
2003 SHALE...
John Deere MX7 Rotary Mower (A47809)
John Deere MX7...
 
Top