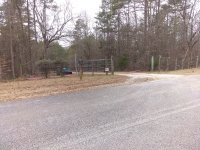
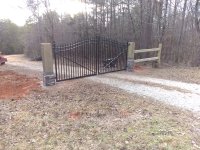
The fence and gate at the top of our driveway were looking well worn. The setup also had a safety disadvantage: If you pulled into our drive with the gate closed, your vehicle's arse end was still on the roadway. We decided we wanted to demolish the existing fence and rebuild the new setup about 15' further onto the property, for both the aethstetics and improved safety.
The old setup:

A friend just retired from the fence business; he had a set of damaged (a few bent top spikes and vertical rails), aluminum estate-style gates in his warehouse and offered them to me. I was able to straighten the damaged aluminum with considerable pressure using a 5,000lb 4" rachet strap. Not to "as new" quality, but enough that only a close inspection of the gate shows minor creases and deformations in the aluminum where it was bent.
When I demoed the existing fence and gate, I pulled the 6x6 PT gate posts with my FEL. They came up fairly easily, as they were not in concrete. Just a bump to loosen them, and upward with a lifting strap. Other than weathering, they were in remarkable condition for 25+ year old posts. Completely solid, top to bottom. There was a .40 CCA-A tag on one of the posts. A classic case of "they don't make 'em like they used to." I pressure washed them and am reusing as end posts.
An in-progress pic of the new gate and fence below. Main posts are boxed 2x12s PT, painted with spray-on undercoating from ground level down, faced with wire mesh for the masonry from ground up. Couple of pieces of rebar through the bottoms to hold it in the concrete better, and also tie the concrete together if I decide to fill the void inside the box with concrete (undecided on that). The faux stones are left over from the water table of our 2018 house build. They'll go to the top of the posts. The stonework for the main columns will be matched with a stoned concrete pedestal base for the end posts (you can see the pedestal form around the end post in the far right of the picture).

Digging note of interest: I pondered how to dig the post holes for both the boxed 2x12s and the 6x6s. I don't have a post hole digger for my tractors. My backhoe bucket would have removed more dirt than I wanted and would have required more concrete. Instead, I used my HF Predator auger with 6" bit. For the larger posts, I augered nine holes in a 2' square and shoveled out the dirt. Worked well. For the 6x6, I augered one hole and widened it to spade-width (about 12" on all sides) with my shovel. The auger made the labor shorter and much easier. Not as easy as a big auger or a narrow backhoe bucket, but perfectly acceptable for casual DIY work.
The old setup:

A friend just retired from the fence business; he had a set of damaged (a few bent top spikes and vertical rails), aluminum estate-style gates in his warehouse and offered them to me. I was able to straighten the damaged aluminum with considerable pressure using a 5,000lb 4" rachet strap. Not to "as new" quality, but enough that only a close inspection of the gate shows minor creases and deformations in the aluminum where it was bent.
When I demoed the existing fence and gate, I pulled the 6x6 PT gate posts with my FEL. They came up fairly easily, as they were not in concrete. Just a bump to loosen them, and upward with a lifting strap. Other than weathering, they were in remarkable condition for 25+ year old posts. Completely solid, top to bottom. There was a .40 CCA-A tag on one of the posts. A classic case of "they don't make 'em like they used to." I pressure washed them and am reusing as end posts.
An in-progress pic of the new gate and fence below. Main posts are boxed 2x12s PT, painted with spray-on undercoating from ground level down, faced with wire mesh for the masonry from ground up. Couple of pieces of rebar through the bottoms to hold it in the concrete better, and also tie the concrete together if I decide to fill the void inside the box with concrete (undecided on that). The faux stones are left over from the water table of our 2018 house build. They'll go to the top of the posts. The stonework for the main columns will be matched with a stoned concrete pedestal base for the end posts (you can see the pedestal form around the end post in the far right of the picture).

Digging note of interest: I pondered how to dig the post holes for both the boxed 2x12s and the 6x6s. I don't have a post hole digger for my tractors. My backhoe bucket would have removed more dirt than I wanted and would have required more concrete. Instead, I used my HF Predator auger with 6" bit. For the larger posts, I augered nine holes in a 2' square and shoveled out the dirt. Worked well. For the 6x6, I augered one hole and widened it to spade-width (about 12" on all sides) with my shovel. The auger made the labor shorter and much easier. Not as easy as a big auger or a narrow backhoe bucket, but perfectly acceptable for casual DIY work.